Changing the Date and Time
There are four options for setting the date and time on your Media Vault.
One option is to click Yes on the HP Media Vault Configuration dialog at the end of the installation to use your computer settings for the language, date, time, time zone, and network workgroup.
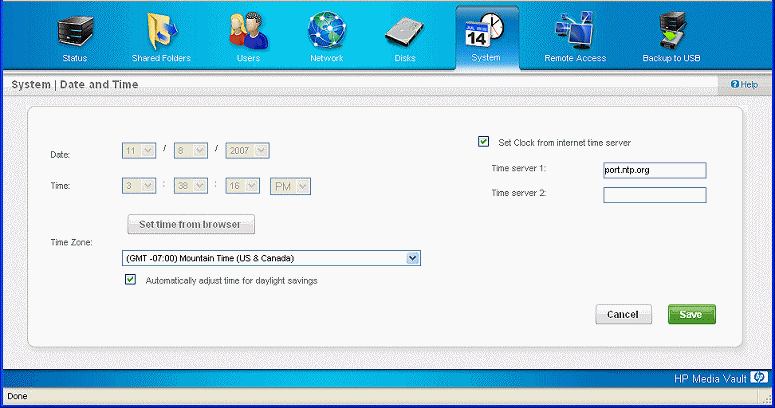
The factory default method for maintaining the date and time after the initial installation is to synchronize the Media Vault with an Internet Network Time Protocol (NTP) server. This feature is called Set Clock from Internet time server and it periodically checks the date and time using the Internet.
If you do not want to set your clock using the Internet time server, you can type the date and time or click Set time from browser. Both of these options are a one-time change. Neither of them check the date and time on an ongoing basis to make sure they are accurate.
See the instructions below for changing the date and time after the software installation.
<<<<<<< .mine

| To set the clock from Internet time server |
- At the computer, click Start, All Programs, HP Media Vault, and then Control Center.
- On the Tools tab, click Customize HP Media Vault.
- You are prompted for an administrator name and password if you set one up. For additional information, see Editing System Settings.
- On the System tab, click Edit.
- Click Edit next to Date and Time.
- Select the Set Clock from internet time server check box.
- Type the NTP server IP address or name in Time server 1.
- Type an optional NTP server IP address or name in Time server 2.
- Select your Time Zone.
- Check Automatically adjust daylight savings, if applicable.
- Click Save.
| To set the clock manually or from browser |
- At the computer, click Start, All Programs, HP Media Vault, and then Control Center.
- On the Tools tab, click Customize HP Media Vault.
- You are prompted for an administrator name and password if you set one up. For additional information, see Editing System Settings.
- On the System tab, click Edit.
- Click Edit next to Date and Time.
- Clear the Set Clock from internet time server check box.
- Enter the Date and Time or click Set time from browser.
- Select your Time Zone.
- Check Automatically adjust daylight savings, if applicable.
- Click Save.
| » Back to top | < Back | Next > |
