
Removing an Internal Hard Drive
Hard drives can be removed from the HP Media Vault. However, hot swapping is not supported. The Media Vault must be powered down prior to removing the drive.
| To remove a hard drive from total storage |
- At the computer, click Start, All Programs, HP Media Vault, and then Control Center.
- On the Tools tab, click Customize HP Media Vault.
- You are prompted for an administrator name and password if you set one up. For additional information, see Editing System Settings.
- On the Disks tab, locate the internal disk you want to remove.
- Click Safely Remove.
- When the server is ready, you receive a message telling you that it’s okay to remove the drive from the server.
- Click OK.
- Be sure that the light-bar for the hard drive is purple
 . This indicates
that the drive has been properly removed from the server’s total storage.
. This indicates
that the drive has been properly removed from the server’s total storage.
- Power down the server by pressing the power button on the back of the server and wait until it completely shuts off.
| Note | |
|
Removing non-mirrored hard disks can cause undesirable behaviors. In a non-mirrored system, files may span multiple disks and removing one disk makes the entire HP Media Vault non-operational (at least until the disk is reconnected). If you remove a non-mirrored disk and change your mind, replace the drive. Click Fix under the disks Actions to add the drive back to the total storage space. |
| To remove a hard drive from an expansion bay |
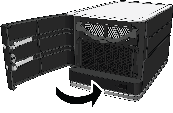
- Open the door on the front of the HP Media Vault.
- Press the lever to unlock the handle.
- Lift the handle of the hard-drive tray all the way up.
- Gently pull the hard-drive tray from the expansion bay.
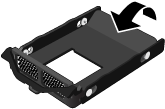
- Flex the back of the right side-rail, and then withdraw the back pin from the hard drive by gently pulling the side-rail down and away.
- Flex the front of the right side-rail, and then withdraw the front pin from the hard drive by gently pulling the side-rail down and away.
- Remove the drive from the hard-drive tray.
- Fold up the flap near the back of the hard-drive tray.
- With the handle up, slide the hard-drive tray back into the system bay.
- Close the handle on the hard-drive tray until it locks.
- Close the door on the front of the server.


| Note | |
|
Folding up the flap improves air flow and helps keep the server cool. |


| » Back to top | < Back | Next > |