|
Your HP Media Vault is bundled with NTI DriveBackup!. NTI DriveBackup! is an easy-to-use application lets you restore an entire disk drive or drive partition on your PC that you have previously backed up using NTI DriveBackup!.( For information about creating a backup, see Create a drive backup.)
If you wish to restore the system drive, you must use the PC Restore Disc. A system drive cannot be restored from the Windows operating system because it would have to write over itself.
About restoring a drive backup
Keep the following in mind when restoring from NTI DriveBackup!:
- When restoring a disk drive, any content that exists on the target hard drive or drive partition will be erased.
- Restored NTFS partitions cause the Windows chkdsk utility to run when the system is rebooted. This utility creates and displays a status report for a disk based on the file system. Windows 2000 SP4 or Windows XP will run the verification process and then restart. The restored drive should be fully operational after the computer restarts.
- You cannot select a partition that is smaller than the amount of data on the original partition. However, you may select a larger partition. In some cases, you may need to select a target partition that is the same size as the original partition.
- When you select a drive to restore, you must pay attention to the compatibility of the file systems between the source backup and the target drive. The following table lists all compatible combinations of source and target file systems and the resulting partition format.
-
Compatible Combinations
| Source Partition |
Target Partition |
Resulting Partition |
| NTFS |
NTFS |
NTFS |
| NTFS |
FAT16 |
NTFS |
| NTFS |
FAT32 |
NTFS |
| FAT16 |
FAT16 |
FAT16 |
| FAT32 |
FAT32 |
FAT32 |
| Any other combinations are not supported. |
To restore a drive backup, follow these steps:
- Start the software:
- Double-click the HP Media Vault desktop icon.
- Click the Backup tab.
- Click Restore your entire drive.
- In Step 1, from the drop-down list, select the location of the backup file you want to restore.
- Click Browse to find and select the specific backup file to restore. DriveBackup! files have a .npf file extension.
The selected file appears in the box below the list box and Browse button.
- In Step 2, from the drop-down list, select the hard drive you want to restore.
- Click Start.
- The time it takes to restore the drive or drive partition depends on the size of the backup file.
DriveBackup! Menus
The DriveBackup! menus provide additional functionality for backing up your drive or drive partition.
- Job Menu
This menu provides the following standard file capabilities: New, Open, Save, Save As, Exit.
- Options Menu
Sets password protection.
- Reports Menu
Allows you to view or delete reports of all backup and restore operations. Every time a backup is created or restored, DriveBackup! creates a report file that contains information to help you to trace and diagnose problems that might occur. DriveBackup! will report all errors that have occurred in backup or restore process in these files. By default, all report files are located in the Report Files directory found in the installation directory for your DriveBackup! software.
- View Backup Reports
Opens the Backup Report dialog box where you can view or remove reports by highlighting the report and selecting the appropriate button.
- View Restore Reports
Opens the Restore Report dialog box where you can view or remove reports by highlighting the report and selecting the appropriate button.
- Help Menu
Provides the built-in NTI help and support.
NTI Image Explorer
The NTI Image Explore allows you to restore individual folders and files from a DriveBackup! file. DriveBackup! files have an .npf extension. To restore an entire drive or partition, see Restore a drive backup.
To restore individual folders or files from an .npf file, follow these steps:
- Start NTI Image Explorer:
- Click Start, All Programs, NTI DriveBackup! 4, NTI Image Explorer.
- In the EasySteps 1: What to restore? screen, select the location of the backup file you want to restore from the drop-down list.
- Click Browse to find and select the particular backup file you want to restore.
- The selected file appears in the box below the list box and Browse button. The backup files contained in the DriveBackup! file appear in the selection panes in the bottom part of the screen.
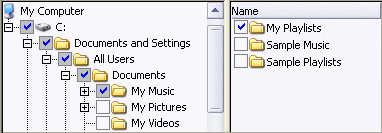
- In the left pane, navigate to the folder that contains the files that you want to restore. (The selection of folders and files is identical to that described in Run automatic backups for important files.)
- In the right pane, select the folder or files that you want to restore.

- Click EasySteps 2.
- Select one of the following options to restore the files:
- To restore the files to their original location, select Original.
- To restore the files to a different location, select Other and then Browse.
- Click EasySteps 3.
- Select the overwrite options of the restore:
- Never replace a file with its backup copy
- Replace a file only if its backup copy has a newer file date and time
- Always replace a file with its backup copy
- Click Start.
- In the Operation Finished dialog box, click Close; or if you want to view a report of the restore, click View Report.
|
