
HP de100c/de200c
Digital Entertainment Center
Frequently Asked Questions
and Knowledge Base
IMPORTANT NOTICE: Before posting a message to the user group, please read about instability issues and please follow the procedure for a failsafe recovery because it generally solves many common problems.
This FAQ/Knowledgebase is operated by Lee Devlin and is not officially sponsored by the Hewlett-Packard Company. I set it up to work in conjunction with an on-line user group community of HP de100c owners and enthusiasts to help solve problems and share information. I was the Systems Architect at HP for the HP de100c Digital Entertainment Center as well as the HP DVD Movie Writer and HP Media Vault, products for which I also maintain FAQ/Knowledgebases. I left HP in May, 2007 after working there for 24 years and I am now an Engineering Consultant. If you want to know more about me, you can view my profile on LinkedIn. If you want to contact me, my email address can be found here.
Analog Line-In Recording was added in the software version 082702_1.4.146 and is documented in the Line In Recording help screen (reachable from the 'options' menu). The recommended method for capturing analog files is to use the tape out (or DAT or MiniDisc) recording jacks on a receiver. It's important to make sure that the analog source is sufficiently strong to drive the dec's inputs. Typically, this requires a source between .4V to 2V rms into the Line-In. You can adjust the input gain on the screen with the volume slider control so that while playing, the selection the V/U meters deviate sufficiently to assure the A/D capture is using the full recording range of the A/D converter. It's OK for the source to periodically illuminate the furthermost red blocks on the V/U meters, but if this happens continuously, it's an indication that the input is being overdriven which may cause 'clipping' and distortion. The slider should be moved to the left until clipping no longer occurs.
A turntable which plays vinyl records cannot be connected directly to the dec. The signals are much too low and require the amplification and equalization that is provided in the phono stage of a receiver, amplifier, or pre amp.
The de100c has a grounded chassis. It's likely to be the only accessory in your cabinet with this ground reference where all of your other equipment may have floating chassis grounds. The exception is generally the TV whose chassis ground is often made with the Cable TV or Satellite TV coax which is grounded outside the house. This sometimes creates a problem with an audio hum or video signal lines as soon as the de100c is connected. The most common advice is to make sure everything is plugged into the same electrical outlet circuit which is always a good starting point. However, if the ground loop is created by the TV coax, then you'll have to isolate that coax ground. If you remove the cable TV coax cable from the system and notice that the problem goes away, then the chances are good you can fix the problem by isolating the cable TV coax ground. The Xantec 63400 Ground Breaker which costs $6.95 is a very clean solution. You can also run a quick experiment with some inexpensive Radio Shack isolation transformers to confirm that the hum is definitely coming from the ground loop formed by your TV cable coax.
Backup to the CDR can be accomplished via the "Write full file system mp3 disk" feature. The "flat file system" feature is mainly for the early mp3-CD players that didn't understand long file names or subdirectories. A full file system will name the files with song titles and put the them in named subdirectories (Artist/Album) that will make them easier to manage. The advantage of having an MP3 backup instead of re-ripping your original CDs in mainly in saving time and effort. Ripping 10 albums on the DEC takes about 90 minutes but restoring them from an mp3 CD takes less than 4 minutes. Adding 100 CDs is a an all-day task, but it can be done in less than an hour if you restore them from MP3 disks.
The best way to backup your dec is over a network to another PC. In order to do that, you software version 061702_1.4.75 or greater. See more information on how to do that here. Once that is accomplished, there are programs that allow spanning of CDR disks (such as HP's Simple Backup) that can help you to move it off your PC and on to recordable media. Also, DVD+RW disks which hold 4.7GB to 8.5GB per disk could be used in conjunction with a DVD+RW drive such as HPs DVD aftermarket drives. Thus a completely full de100c could be backed up on to 8 DVD+RW disks by moving them through a PC with a DVD+RW drive. The friendly links utility allows a much nicer way of backing up the dec because it gives the files recognizable names, so you should consider installing it prior to making a backup. If you have iTunes, the same thing can be accomplished by adding files to it and having setting it up so that it copies the files to a new location and organizes them. This will rename the files that were ripped on the dec and put them in folders that have a hierarchy of Artist->Album->SongName.mp3.
There are a number of MP3 tagging programs that can be used on the PC to rename the files generated by the dec when you rip CDs on it which will have filenames like f0113a0f_11bf5122_03.mp3. Here are some links to ID3 taggers that you can use to rename the files after you've backed them up to a PC so that you can name them with Artist\Album\Track:
- MP3 Tag Tools (free)
- Dr. Tag (free trail period, then $24.90)
- MP3 Tag Studio (free download $19 shareware)
When using these programs, practice first on a small number of files. If you're not careful with them, you can make sweeping changes that you didn't intend to make.
To make changes to the BIOS, hold down on the front panel Library button after the initial HP logo appears during a cold boot. You will see a message appear on the TV or CRT: "Prepare into CMOS setup!!"
While continuing to hold down on the Library button, then hit Play and then Record. You will be prompted for 8 characters the unique 16 character password which you can input with a USB keyboard. The passwords can be found here. Then you'll be able to view and edit the BIOS settings.
If you see an error message on the screen during boot, this is what they mean:
0001 = The CPU fan has failed
0002 = The power supply fan has failed
0003 = Thermal sensor error
0004 = HDD serial number doesn't match
0005 = No boot device found
You can overwrite the BIOS by downloading this iso image (which is 17MB in size) and burning it to a CD and then booting from it. This should only be necessary if the BIOS flash chip goes bad and needs to be replaced or if it has been reprogrammed with some other image inadvertently.
The CD lookup service provided by Gracenote (CDDB) no longer works. To fix it, you'll need to change to FreeDB. A new ISO recovery image is available that allows you to update the DEC to point at the FreeDB server. If you were planning to do a recovery, that would probably be the easiest way to do it. Otherwise, you can follow these steps:
Log in to your DEC using telnet. Type in the following (paying attention to the spaces):
cd /opt/odin/.realnetworks <Enter>
cp Odin_1_0 Odin_1_0.bak <Enter>
vi Odin_1_0 <Enter>
The cd command is to change the directory to the location of the configuration file which is named Odin_1_0. The cp command makes a backup copy of the file you're about to edit and then the vi command launches the VI editor. Use the down arrow key to move the cursor down to the line that starts with "CDDBServerType"
Use the right arrow key to space over to "gn". Type in 'xx' to delete those two characters. Type in 'a' to go into append mode. Then type in "freedb" to replace the "gn" that you just deleted. Then hit the <Esc> key to get out of append mode. Then type 'ZZ' to save the file. To double check that the change was made correctly, you can type this command:
more Odin_1_0 <Enter>
That will display the file. You can use the space bar to page down the screen. If you're satisfied that the change was made correctly, you can then type:
killall X <Enter>
This kills the main application and causes it to restart so it will change to the FreeDB database for all future CD information lookups. To get the DEC to lookup a CD's info again, just go to the CD menu and if it reads Track1, Track2, etc. then hit the 'options' key on the remote and then select 'CD info'. This will result in the DEC performing the lookup again. If it had failed on the gn (GraceNote) server, it should now work on the Freedb server.
UPDATE: 2022-04-10 Don W. has informed me that Freedb has gone offline. There is a project calld gnudb that has replaced it and Don was successful at getting the DEC to connect to it. You can read about it at gnudb.org. Don told me that in order to make it work, all he needed to do was to change the URL of freedb.freedb.org to gnudb.gnudb.org in the file mentioned above. He also let me know that there is a PATA-SATA interface available in the event that you need to replace the HDD in the DEC. However, be aware that there is a 10,000 track limit on the db which becomes unstable once that threshold is crossed. The orginal 40 GB drive could only hold about 7500 tracks so it never had this issue. It only became apparent after people began installing larger hard drives.The CDRW drive that shipped with the dec was based on the Mitsumi CR-48X5TE 4x writer. Quite a few drives can be substituted, but it would be easiest to just get one of the drives in the Mitsumi CR-48 family (even if it's faster) since it has the highest probability of working. If you substitute a different type of writer, it may be necessary to remove the tray door (which is generally snapped into place) so that it doesn't catch on the DEC's fold-down door when retracting. Putting a faster drive in the DEC may not cause it to record any faster and it won't rip any faster since that is dependent on CPU speed. The drive jumper should be set to master.
Many users have expressed a concern about the way that Compilation CDs are
stored in the database. The issue arises from way that the database is organized, i.e., by a hierarchy of Artist->Album->Track.
If an Album has Tracks that are by multiple artists, then if you organize it by separate artist names, the
compilation album will get split up into separate
Albums. This leads some to think that the Album should be the highest level of
the hierarchy but if it was done this way, then every 'Greatest Hits' album would get merged together because they'd have the same name.
There are several work-arounds for this issue, and the one most commonly used is to group compilation albums under a single artist name, such as Various Artists or something similar (which is often
how they are generally categorized on CDDB and freedb). You could also use a playlist
by storing the Album as a unique playlist, and then edit the id3 tags to get the songs to appear under the Artist
category too. Of course, after you do that, you'll end up with lots of Albums with the same name when you sort by Album. However, the playlist will
still allow you to play the whole group of tracks as a compilation.
The DEC shipped with a 566 MHz Celeron CPU based on the Coppermine core. Other Coppermine core CPUs work with the DEC, including the Coppermine PIII, although the only performance benefit you're likely to experience is an increase in the ripping speed and video performance. CPUs based on Intel's Tualatin core will fit that socket 370 in the DEC but won't work due to different voltage requirements. There are a number of aftermarket products that adapt Tualatin-based CPUs to work on motherboards designed for the Coppermine CPUs. Raymond Day reported that he was successful in using a Powerleap PL-370/T 1400C adapter in conjunction with a 1.4GHz CPU based on Tualatin core. The adapter has jumpers to set the FSB speed and core voltage of the CPU. The CPU voltage setting depends on the CPU you're using. Check the printing on the CPU for the voltage it needs. It appears that some vendors cannot tell apart Coppermine core CPUs from Tualatin cores, so if you're unsure, use this Intel webpage to look up the CPU by its reference number. The Coppermine process is .18 micron, whereas the Tualatin process is .13 micron.
Be aware that the faster the CPU, the more power it will consume and hence the more heat it will generate. When the DEC senses an increase in temperature, it may increase the fan speed which introduces more noise. The fan speed will not resume to the lower speed until the DEC is shut down and restarted.
For more in depth information about the CPU replacement, visit this page.
Software version 061702_1.4.75 added the capability to export a tab-delimited listing of the database in a number of text files which will be stored in the 'export' directory. These listings can be imported into a text editor or an Excel spreadsheet. You must have 'file sharing' enabled in the Advanced Network settings menu to see the de100c on the network. To get a tab-delimited listing of the database, go to the 'Library menu' and select 'Create Listings' and it will generate the files in the background. It takes about 10 seconds/1000 tracks so it should take no more than a few minutes. This feature is a 'snapshot' of the database, so if you modify the database by adding or deleting tracks, you must generate a new listing to reflect any changes.
The files generated are:- albums.txt
- artists.txt
- library_information.txt
- playlists.txt
- tracks_by_artist.txt
- tracks_by_title.txt
Occasionally, people ask me where they may find a DEC for sale or where to sell one themselves. I generally recommend Ebay or advertising directly on the DEC Yahoo Group.
It's possible to get a 'no dial tone' message if you have a voicemail service that produces a non-standard dial tone to alert you to the fact that you have voicemail waiting. You must clear the voicemail box to get a valid dial tone in order to connect. Some ISPs such as AOL and Compuserve and the free ones are not compatible with the dialup networking function of the dec. Other smaller ISPs have also shown incompatibilities. MSN and UUnet are two large dial up ISPs that are known to work.
Despite the higher product number, the de200c was to be a cost-reduced version of the de100c. The key differences are that it had a 20GB drive, no HPNA networking, and only one USB connector on the rear of the unit instead of two. Other than that, the products are identical. The de200c was cancelled before being offered to the public and thus was not a supported HP product. They were offered to HP employees with the following disclaimer:
"You are invited to participate in
this program ONLY if you are a U.S. Hewlett-Packard employee
intending to purchase products for personal and/or family use. Items
purchased from this website are considered NOT FOR RESALE and are INELIGIBLE
for any other HP discounts, rebates, etc.
Products are sold AS-IS with NO WARRANTY, implied or
otherwise."
They can be recognized because the box is stamped with a message that reads, "This item has been discontinued by HP and is sold AS IS with no warranty expressed or implied."
[ED: This was an official confirmation from HP that the de100c and iPAQ Music center were discontinued.]
HP and Compaq have been selling consumer entertainment products for the past year -- HP offers the HP Digital Entertainment Center and Compaq offerings include the iPAQ Music Center and portable audio players and CD players.
After careful review during the integration planning process, the new HP has chosen to discontinue its digital entertainment line of products, which includes the HP Digital Entertainment Center (de100c and de200c) , the Compaq iPAQ portfolio of music products including the iPAQ Music Center (M-1), the iPAQ personal audio player (PA-2) and iPAQ personal CD players (PCD-1 and PM-1).
HP recognizes there are significant opportunities in the digital entertainment market moving forward. However, at this time, the new company has chosen to eliminate its line of digital entertainment-specific products to focus resources on its core business strengths and assets.
Q: Will HP honor warranties for customers who have purchased an HP digital entertainment or Compaq iPAQ audio products?
A: Yes. HP will honor all standard product warranties and support commitments for products for the full term of those commitments.
Q: If I purchased a de100c or the iPAQ Music Center, how long will my services continue?
A: HP will update current owners of the digital entertainment center and iPAQ Music Center products as further information is made available.
Beginning with the release of software version 061702_1.4.75 the capability to export the music directory was added. The files will be in folders labeled 'imported' or 'recorded' indicating whether they moved over the network or recorded from the CD. The songs in the 'recorded' directory are likely to have filenames like 4f09bf07_bd3a7a4_05.mp3 if they were recorded from an audio CD (as opposed to an mp3 CD, where they retain the mp3 filenames). These files will import properly into PC Jukebox players which use the ID3 tags to organize the tracks by Artist/Album/Track title.
![]() If you use iTunes, you can set it up to
automatically rename the files and put them in Artist/Album directories when you
import them from the DEC to a PC with iTunes. This is an excellent way to
backup your DEC's music collection. It will also change the odd filenames
to the actual track names. To set this up in iTunes, go to the Library and
select Edit->Preferences->Advanced and under the General tab, select the box
that reads, "Keep iTunes Music Folder Organized". Then you can also check
"Copy files to iTunes Music Folder when adding to Library". Then if you
add the DEC's export folder as a drive letter to your PC and select the export
folder to be added to your iTunes library, it will copy all the songs over to the PC
and rename them in the process.
If you use iTunes, you can set it up to
automatically rename the files and put them in Artist/Album directories when you
import them from the DEC to a PC with iTunes. This is an excellent way to
backup your DEC's music collection. It will also change the odd filenames
to the actual track names. To set this up in iTunes, go to the Library and
select Edit->Preferences->Advanced and under the General tab, select the box
that reads, "Keep iTunes Music Folder Organized". Then you can also check
"Copy files to iTunes Music Folder when adding to Library". Then if you
add the DEC's export folder as a drive letter to your PC and select the export
folder to be added to your iTunes library, it will copy all the songs over to the PC
and rename them in the process.
The 'export' directory is read-only and cannot be modified. This is to prevent the corruption of the database that would result from having separate processes manipulating the database files.
The very latest software image for the de100c is 091702_1.4.201 and if you're at this revision, there is no need to force the unit to find a new one. As of 8-1-2003, the update server has been shut down so there is no point in trying to update a dec using the key sequence.
[note: the following instructions are for historical purposes only. The update server has been taken off line as of 8-1-2003, so to update your dec to the latest software in the event that it was in storage prior to 8-1-2003, you have to unlock it and boot from the recovery CD. The unlocking procedures are discussed in the developer's page]
To force an auto update: From the Home menu, push CD->Internet Radio->Record buttons on the front panel holding down on all 3 buttons and then you will be prompted if you intend to actually perform an update. Use the navigation keys to select 'Yes'. If you're on a dialup connection, this could take several hours to download a new image and perform the auto-update. A fast connection should allow it to occur in 15 minutes or less. [Please note, this will not work after 8-1-2003]
There are other three key sequences available on the de100c, but they are to solve severe problems and may involve some data loss. They should only be necessary in extreme circumstances.
Fixing the percentage of disk full
Occasionally, when a DEC that had an early software release underwent a failsafe recovery, the /tmp directory was lost and so there was no way for the DEC to know how big the disk drive space was available initially. Therefore, it might report 100% available even though it showed a lot of content in the database. To fix this on the de100c, go into the /tmp directory and edit the file "hd-space-kb-baseline" so that the number shown in there is 36313042 (16826860 for the de200c). It is in ASCII so you can edit it with 'vi'. This is the number of kb that a de100c initially had available for content. The numerator for the calculation (space available) is kept in the file "hd-space-kb-available". A calculation is stored in "hd-space-percent". It will be necessary to power cycle the dec completely for it to redo the calculation.
The hard drives that came with the de100c and de200c were Seagate U6 models (40GB/20GB respectively). They can be replaced with any similar model ATA-compatible hard drive up to 120GB in capacity. The Linux kernel that shipped with the dec was limited to addressing 137GB maximum, hence the limit of 120GB drives. Be careful about loading the dec with large number of tracks if you install one of these larger drives. It slows down the boot process and will corrupt the database if you exceed 10,000 tracks in the same genre. The dec wasn't tested with more than 7500 tracks total, so you're on your own when attempting to fill up a larger hard drive.
The dec first needs to be unlocked to replace the hard drive. This will happen automatically if it was running the latest firmware image (91702_1.4.201). If it wasn't, check out the developer's page for instructions on unlocking the dec.
The drive should be set to 'master' via a jumper on the back of the drive, which is usually shown on a label on the exterior of the drive. If that doesn't work, try the CS (Cable Select) setting.
There has been a problem noted with Samsung drives where their 5400 rpm models had to be set to Cable Select in the '>32GB' position in order to see the full drive.
Importing/Exporting files over the home network
If you're having difficulties seeing the DEC's folders on your network and you're running a newer OS like Win7, 8 or Mac OSX, please refer to this section of the FAQ.
Importing files is explained in the manual, but it's not all in one place. Exporting is not in the manual at all because it was added in a software upgrade after the product released. Prior to importing songs to your DEC, you should make sure that your songs have good ID3V1 tags on them so they will be properly categorized when they are imported into the de100c. You can do this with your PC Jukebox software or MP3 Tagger software and make sure to use the feature that is related to the ID3V1.1 tags. The de100c doesn't use the information in the newer ID3V2.x tags. There is more information on proper ID3 tagging here and here.
To enable importing or exporting files on the de100c, you must go into the DEC menu Settings->Network Settings->Advanced Network Settings->Modify and chose to Enable File Sharing. You must select the workgroup name and the default name for the de100c is 'Workgroup' which is the same as the default for most Windows systems. Make sure to check to see if your PC's network settings have the same network name. After enabling the file sharing on the dec, you should see your de100c appear in the Network Neighborhood or My Network Places with a name like, "De100cxxxxxx" where the xxxxxx is a portion of the serial number. Under that device, you'll find an 'import' folder into which you can drag and drop mp3 or rm files. You'll also see an 'export' folder which we'll talk about below. In order for the de100c to import the files you've dragged to it into its database, it must be idle for more than a minute (i.e. not playing and no button or remote control activity). If it's taking an excessive amount of time to import the songs, check the clock on the dec, because it uses the timestamp of the file to determine how long ago the file was imported and if the timestamp is a time in the future, you can be waiting a long time. After the files have been imported, the import directory will be empty and you will find the songs in the Library.
Exporting files works similarly, except the files are in the export folder. You can find them in the two subfolders under export. One is called recorded for files that were ripped from CDs, and the other is called imported for files that were imported over the network. These files can be dragged and dropped on to a PC for backup purposes.
Hint: A quick way to access your files on the dec without having to map a network drive is by using this command sequence:
Start-> Run-> Type in: "\\ip.address.of.dec" without the quotes (where the ip.address.of.dec is a number such as 192.168.1.101 that you can find under its general settings)
There have been reports of the de100c becoming unstable and exhibiting behaviors such as:
- getting stuck for more than an hour in 'Maintenance Mode'
- hanging on the startup screen
- spontaneous restarting
- skipping over all songs
- sluggish response
- refusal to read or write CDs
- inability to connect to the Internet
- missing key functions like the remote control, front panel display, or TV/VGA display
The first step to try to correct issues such as these is to take the unit down to a 'cold boot' state and allow it to power up from that state. The proper way to do that is to put it into a sleep state with the power button on the front panel or the remote until the front panel lights turn off, and then unplug it. Then plug it back in, push the power button, and allow it to boot up normally. If this does not correct the problem, then a 'failsafe recovery' should be used.
If you find your dec in a mode where it's stuck in the 'Starting up, Please wait' screen for several hours, then you should perform a failsafe recovery. If that doesn't fix the issue, try removing the network card (and/or the modem card if you have a de200c) and see if it corrects the problem. If so, your network/modem card may be bad and will need to be replaced.
A frequent request is how to add new radio stations to the de100c. The central database for the iRadio server is stored remotely, so there is no easy way to add or request new stations. However, if you are comfortable with using Linux you can point your dec to a new iRadio server that is hosted by one a volunteer. This is a private activity with no assurances that it will be available indefinitely, but it's possible others could mirror the service in the future. It is explained on a
dec developer's page.Maintenance Mode, getting stuck in
Maintenance mode occurs daily at the time set in the Scheduling menu provided the dec isn't busy playing. Normally, this mode is used to check for updates. If you are already at 1.4.201, then you shouldn't need any updates and so maintenance mode should only take a few minutes. Other activities that occur in Maintenance Mode are the main application shut down, temp files cleaned, log files rotated, and then the main application is restarted. The main application startup is dependent on the amount of tracks on the hard drive - the more songs, the longer it takes and sometimes it doesn't finish before maintenance mode wants to go back into sleep mode and you'll find the system in screen saver mode with the message in the VFD telling you that it's in Maintenance Mode and not to power down. If you find that it's in this mode for more than 10 minutes and there is no disk activity going on, it's OK to power it down.
There is a difference between high and low density memory. The dec only
supports the low density type, which is more expensive than the high density
type. If you put in high density memory, it will only see half of it.
168 pin PC100 or PC133 memory is available in the 256 MB modules in both high and low
density versions. Reputable vendors will try to help you to select the correct type.
Since the de100c can only handle 512MB total memory, it requires low density
memory. The de200c will be limited to 256MB total since it has only one memory
slot. Both products shipped with 64MB of SDRAM. FMI see:
http://www.icentral.com/html/1stchoicememory/page492.html
If you are interested in testing your dec's RAM, you can download and burn this memory testing iso image to a CD and boot from it. A set of instructions for running it are available here. You can skip down to the part titled, "Running Windows Memory Diagnostic". This diagnostic will run until you stop it. If you run it for about an hour without finding any problems, then your memory is probably fine.
MP3 files have two different methods for attaching metadata to files. Most MP3 players support ID3V1 since it's the oldest and most common place to find the ID3 tag information. Initially, there was no provision in the MP3 format for providing metadata for information like Song Title, Artist or Album information so it was added as an afterthought and put in a place where it would do the least harm for applications not expecting it, i.e., at the end of the file. It is 128 bytes long and has the following fields:
| Song title | 30 characters |
| Artist | 30 characters |
| Album | 30 characters |
| Year | 4 characters |
| Comment | 30 characters |
| Genre | 1 byte |
Later, the comment field gave up its last two positions to contain the track number information and this became known as ID3V1.1. The de100c only uses the V1.1 tag information when importing files. It does not use anything stored in the V2.x tags.
ID3V2.x is a newer standard and is so flexible that it is difficult to support between players due to the large variety of possibilities in reading the numerous types of tag information which can grow to be 256MB. Whereas V1 tags are in a field at the end of the file, the V2.x tags are in a header at the beginning of the file.
In addition to the ID3V1.1 tags, the de100c has an auxiliary database that allows you to edit this metadata to that it can be more descriptive and it will attempt to put these edits data back into the original files, although it will truncate any changes to the lengths of the ID3V1.1 standards.
The de100c shipped with a 3-function network PCI card that used the Broadcom 4413 chipset. This single card supported 10/100 Ethernet, HPNA, and a soft modem. This card isn't available as an aftermarket part. The de200c shipped with two separate cards, one was from Accton (P/N EN1207D-TX/WOL) which is based on the Realtek RTL8139 chipset. The de200c had a separate soft modem card based on a Smartlink SL1500 chipset. In addition, the DEC has a driver for the 3com 3c59x Ethernet cards. So if your your networking card goes bad, you should look a card based on the RTL8139 chipset (or a 3com 3c59x card) to replace it.
Here is a list of RTL8139 cards that are known to work:
- Accton EN1207D-TX/WOL
- Hawking PN102TXA
- D-Link RTL-8139/8139C/8139C+
The de100c will also work with a 3com 3c59x card, but you must make these modifications to the modules.conf file:
on the /etc/modules.conf file you need to update
the first line.
replace the line => alias eth0 8139too
by the line => alias eth0 3c59x
save the file and reboot
The Linux open source components that were modified are available at this ftp location.
Here are a few more websites dedicated to the de100c
A developer's web page
for adding some extra features
Robert's web site for more
development features
Password server which uses your dec's serial number to get your dec's password with JP Kole's magic decoder
ring. For more information on the procedure see the section on unlocking your DEC.
The owner's manual in .pdf format can be found here. The setup posters in .pdf format can be found here: part1 part2.
Portable MP3 Player Download Support
The following MP3 portables are supported for downloading from the de100c:
- Creative Labs Nomad Jukebox (6GB and 10GB)
- Iomega HipZip
- Nike PSA Play 60 and 120
- Sandisk Imagemate CompactFlash and MMC reader
- Sonic Blue Rio Digital Audio Players models 500, 600, and 800
There are no other portables supported for the de100c and since no further software updates scheduled for the dec, there won't be any more added. If you want to add download support for a new portable, there is a section on the developer's page that explains how to do it.
The de100c uses port 80 (http) and port 443 (https) for the purpose of accessing the Internet and for contacting the dec.digitalentertainmentportal.com server for auto update packages. This server is off line now.
The best way to power down the de100c to a cold boot state is to stop the music from playing, go to the home menu, and use the power button on the front panel or remote control to power it down, waiting for the LEDs on the front panel to go out, and then unplug it. That assures that the file system has a chance to shut down cleanly before removing power. If the unit is hung doesn't respond to a power down via a momentary push of the front panel button or remote, then holding it down for 6 seconds or unplugging it would have the same result. You should not use the method of holding down on the power button unless the unit is hung because it may lead to instability which requires a failsafe recovery.
The de100c doesn't actually power down completely when you push the power button on the front of the unit or the remote control. It goes into a low power kind of sleep state which allows it to wake up at night and check for updates. This state also allows it to come up much faster once it's gone through the cold boot state. The manual states that in order to power the unit down completely, you must hold down on the power button for 6 seconds. When the fans stop, you know the unit is completely powered down. If you're having a problem with the unit, it's always a good idea to take it to the completely powered down state and start it up again. The safest way to do this is to push the power button, wait for the lights to go off, and then unplug it. This assures that the file system has finished cleanly shutting down. Holding the power button down for 6 seconds should only be used when the dec is no longer responding.
The de100c has a custom 85W power supply and the output voltages are a subset the standard ATX form-factor supplies, although with a custom pinout..
J25 (6-pin header)
1 5V
2 5V
3 5V
4 5V standby (always on)
5 On/Off switch (short to ground to turn on all
other voltages)
6 Ground
J24 (8 pin header)
1 Power valid
2 5V
3 5V
4 +12V
5 -12V
6 Ground
7 Ground
8 Ground
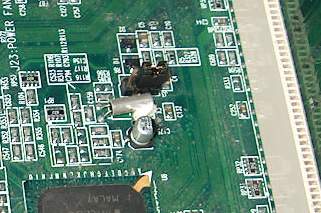
If your dec is completely dead, i.e., it won't respond to any input including the power button not even with its front panel lights, it would be a good idea to measure the voltages on the power supply with a voltmeter. You can access the conductors while the J24 and J25 connectors are plugged in to the motherboard by inserting the probes down into the tops of the connectors. First check J25 pin 4 for 5V standby power. If you don't see 5V and know that the dec is plugged into a good AC power source, the power supply is probably bad. If you see 5V, then try shorting J25 pin 5 to ground and see if you get the front panel lights to come one and the disks to spin up. If so, your power supply is probably OK, but the motherboard may be bad or some other hardware device is shorted. You can try removing various hardware such as the CDRW drive, hard drive, or network card to see if they are dragging down the supply and preventing the dec from starting. You can also try removing the jumper on J3 (which is located on the motherboard just to the left of the riser card when viewed from the front) for about a minute. This will allow the DRAM and the circuit monitoring the front panel button to reset and this has sometimes been known to fix the problem when a dec becomes completely unresponsive to the power button. Some photos of J3 are shown below.
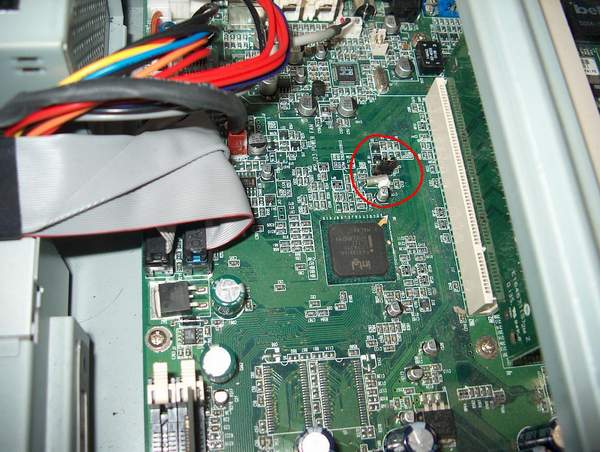
Motherboard of DEC
Note the jumper on the two right-most pins. This is the normal position to keep the battery in the circuit.
Jumper J3 is on the motherboard back by the riser card. The jumper is shown in the normal position for operation on the two pins closest to the riser card. Remove the jumper for about a minute to clear the DRAM.
If the problem is with the hard drive, CDRW, or network card, you can find a substitute. Unfortunately, there are no more power supplies or motherboards available for decs, but you can sometimes find used decs on Ebay that you can use for parts to make up a good dec from another that has a different problem.
To rebuild the music database:
From the Home menu, push CD-> Library-> Now Playing on the front panel holding down on all 3 buttons and then follow the directions. It is not a good idea to rebuild the database unless you're experiencing some severe problem where the database appears to be corrupt. This operation will use the ID3V1.1 tags to completely rebuild the song title/artist/track list from scratch. If you've made any edits to the original tag information and it overflowed the character limit of the ID3V1.1 specification, then you will lose that additional information. Any edits where only capitalization was changed will revert to the original ID3 information. A typical rebuild will take about 1 minute per 100 tracks and it will delete all of the playlists.
Do not power down the de100c while it is rebuilding the database or you could lose files!
The original recovery CD image can be downloaded via ftp here. It is a very large image (156 MB) and should not be attempted unless you have access to high speed Internet connection.
![]() A new image has been created that points to the new CD lookup server since the original service from Gracenote is no longer responding. It is recommended you download and use this new image to avoid having to fix the CD lookup
server whenever you need to perform a failsafe recovery. If you wish to make sure this 156 MB file
downloaded properly, its md5sum is 2e638d6489e7f7dc3e6985b462dac25a.
A new image has been created that points to the new CD lookup server since the original service from Gracenote is no longer responding. It is recommended you download and use this new image to avoid having to fix the CD lookup
server whenever you need to perform a failsafe recovery. If you wish to make sure this 156 MB file
downloaded properly, its md5sum is 2e638d6489e7f7dc3e6985b462dac25a.
Purpose of the recovery CD image:
The ISO image is a special CD-burner file format to help create a bootable "Recovery CD" for both the de100c/de200c products. If you have a CD or DVD recorder drive but don't have any software to record ISO images, you can download Infrarecorder one from Infrarecorder for free.
The burning program must support a feature known as 'create CD from ISO image'. You can't simply copy the ISO file to a CD or it won't work as a bootable CD. After burning the iso image, put the CD in a Windows system and you should see two folders "FIJI" and "ISOLINUX" and two files, AUCD and AUPACKAG. If you just have a single .iso file, then the options in your burning program were not selected correctly.
The Recovery CD will only function if the DEC is unlocked. All de100c/de200c products were scheduled to unlock after August 1, 2003 provided they had the latest software image which is version 091702_1.4.201). A locked DEC can't use the recovery CD. If you have an earlier version of firmware, you will need to go to the developer's information page for instructions on how to unlock the dec and proceed with updating it from a recovery CD.
The Recovery CD attempts to preserve any music content on the hard drive of the DEC if it recognizes it as a previously-used DEC hard drive, otherwise, it will overwrite it. It will require the user to re-input any registration data and network settings. There is a very small risk that content can be lost through this process so it's always a good idea to have a 'backup' of your music content, if that is possible. A periodic full system backup is a good idea for when you have a hard drive failure, which you will, eventually.
If you do feel comfortable burning the recovery CD yourself, it is a good idea to confirm that it downloaded correctly. This is best done by calculating and MD5 checksum for the original failsafe image which is:
db309f63417aee65062f179306174090
By comparing the MD5 sum of the ISO image you downloaded to your system with the MD5 sum provided here, you can verify the file did not get corrupted during the download process. If your MD5 sum does not match the one given here then your file is corrupt and should be deleted and downloaded again.
For Linux: To compute the MD5 sum of a file on a linux system simply use the command "md5sum <filename>". The first part of its output will be a 32 character hexadecimal string which represents the MD5 sum of the file.
For Windows: Windows systems do not ship with software to compute an MD5 sum so you need to find and install software that will do this. A good and free (in the beer sense) program is called WinMd5Sum and can be downloaded from http://www.nullriver.com/products/winmd5sum. It's a small GUI based application that is simple to use.
(Thanks to Scott Lee for these MD5 calculation instructions.)
How to use the recovery CD: Make sure you're running the latest version of software on the dec (091702_1.4.201) or that your dec was unlocked or else the recovery CD will not work. To use the CD, you have to get it in the drive. The best way to do this is to pull the CD front door on the dec open by grabbing it on the left side and rotating it downward. For the first few seconds of power up, you can push on the eject button which is visible through a slot on the near the right side on the front of the drive just behind this door. . This will eject the CD's tray. Then you can put the disk in and push the drive closed. Then unplug the dec, plug it back in, and power it up again and it should boot from the CD. It will eject the disk when it's done restoring the system files from the CD. If you find it taking a long time, let it finish. If you see 3 asterisks for a long time, it's working on fixing the content partition and that can take a long time if you have a lot of content so make sure to let it complete.
The remote control for the de100c uses the very standard NEC IR codes. These codes are sent out as 4 hex characters in a serial bit stream. The complete format for all the keys on the remote and the discrete on and off codes can be found in a Word document file here. There are two columns for the codes because if you use an IR capture device such as the Ira-3 and a program like Girder to try to capture them, the bit stream is interpreted in what is known as 'Big Endian' format which means that it believes the first bit in the stream is the most significant bit of the byte. The NEC code is actually specified as 'Little Endian' format which means the LSB is sent first. There is a simple .ccf configuration file available for the Pronto and compatible remotes.
The codes can be captured on a learning remote but there you must use a special technique due to the way the de100c IR remote and receiver work as explained in this Word document. In short, the proper technique requires that the key must be tapped quickly and let go. If you hold it too long, the repeat sequence will get captured and make the learning remote susceptible to double keying.
The de100c has no discrete on/off codes available. They were reserved, but not implemented. However, if you install the full shut down kernel, then you can use the discrete on/off codes which you can program into a Pronto to make it work. The codes are given in the word document mentioned above.
A common question on the DEC list is whether it's possible to purchase a replacement remote for a lost/broken remote control. I have a few of these remotes still new in package (fully tested with new batteries) available to anyone who needs to purchase one. The cost is $14.95 + $5.00 shipping, only available in the U.S.. Please use the button PayPal below if you wish to purchase one:
Restoring Original Failsafe Image
There is a firmware image on the disk that will take the unit back to the original configuration and then successively apply all the auto update patches. This procedure is needed if the software has become unstable. Here is the procedure:
Rebuilding the OS partition
Make sure the DEC is powered all the way off to initiate a cold start and then press the power button on the front panel. At the initial HP Invent logo splash screen on the TV, press and continue to hold the CD button on the front panel. You must do this before you see the normal 'Starting up, please wait' message. Soon, the TV screen will display the flickering message in small text on a black screen:
"Startup will continue in 5 seconds: Please wait"
While this message is displayed, keep holding down on the CD button and then press Library and then the Now Playing button so that all three buttons are pressed at the same time within 5 seconds of the message's appearance. Then let them go. Soon you should see the splash screen and then a message that starts with "Reconstructing from Fail-Safe: forced from front panel (All AU packages)....". If you are running a VGA monitor instead of a TV, it's possible that you won't seen the 'Startup will continue in 5 seconds: Please Wait' message, but instead the screen will just stay black. So if this happens, press and keep holding down the CD button and press Library and Now Playing buttons anyway and then let them all go. Please note, the Now Playing button is not right next to the CD and Library buttons. I've had several customers who tried for hours to get the failsafe to work, assuming the Internet Radio button was the Now Playing button simply because they assumed that all three buttons must be the ones that are adjacent to each other and never read the text under the last one. You should eventually see a screen that looks like this:
DEC loader version 091702_1.4.201
DEC software version 091702_1.4.201
==========================================================================
Reconstructing From Fail Safe: Forced
from front panel (All AU packages)
0........10........20........30........40........50........60 Tasks
***
This process should take about 20 minutes. It will completely overwrite the OS and could take a long time to finish if the content partition has any file system corruption. You'll know it's fixing the content partition if it stalls on a screen that has three '***'. Let it go if this happens since it may take a long time. This procedure reinstalls the image from the failsafe partition and all updates. You will lose your registration data and networking settings, but the content will stay intact. It's always a good idea to back up the content just in case. In fact, a backup is the only way to recover your content in the case of a disk crash so you should periodically backup your dec to protect all the work of ripping your CDs.
[Update Dec 14, 2003: Please note, now that the update server is off-line, don't use these next options, instead, use the recovery CD These two sections are only left here for historical purposes]
Reinstalling all software except the last update package:
If you would like to go back to the way the system was before the most recent update, i.e., all updates -1, use the same procedure above except press the CD, Library, Record buttons. This might be useful if your dec is stuck on software version 1.0.9 which was a common problem. This will back it up to version 1.0.7 and then you should Force Auto Update to bring it up to the latest software.
Clearing the Entire Database and restoring the image to the factory default
If you want to scrub the system clean completely, and restore it to its
initial condition, use the three dangerous
buttons in the manner
described above (i.e., during power up). This will delete all content and
updates from the device and restore it to the condition that it left the factory
and not apply any updates. This is particularly useful if the unit
contains a lot of really bad music
![]() . Then you can use the Force
Auto Update, to bring it to the latest software version and then put good music on it.
. Then you can use the Force
Auto Update, to bring it to the latest software version and then put good music on it.
The schematics for the de100c are available in .pdf format:
This should only be needed in extreme circumstances for example when the Failsafe recovery or Recovery CD won't work. Take off the cover and put a jumper between pins 4 and 6 on the serial port (J30) which is in the front right hand corner of the motherboard. (The connector has 10 pins and only pin 1 is labeled. The odd pins are on one side and the even pins are on the other. That should help you identify pins 4 and 6.) You will be prompted to 'Press 'Select' to erase the hard drive'. You will get a message:
"System is erasing HDD now, this need long time to do it. Please wait half hour..."
Remove the jumper after you see this message. The system will power down when it is finished. After it's done, you'll need a recovery CD and your serial number. If it takes more than 2 hours, it's safe to power down the unit as enough of the disk will have been erased. You will then rebuild the dec from scratch with the recovery CD. You will have to restore all your content from a backup. This procedure is known to work on the models of hard drive that comes with the dec, i.e., the Seagate U6 drives, but may not work with other manufacturer's drives.
Turn off your dec and unplug it. Jumper between pins 2, 7, and 8 on the serial port (J30) which is in the front right hand corner of the motherboard. (The connector has 10 pins and only pin 1 is labeled. The odd pins are on one side and the even pins are on the other. That should help you identify pins 2, 7 and 8.) The easiest way to do this is with needle nose pliers. Just short pins 7 and 8 together with one jaw and use the other jaw to connect pin 2. Plug it back in and press the power button. While the dec is powering up you will be prompted to "Press 'Select' to erase the serial flash." When you press the 'Select' button, you will get a message:
"Erasing serial flash, please do not power down."
You can now remove the jumper(s). The system will power down when it is finished.
The serial flash contains the serial number and hard drive password so you shouldn't do this unless you have an unlocked hard drive and a recovery CD. To reprogram serial flash, you must boot from a Recovery CD which will prompt you for the serial number which can be found on the bottom of the dec. When you type in the serial number, it will write the serial number and password to the motherboard. This would be useful in the event of a motherboard going bad and there would be a need to mate up a new motherboard with an existing locked hard drive.
The de100c software version can be found in the location "Settings/General Information/About de100c" menu. The revision number uses the format "mmddyy_x.y.z." The first part is the date the software was compiled and the important part is the revision level in the x.y.z portion. The initial units shipped with software version 101101_1.0.7. This was replaced quickly by version 1.0.9 and then 1.1.31. If your de100c has an unreleased version of firmware such as L1410-18000, do not use it, contact me for instructions on how to update it because it will not update itself.
Subsequent software revisions have occurred in the following order:
| Date | Software Revision number | Features Added |
| February 9, 2002 | 020102_1.2.67 | Misc bug fixes |
| April 4, 2002 | 032602_1.3.38 | Internal volume Control; USB Keyboard Support; downloading to Rio 600,800, and Nike PSA portables |
| May 18, 2002 | 051502_1.4.41 | USB keyboard support in the Music Finder, support for downloading to Creative Nomad, screen saver timeout settings. |
| June 18, 2002 | 061702_1.4.75 | Export directory enabled; text listing of database files in export directory |
| August 27, 2002 | 082702_1.4.146 | Added Analog Recording capability. Fixed bug with track number field in TagClinic. Fixed bug with orphaned subdirectories not being pruned after files were removed from the import directory. |
| September 17, 2002 | 091702_1.4.201 | This is intended to be the last auto update package. It unlocked all the de100/200c's on August 1, 2003 so that they may be reloaded from a bootable CD image. |
If you plug in only a TV during startup, the VGA output will be disabled. If you plug in only a monitor during startup, the TV output will be disabled. If they are both plugged in, they will both be activated but the image on the TV will be centered at the expense of the image on the monitor. If nothing is plugged in at startup, it will default to activating only the TV. The VGA port will work with most standard VGA monitors, but there have been some reports of certain monitors not working properly. It has been noticed that the only way to get certain monitors to work correctly is to have both the TV and VGA connected at the same time. You can substitute a 75 ohm load for the TV if you find it is necessary to have the TV plugged in simultaneously in order to get your VGA monitor to work properly.
Beginning with software version 032602_1.3.38, the de100c supports certain USB keyboards for text editing and control in the main application. Prior to that, the USB keyboard was only supported at the OS level, i.e., typing <ALT>, <ALT>, e, x (as four separate keystrokes) always worked to put you at a login prompt.
Here is a list of USB keyboards that are known to work:
- Apple keyboard model M7803
- Belkin USB MediaBoard Model F8E211-USB
- Belkin USB Classic Model FE8206-USB
- Compaq KU-9978
- HP Pavilion keyboard SK-2506U (P/N 5184-9647 and 5183-9960)
- HP Pavilion keyboard P/N 5185-2027
- HP keyboard Model Number KU-9970 P/N C4772-60101
- HP USB wireless keyboard kit, part number P5911A.
- IBM MediaAccessPro keyboard [09N5549]
- Logitech iTouch Internet Navigator Model 967093-040
- Logitech Internet Navigator Keyboard Model Y-BE22
- Logitech cordless "Access" keyboard model #967225
- Microsoft Natural Elite Model A11-00337
- Microsoft Natural Keyboard Pro Model RT9401
- Microsoft Natural Pro Model B61-00002
- Microsoft Internet Pro Model C17-00001
- Microsoft Office Model E17-00002
- Microsoft Office Keyboard Model E17-00108
- SGI USB keyboard manufactured by Siltek
- Turbo-Trak KB-9021RE
- ViewSonic VSACC27936-1M USB Keyboard
There is no harm in trying any USB keyboard, it's just that some of them may not work.
Special USB keyboard codes
- ALT-p: PLAY
- ALT-r: RECORD
- ALT-t: STOP
- ALT-h: PAUSE
- ALT-j: EJECT
- ALT-f: FFORWARD
- ALT-w: FREWIND
- ALT-b: BACK
- ALT-o: OPTIONS
- ALT-a: ADD
- ALT-i: INFO
- ALT-m: MENU (ie. HOME)
- ALT-SHIFT-f: SKIP_FWD
- ALT-SHIFT-b: SKIP_BACK
- ALT-SHIFT-s: SHUFFLE
- ALT-SHIFT-r: REPEAT
- ALT-SHIFT-n: NOW PLAYING
- ALT-SHIFT-u: VOLUME UP
- ALT-SHIFT-d: VOLUME DOWN
- ALT-SHIFT-m: VOLUME MUTE
The keyboard can be used to edit the track/album/artist information and works in parallel with the on-screen keyboard. For this reason, there are a few things to remember when editing with the keyboard. For example, the left and right arrow keys move the cursor in the editing field but do not move the cursor around to various characters on the on-screen keyboard. The Enter key completes the editing, just like the 'DONE' key on the on-screen keyboard finishes the edit. There is no equivalent of the 'CLEAR' key on the on-screen keyboard while using a USB keyboard so you'll still need the remote control to access that function
There is a user group at Yahoo set up specifically to discuss the de100c and share information with other users. A webpage to collect miscellaneous information primarily of interest to developers can be found here.
The de100c is able to play videos in the iGuide. Although it's not advertised, you can also add videos (in .rm format) to your Library. This can be done by writing them to a CDR or by transferring them over the network. Real Producer is available for free from Real Networks and is used to make .rm video files. You can download a free version of Real Producer Basic if you're curious about experimenting with videos on your de100c. Before you import the file, it would be a good idea to play it on a PC so you can see what the Artist tag has in it. That way you'll know where to find it in the database after the import. If it's not filled in, you'll most likely find it under 'Unknown Artist'. Real Networks has recently replaced the Real Producer Basic with another product called Helix. This codec is not supported on the dec so you'll have to use version 8.51 of Real Producer Basic if you want to capture files for your dec.
There is a new section in the developer's page about the Helix decoder that is now available for the dec.
The best way to adjust the volume of the DEC is via the volume control on your receiver because the default output level is adjusted to match other audio components (i.e. 2V rms max). The software version 032602_1.3.38 added a way to control the de100c's internal volume from the remote control. To do this, it is necessary to push the 'Play' and then the 'Options' keys. You'll see the Options menu selection up on the screen (add to...; edit; delete; etc.). While in this mode, the PG UP and PG DN keys will adjust the volume of the analog outputs internally. The digital (SPDIF) volume is unaffected. In addition, the INFO key will operate as a mute/unmute in this mode. Be aware that if the volume is adjusted all the way down using this feature, it's possible to become confused about why there is no sound coming out of the de100c. The volume may be restored to the factory default with a cold reset or by using the 'Play', 'Options', and then pressing the 'PG UP' key to restore it to its maximum value.
The dec uses Samba for file sharing. Since the dec was introduced in 2001, it's a very old version of Samba and doesn't work with versions of Windows beyond XP due to security updates made to Windows networking protocol. The same is true for Mac OSX. If you want to have access to the import and export folders, you'll either need to use an older version of Windows such as XP, or optionally, a Linux system like Ubuntu which has no problems seeing the folders (provided file sharing is enabled on the dec) so that you can import or export your music over the network.