How to Convert Video Tapes to DVD Format

Share

About 10 years ago I helped to develop a product that converted videotapes to DVDs. It was called the HP DVD Movie Writer. It was sold for several years under the HP model numbers dc3000, dc4000, and dc5000. Those products are obsolete now, and the software drivers and application software haven’t been updated to work on the more modern operating systems like Windows 7 and 8. I still maintain the FAQ webpage for it and so I periodically get questions about what to use these days to convert analog video tapes to digital formats when customers find their Movie Writers are no longer supported. I’ll attempt to answer that question in this article. The HP DVD Movie Writer was introduced at a time when few computers had a DVD writer included, so it made sense to bundle a DVD writer with a video capture device along with the necessary software and offer it as a solution.

Converting videos from tape to DVD can be very laborious, and most people are primarily interested in preserving the video in a format that is likely to outlast video tape and be playable on devices that people are still using years from now. The VCR player has been relegated to the closet in many homes years ago and videotapes are gradually degrading, so it’s important to get them copied to a digital format if you want to preserve these videos for your children and grandchildren. You may also want to convert them so that you can upload them to a video sharing service like YouTube.

Most video capture products available today come with software that will help you edit the videos, and that can be fun and produce amazing results, but it requires some effort and a bit of learning to edit a video. The way most home videos are shot make them hard to watch because they have no story line along with little or no narration and so they tend to sit on a shelf forever after being watched once or twice. After watching a few home videos, it really gives one an appreciation for all that goes into making up a video that is entertaining to watch. But it’s still nice to know your old videos are still there ‘just in case’ one day you get ambitious and want to create a nice video for your family to have and share with their children. As time goes by, it will get harder to find a player you can connect up to a TV to play them. Capturing analog video tapes to digital files is essential if you ever want to watch the videos again at some point in the future.

Now that many computers include DVD writers, when people ask me what I recommend for converting video, I generally tell them to use a USB video capture device from a reputable company. Very inexpensive video capture devices are available now, some for less than $10 from no-name Chinese companies that you can buy on Amazon.com or Ebay. I’d stay away from them as they usually come with very poor documentation, no support, and minimal software included. I’d stick with a device from a well-known company that has been in the business for a while like Diamond Multimedia. The Diamond VC500 is one of their more popular products that has been around for a while and in general gets good reviews.

vc500 box contents

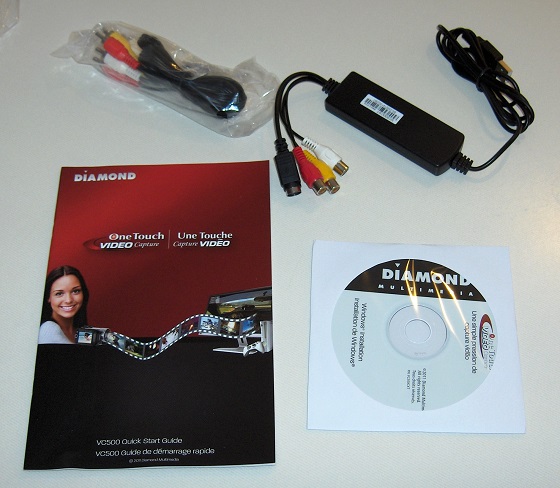
The box contains the capture device, a setup guide, an install CD and a video cable.

The VC500 costs around $35 and has software included with it that lets you capture and edit the video as well as produce the DVD. Capturing simply converts the video on your analog tapes into digital files, known as MPEG files, which typically end with the extension MPG. For preservation purposes, this is the most important step, that is, getting the videos into a digital format. Editing involves cutting up the mpg files and add things like title blocks, transitions between segments, dubbing in music or narration, and in general, making your videos more watchable. It’s what we take for granted when we watch a commercially produced video. A well-edited video is a joy to watch.

DVD authoring is what allows you to set up a navigation menu and chapters so that when you put the DVD in the player, you can more easily select which part of it you want to watch. You don’t have to split up the video on the DVD in chapters, of course, it just makes it more convenient to watch, especially if you have multiple events stored on the same DVD or if you want to be able to watch it in segments.

The software included with the Diamond VC500 is compatible with all modern version of Windows from XP to Windows 8. One of the programs the VC500 includes is Showbiz from Arcsoft, and that’s the same software HP shipped with the HP DVD Movie Writer. I found it easy to learn and use and it can do everything you will need from capturing and editing the video to authoring the DVD. Showbiz has been around for a long time and has all the features you’d need if you want to edit the video as well.


The items included with the VC500 include the software installation CD, the video capture device which attaches to a USB port, an AV cable that connects to your VCR or analog video source, and a Quick Start Guide. When you insert the installation CD into your computer, you will be prompted to install up to 3 programs. I first installed the driver, then the software called EZ-Grabber, and then Showbiz. There was also a program called Dyyno Broadcaster that was installed, but I don’t think that I will use it. It appears to be an on-line video sharing site like YouTube, but with a program to make it easier to share your videos with others on the Dyyno website. You need to set up a login on that site if you want to use it. In reality, I believe you could get by with just installing the driver and Showbiz, since Showbiz has the ability to capture video like EZ-Grabber as well as editing and DVD authoring. But EZ-Grabber may be easier to use if all you want to do is get the files in digital format for playback on a computer.

Arcsoft's Showbiz 3

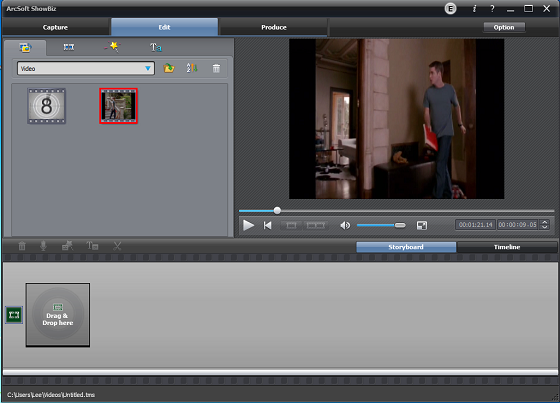
Arcsoft’s Showbiz 3 is an easy-to-use video capture-edit-DVD authoring package.

If you have a lot of videos, make sure to have plenty of hard drive space available since capturing video consumes about 3 to 4 GB per hour of video. You can capture in lower resolution to save space, of course, but for the best quality capture, I’d recommend MPEG2 720×480 quality since that is the native format of DVDs. There’s not much point in trying to capture analog sources at HD quality since they are not high resolution sources and so it won’t help make the image look any better. And I wouldn’t worry so much about editing the videos or making DVDs right away, just get them all captured to MPG files, rename them to something that will let you know what’s in the file possibly with the year they were shot such as “1992-hawaii-vacation.mpg” and that will help you to organize them into easy-to-find files for when you do want to create your DVD masterpieces. And I’d recommend you keep the original mpg files even after you’ve made DVDs, since that way you can always cut and splice segments of video together to create new DVDs should the need arise.


When you burn a DVD, make sure to use the write-once media, not the re-writable media, even though re-writable media sounds like it’s more flexible. The name for write-once media is DVD+R or DVD-R. Rewritable media is called DVD+RW or DVD-RW and it’s really better for storing computer data like a backup that you may need to overwrite in the future than it is for making playable DVDs. The rewritable DVDs are not as compatible with DVD players as are the write-once DVDs because their reflectivity is lower. Also, make sure to get a known brand of media like Verbatim, Maxell, or Sony because name brand media is supported by most DVD writers. Store and no-name media brands of media may be cheaper but do not always record or play back reliably.

I wrote up this entry because I got a lot of questions over the past few months about video preservation so I wanted to give people a link I could point them to so that I’d have an up-to-date recommendations for a product that I know works and provides an economical solution for analog-to-digital video conversion. Some people use a service for converting video tapes to DVD, but you’ll probably spend as much per tape you have converted as you will for the VC500. So if you get a capture device you may learn a valuable skill and have some fun in the process. Who knows, that next viral video may be on your shelf, just waiting for you to capture it and upload it to YouTube for audience to appreciate it. 😉

Fixing Dodge Durango Transmission Problems by Replacing Sensors

Share

I recently encountered a problem with my 1999 Dodge Durango’s transmission that was repaired by replacing some sensors. Whenever I discover the solution to a problem I’m having and figure that there are a number of others who may be having the same issue, I like to post the discovery on my blog.

I purchased my Durango new and it has been the most reliable and useful vehicle I’ve ever owned. I love it. So when the transmission started acting funny after about 130,000 miles, I began to think my luck had finally run out. I was impressed lately when I took it to a Grease Monkey, which is an oil change franchise common in Colorado, and learned that one of their other customers owns 2 Dodge Durangos of the same vintage as mine and each was approaching 300,000 miles with no major issues.


The transmission problems were especially worrisome because I’ve recently acquired a light weight camper (a 16′ Scamp) and have begun taking it on camping trips. I expect to be using it a lot in the future and that will include towing it up some pretty steep grades in the Rocky Mountains here in Colorado. So I need a vehicle I can rely on to handle the task.

Dodge Durango and Scamp 16

The issue I was having was most noticeable when I was starting out from a dead stop. The vehicle seemed to surge back and forth shifting up and down, with the RPM climbing and falling. It would do this for as long as I held the accelerator in the same place. It was almost like a positive feedback loop. But if I stepped down harder on the gas, the problem seemed to go away, instead of getting worse, which wouldn’t generally happen if something inside the transmission was at fault. When your transmission is sick and you ask more from it, it usually demonstrates the problem with even more enthusiasm. But that wasn’t happening in my case. It seemed like it couldn’t decide whether it needed to upshift or downshift at a particular speed which was in the 10-15 mph range.

I started searching for Dodge Durango transmission problems on Google and came across a YouTube video that showed a similar issue, except this guy was having his problem at 70 mph where the vehicle kept dropping into and out of overdrive. He said in his research he had read about transmission problems that could be related to both the throttle position sensor and the transmission speed sensor which are both relatively inexpensive and easy to change yourself. His video goes into detail on how to change the throttle position sensor and it looked quite easy.

I also found a website that talked about how to test the TPS using a volt meter. However, I found that the voltages were impossible to measure because the plug that connected to the TPS is all sealed up. So I reasoned, based on the description of the test, that the throttle position sensor was a simple potentiometer and the way to find a problem with it was to rotate it while watching the resistance level. By removing the plug, I was able to get alligator clips on the potentiometer’s left and center conductors and I carefully rotated the potentiometer from idle to maximum throttle by rotating the linkage on the throttle body. Ideally, it should read from about 800 ohms to 5 K-ohms and increase consistently while rotated in one direction.

Durango Throttle Position Sensor

Image of a 1999 Durango Throttle Position Sensor

The Sensor is easy to access on the side of the throttle body.

The sensor is easy to access on the side of the throttle body just under the air box.

Instead of smoothly increasing in resistance, I noticed a point around 1200 ohms where the resistance would increase, but then go DOWN about 200-300 ohms for a while, and then come back up even though I continued rotating in one direction. This defect would cause the voltage to do something similar, so I reasoned that the TPS was a likely candidate to be changed first.

These sensors are easy to find in local auto stores like O’Reilly, Autozone, NAPA, etc.. where they keep them in stock. My web search on the Autozone site assured me that the TPS333 (the model my 1999 Durango 5.9L used) was in stock at my local Autozone store. I picked it up for $34 including tax. It came with extra mounting screws, an O-ring, and a gasket. Although my existing sensor had no gasket, I figured it wouldn’t hurt to install it. It was very simple to remove the old one and replace it with the new one using a Torx T-25 driver. The only ‘tricks’ were that I needed to press in on a latching mechanism to remove the plug and that you have to rotate the part slightly as you install it to get the shafts to mate.

I rotated the linkage by hand to make sure it moved correctly and then I took it out for a test drive. At first, I thought that this had completely fixed the issue. However, it came back after a while so then I tried replacing the transmission speed sensor, a part that costs around $20 and requires a bit more effort to replace. It’s on the driver’s side of the transmission housing and I found it necessary to remove the plate that protects the transmission in order to get a wrench in closer to it. After I replaced that item, I noticed no difference.

I continued to drive the vehicle for a few more weeks and noticed that a new problem had emerged. Sometimes while accelerating, the transmission wouldn’t want to shift into a higher gear. It was frustrating while attempting to achieve highway speeds only to see the tachometer approach the red line. Usually, I could get it to shift by dropping it into 2nd gear with the shift lever, then back into drive and it would usually shift properly after that. This was an intermittent problem too, one that I feared would be hard to diagnose and fix.

The only other candidates that I could think of based on my research were the governor solenoid and governor pressure sensor. Unfortunately, these parts are inside the transmission and are a bit more expensive (about $80 for the sensor and $120 for the governor solenoid). Of course, that meant dropping the pan which is a messy job. I knew that the transmission was due for an oil change, and that I hadn’t ever had a proper oil change where they could access and change the filter (most shops today rely on a ‘transmission flush’, which means they suck out the old fluid and don’t actually change the filter). So I figured that I could combine a transmission fluid and filter change at the same time the governor solenoid and its sensor could be changed so I could more easily rationalize paying nearly $200 in labor to a shop instead of doing it myself.

I took the vehicle to the local AAMCO shop and explained what was happening and they agreed to test drive it with a scanner so they could monitor transmission oil pressure. What they found was that the pressure never got above 30 psi and this was causing erratic shifting, indicating that there was something wrong with the governor solenoid or its pressure sensor. These parts are nearly always changed at the same time since if one is bad, the other is probably also worn and you need to drop the pan to get to either one so it just makes sense to do them both at the same time.

I am happy to report that after spending another $450, the transmission is back to normal, shifting precisely when it should and hopefully ready for another 135,000 miles before needing any repairs. In the 15 years that I’ve owned this vehicle this is the only repair I’ve other than routine maintenance and since the vehicle was paid for long ago, I don’t feel too bad because people who replace vehicles every few years can end up spending that much monthly on a loan or lease payment.

In reading through several forums, I read a horror story where a Dodge dealership wanted to replace the entire transmission for a similar problem for around $4000 but the person declined and found fixed it by replacing the throttle position sensor. So I think it makes sense to try with the easy/inexpensive fixes first and then work up to the more difficult and expensive parts. At the least, you’ll have the peace of mind that all your sensors are good as new.

So if you have a Dodge Durango or Dodge truck based on the same chassis and you’re having transmission issues like I described, you may want to change these sensors to see if the fix works for you too. There’s too high a temptation for a dealership or transmission shop to want to ‘over repair’ and hence over charge for a simple issue like this.

Keeping Your Website’s Copyright Notice up-to-date

Share

I am often amazed at how some websites don’t manage to update the copyright notice at the bottom of the page to the current year. As I write this, I have hundreds of pages that have a copyright notice and in about 12 hours from now (since today is December 31st), they will automatically update to the year 2013 without me having to do anything. I noticed that when a new year arrives that for several months many websites will have the latest copyright date set to last year, and in some cases, they can be years out of date. When I see that, it makes me feel that someone is asleep at the switch.

Google uses more than 200 ‘signals’ to measure the influence of a page, and it would surprise me if they didn’t include the latest date in a copyright notice as something that might be of interest. Fresh content is king, and stale content is like two-day old bread and that’s why the bots never stop crawling your content. But to see a copyright that is years out of date on content that has obviously been updated today, well, it makes the site owner look like he’s just not paying attention to the details.

So, how does my copyright update without my intervention? Well all of my pages are sent through a PHP parser, and my copyright notice has this little snippet of PHP code:

Copyright &copy; 2001-<?php echo date(Y); ?> Lee Devlin

When it’s run through the PHP parser and rendered on a browser, it translates to:

Copyright © 2001-2024 Lee Devlin

I have that code in all my footers, both on my WordPress and static pages, and it updates the second date every year, without me having to think about it.

If you want to edit your footer, WP themes generally keep the code in a file called footer.php in the wp-content folder. Feel free to copy that code into your footer, you have my permission. Just remember to change it to your name ;-).

Flip-Pal Review

Share

I’ve found myself answering questions about the FlipPal for some of my friends who are interested in buying a portable scanner and so I thought I’d write up a review of it. I’ve owned a FlipPal for over a year have been advertising it on my website. The reason I promote it is because I think it’s a great product, but without an explanation, people don’t know how it would benefit them over owning a conventional scanner which you can get built into a printer these days.

Flip-Pal mobile scanner

The Flip-Pal mobile scanner

The Flip-Pal is a mobile scanner whose scan window is 5″ x 7″ which makes it great for scanning printed photos that were taken by film cameras. The resolution of the scans will allow you to produce images that are indistinguishable from the original and I find the image quality and color accuracy to be better than other digital scanners I’ve used. The images I have of my childhood are all on prints and if I want to share these photos I need to put them in digital format. And scanning a photo to a digital format is a good idea anyway for the sake of preservation, since printed photos will continue to degrade over time whereas digital files do not.

The Flip-Pal adds new life to your old photos

If you already have a scanner and you are comfortable using it to scan your photos, then there’s not as much incentive to getting a Flip-pal unless you need one or more of its unique features. The thing that differentiates this scanner is that it is battery powered and doesn’t need to be connected to a computer to work and that makes it very portable. It’s slightly smaller and lighter than an iPad so it’s easy to take with you. There are no other portable flat bed scanners like it that scan without having to be connected to a computer. It allows you to take the scanner to the photo, as opposed to bringing the photo to the scanner. That might be important if you have photos you want to scan, but the owner of the photos doesn’t want to part with them or risk sending them in the mail.

Could you use a digital camera to make a digital copy of a print photo? Sure, you could do that but the result would likely be a disappointment because it would look like a picture of a picture and you’d have to deal with focus, glare, distortion, and lighting issues. The Flip-Pal allows you to make high quality digital images of existing photos whereas a digital camera is very clumsy to use for that purpose and would produce a rather poor result.

I have an 8.5″ x 11″ flatbed scanner that is built into my printer. When I want to use it, I have to launch the scanner software and wait for a minute or two for it to start and then put the picture under the lid, click the mouse a few times, preview the image, resize the scan area (since the software always seems to guess wrong size), scan it, save it and if I have a few items to scan I find myself standing up, walking over to the printer and back to the computer, and sitting back down for each photo and it’s an inconvenience. The Flip-Pal scans directly to the SD card so you can do a bunch of scans and then later you can unload the photos and then crop, edit and rename them on your computer when you have time. This makes work flow associated with scanning multiple photos much more convenient. You can work your way through scanning a shoe-box full of photos or a photo album during the course of watching a TV show or having a phone conversation. It also has a feature that if the photo that is in an album with a protective transparency over it and removing it from the album could risk damage to it, you can flip the scanner over and scan the image through the transparency in the album. This is possible because you can see ‘through’ a window on the bottom of the scanner to align it on the photo (hence the name, Flip-Pal). It’s a lot easier than trying to put a large photo album on to a flatbed scanner where it almost always scans at a skewed angle and is prone to falling off or shifting during the scan. The FlipPal also boots up instantly so if you’re in a hurry to do a single scan, it’s much faster than a traditional flatbed scanner.

The SD card is probably the most common of all memory cards since many laptops have SD card readers built-in. The Flip-Pal also includes an SD reader that fits in your USB port just in case you don’t have a card reader on your PC. And using this technique to move the images around gets over the issue of being Mac vs. PC compatible. Both Macs and PCs can read its SD card format and jpg files with no problem.

I find that having my old photos in digital format makes them much easier to share. An old photo shared on Facebook is much more likely to get noticed because they bring back so many wonderful memories. Anyone can upload the latest images from a smartphone, and many do, but if you want to make someone’s day, show them an image from 40 years ago of their mom when she was a child, and that will get some attention.

An old picture posted to Facebook generates more interest than a recently-taken picture

Does it have any disadvantages? I would say that the 5″ x 7″ size can be a limitation if you want to scan a larger image. But it comes with ‘stitching’ software and so if the image is too large to fit in a 5″ x 7″ area, you can take several scans and have them stitched together on your PC using the included software. But I find it to be enough work that I generally will use my large scanner when the need arises to scan a large image.

Some people have commented about the small size of LCD screen, but it’s important to recognize this little screen is just part of a user interface, it’s not intended to render a high resolution image of the scan so you can’t compare it to a display on a smart phone. It’s there to make the device more convenient to use. If you want to share scanned digital photos, you’re not going to use the internal display to do it, you’ll still want to move them to your PC for viewing/editing/sharing.

I like the fact that the FlipPal requires no software to be installed on a PC to work. How many times have you upgraded to the latest operating system and found that it no longer supported your old printer or scanner because the manufacturer didn’t provide drivers for it? That can’t happen with the FlipPal.

The FlipPal is a great tool for anyone involved scrapbooking, archiving, or just for sharing the old family photo albums where it has found many ardent fans. I enjoy its convenience and simplicity. There’s nothing to learn, just press one button and you’re up and making scans in no time. If that sounds appealing, head on over to the FlipPal website and get yours today.