Fixing Dodge Durango Transmission Problems by Replacing Sensors

Share

I recently encountered a problem with my 1999 Dodge Durango’s transmission that was repaired by replacing some sensors. Whenever I discover the solution to a problem I’m having and figure that there are a number of others who may be having the same issue, I like to post the discovery on my blog.

I purchased my Durango new and it has been the most reliable and useful vehicle I’ve ever owned. I love it. So when the transmission started acting funny after about 130,000 miles, I began to think my luck had finally run out. I was impressed lately when I took it to a Grease Monkey, which is an oil change franchise common in Colorado, and learned that one of their other customers owns 2 Dodge Durangos of the same vintage as mine and each was approaching 300,000 miles with no major issues.


The transmission problems were especially worrisome because I’ve recently acquired a light weight camper (a 16′ Scamp) and have begun taking it on camping trips. I expect to be using it a lot in the future and that will include towing it up some pretty steep grades in the Rocky Mountains here in Colorado. So I need a vehicle I can rely on to handle the task.

Dodge Durango and Scamp 16

The issue I was having was most noticeable when I was starting out from a dead stop. The vehicle seemed to surge back and forth shifting up and down, with the RPM climbing and falling. It would do this for as long as I held the accelerator in the same place. It was almost like a positive feedback loop. But if I stepped down harder on the gas, the problem seemed to go away, instead of getting worse, which wouldn’t generally happen if something inside the transmission was at fault. When your transmission is sick and you ask more from it, it usually demonstrates the problem with even more enthusiasm. But that wasn’t happening in my case. It seemed like it couldn’t decide whether it needed to upshift or downshift at a particular speed which was in the 10-15 mph range.

I started searching for Dodge Durango transmission problems on Google and came across a YouTube video that showed a similar issue, except this guy was having his problem at 70 mph where the vehicle kept dropping into and out of overdrive. He said in his research he had read about transmission problems that could be related to both the throttle position sensor and the transmission speed sensor which are both relatively inexpensive and easy to change yourself. His video goes into detail on how to change the throttle position sensor and it looked quite easy.

I also found a website that talked about how to test the TPS using a volt meter. However, I found that the voltages were impossible to measure because the plug that connected to the TPS is all sealed up. So I reasoned, based on the description of the test, that the throttle position sensor was a simple potentiometer and the way to find a problem with it was to rotate it while watching the resistance level. By removing the plug, I was able to get alligator clips on the potentiometer’s left and center conductors and I carefully rotated the potentiometer from idle to maximum throttle by rotating the linkage on the throttle body. Ideally, it should read from about 800 ohms to 5 K-ohms and increase consistently while rotated in one direction.

Durango Throttle Position Sensor

Image of a 1999 Durango Throttle Position Sensor

The Sensor is easy to access on the side of the throttle body.

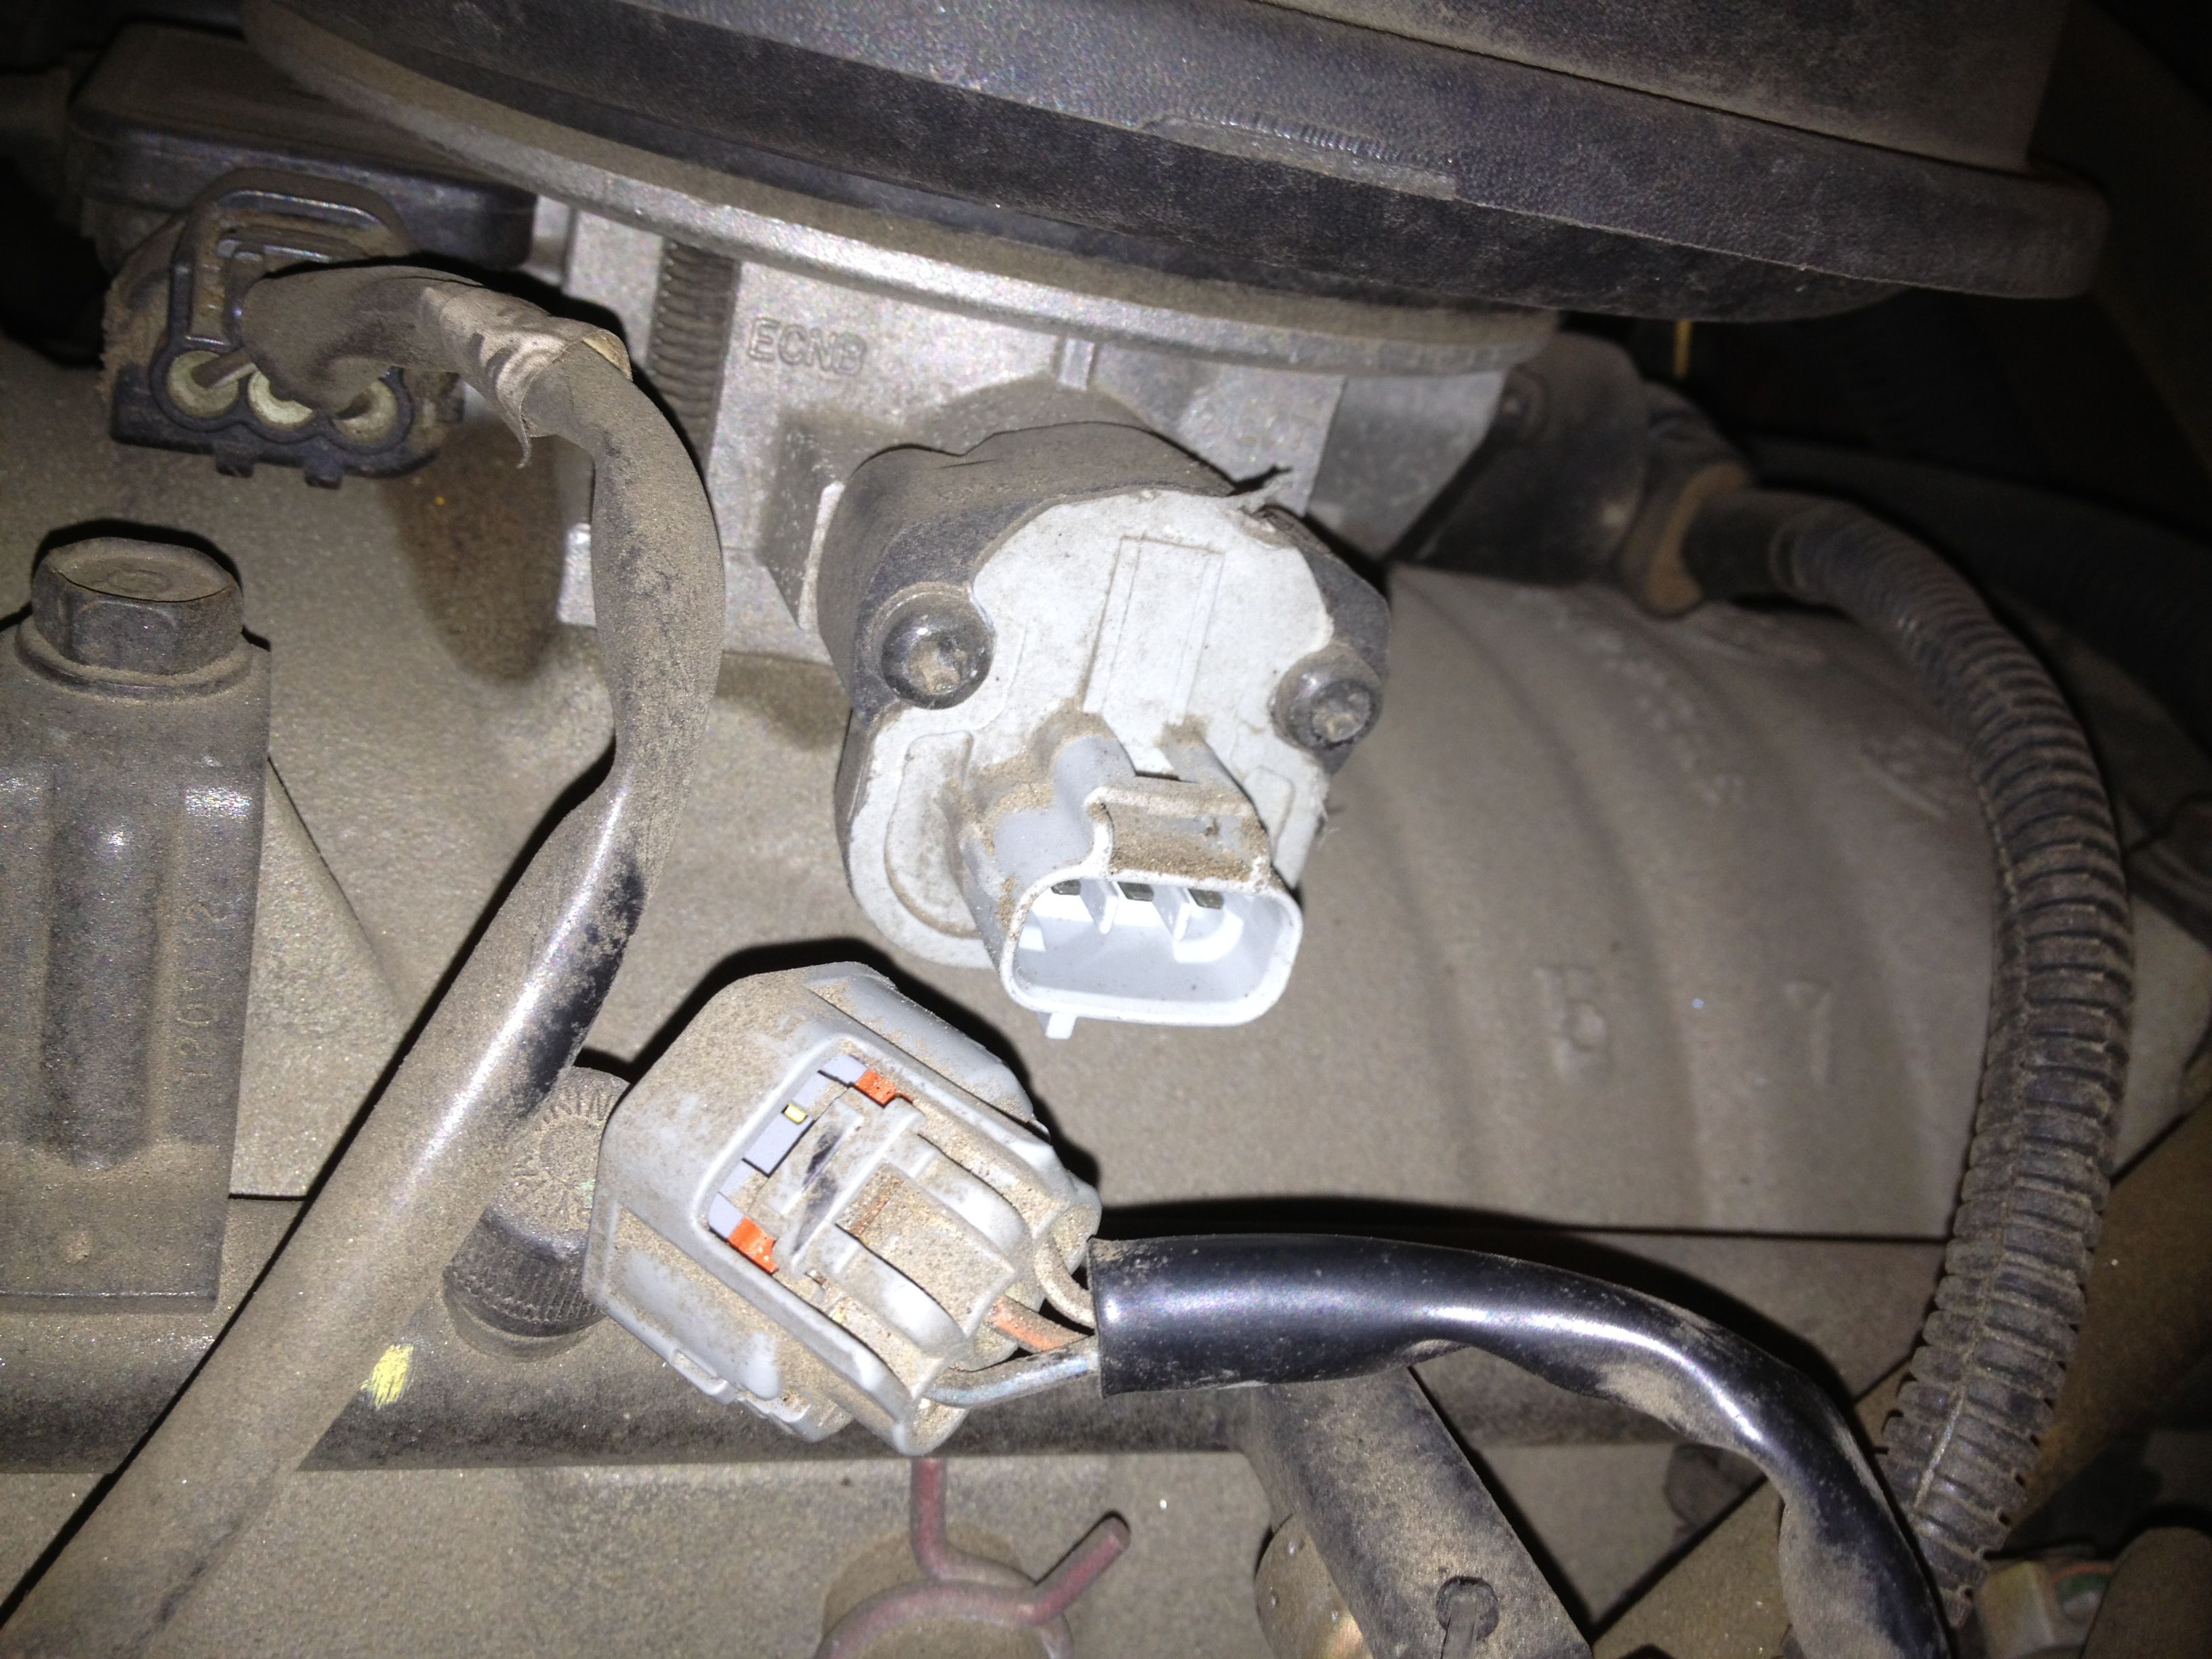
The sensor is easy to access on the side of the throttle body just under the air box.

Instead of smoothly increasing in resistance, I noticed a point around 1200 ohms where the resistance would increase, but then go DOWN about 200-300 ohms for a while, and then come back up even though I continued rotating in one direction. This defect would cause the voltage to do something similar, so I reasoned that the TPS was a likely candidate to be changed first.

These sensors are easy to find in local auto stores like O’Reilly, Autozone, NAPA, etc.. where they keep them in stock. My web search on the Autozone site assured me that the TPS333 (the model my 1999 Durango 5.9L used) was in stock at my local Autozone store. I picked it up for $34 including tax. It came with extra mounting screws, an O-ring, and a gasket. Although my existing sensor had no gasket, I figured it wouldn’t hurt to install it. It was very simple to remove the old one and replace it with the new one using a Torx T-25 driver. The only ‘tricks’ were that I needed to press in on a latching mechanism to remove the plug and that you have to rotate the part slightly as you install it to get the shafts to mate.

I rotated the linkage by hand to make sure it moved correctly and then I took it out for a test drive. At first, I thought that this had completely fixed the issue. However, it came back after a while so then I tried replacing the transmission speed sensor, a part that costs around $20 and requires a bit more effort to replace. It’s on the driver’s side of the transmission housing and I found it necessary to remove the plate that protects the transmission in order to get a wrench in closer to it. After I replaced that item, I noticed no difference.

I continued to drive the vehicle for a few more weeks and noticed that a new problem had emerged. Sometimes while accelerating, the transmission wouldn’t want to shift into a higher gear. It was frustrating while attempting to achieve highway speeds only to see the tachometer approach the red line. Usually, I could get it to shift by dropping it into 2nd gear with the shift lever, then back into drive and it would usually shift properly after that. This was an intermittent problem too, one that I feared would be hard to diagnose and fix.

The only other candidates that I could think of based on my research were the governor solenoid and governor pressure sensor. Unfortunately, these parts are inside the transmission and are a bit more expensive (about $80 for the sensor and $120 for the governor solenoid). Of course, that meant dropping the pan which is a messy job. I knew that the transmission was due for an oil change, and that I hadn’t ever had a proper oil change where they could access and change the filter (most shops today rely on a ‘transmission flush’, which means they suck out the old fluid and don’t actually change the filter). So I figured that I could combine a transmission fluid and filter change at the same time the governor solenoid and its sensor could be changed so I could more easily rationalize paying nearly $200 in labor to a shop instead of doing it myself.

I took the vehicle to the local AAMCO shop and explained what was happening and they agreed to test drive it with a scanner so they could monitor transmission oil pressure. What they found was that the pressure never got above 30 psi and this was causing erratic shifting, indicating that there was something wrong with the governor solenoid or its pressure sensor. These parts are nearly always changed at the same time since if one is bad, the other is probably also worn and you need to drop the pan to get to either one so it just makes sense to do them both at the same time.

I am happy to report that after spending another $450, the transmission is back to normal, shifting precisely when it should and hopefully ready for another 135,000 miles before needing any repairs. In the 15 years that I’ve owned this vehicle this is the only repair I’ve other than routine maintenance and since the vehicle was paid for long ago, I don’t feel too bad because people who replace vehicles every few years can end up spending that much monthly on a loan or lease payment.

In reading through several forums, I read a horror story where a Dodge dealership wanted to replace the entire transmission for a similar problem for around $4000 but the person declined and found fixed it by replacing the throttle position sensor. So I think it makes sense to try with the easy/inexpensive fixes first and then work up to the more difficult and expensive parts. At the least, you’ll have the peace of mind that all your sensors are good as new.

So if you have a Dodge Durango or Dodge truck based on the same chassis and you’re having transmission issues like I described, you may want to change these sensors to see if the fix works for you too. There’s too high a temptation for a dealership or transmission shop to want to ‘over repair’ and hence over charge for a simple issue like this.

Replacing the plug on an Etymotics headset

Share

I’ve owned an Etymotics ER6i in-ear headset for several years now and have been very satisfied with it. I use it for motorcycling, bicycling, mowing the lawn, and any other activity where ambient noise would otherwise drown out the audio from a standard set of earbuds.

Recently the left earphone began cutting out. By wiggling the wires near the plug I determined that the problem was near or inside the plug. I briefly contemplated purchasing a replacement headset, but then I recalled how much they cost, and it was close to $100.

There were a few resources on the web that showed how to fix a bad connection inside the etymotics earbuds, but I found nothing about how to replace the plug, so I decided to write up my experience here.

I already had a solder-on 3.5 mm plug in my parts bin and, although it was a 4-conductor plug, I figured it would work fine with my iPhone, since it uses a 4-conductor jack to mate with the Apple headsets with integral microphone. I just wouldn’t need to solder anything to the microphone ring. If I didn’t already have a plug, I would have used a 3-conductor stereo 1/8″ (3.5 mm) plug, which is available at RadioShack for a few dollars.

The ER6i cords are independent, but I didn’t know what to expect when I cut them off and stripped them. If I had to deal with coaxial braid, that was going to be a pain, but upon cutting the plug off and stripping the wires, I was pleased to find that each cord contained a pair of conductors, both made with fine stranded wire. Each cord had one wire that was color coded along with a bare copper wire carrying the ground. Upon some testing, I found that the red and green wire carried the right and left channels, respectively.

The green and red stranded wires are coated with an insulating material much like magnet wire that’s so thin you can see through it so even though the colored wires looked metallic and like they would be conductive, they were not. You need to tin the colored wire with a small solder blob to simultaneously burn off the insulating material and make a point where you can solder to. I was worried that the red/green wires would touch each other or the ground wire and short, but they won’t short as long as you don’t tin too much of the insulating material.

etymotics cords with conductors

Both copper wires can be twisted together (sorry for the picture focus)

This is what the wires looked like before I soldered them into the plug. The bare copper wires from each cord are twisted together and will be soldered to the ground lug.

iphone jack pinout

You need to use an ohmmeter to confirm which solder tabs are connected to the rings and tip of the plug prior to connecting each wire with a small amount of solder. I found it best to put a small amount of solder on the wires and on the solder tabs on the plug first and then just bring the wire and lug together and touch it with a very sharp-tipped soldering iron.

Plug strain relief installed.

Finished repair, good as new.

It was great to have a working set of earbuds again and if it ever breaks, I won’t hesitate to repair it again.

Cleaning Your Laptop’s Heatsink to Solve Overheating Issues

Share

In the past few months I’ve run into a number of people who have experienced problems with their laptops running hot. I had an HP/Compaq nx6110 laptop sitting in a drawer that I recalled had been exhibiting the same issue. I wanted to loan it to my nephew to use during a visit and I thought I’d take the opportunity to put in a new battery and check to see the if I could find the root cause of the overheating issue.

I had checked a number of sites on the web that talked about overheating issues with laptops, but none of them talked about the potential for the fan/heatsink assembly to collect dust and block the airflow through the heatsink. If you think about it, most laptops operate like a vacuum cleaner in that they suck air up through a hole in the bottom of the case and blow it out the side. The air must flow through a radiator with fins that can collect lint, dust, pet hair and anything else that it might find in ample quantities when the laptop is placed on a carpet, blanket, or your lap. So the odds are pretty good that if you’ve had your laptop for any length of time, dust has accumulated inside and has negatively affected the heatsink’s ability to remove heat from the CPU.

In preparation for removing the fan from the laptop, I downloaded a PDF of HP nx6110 service manual from the HP website. You can do a Google search for your laptop’s model and the words, ‘service manual’ to see if the manufacturer makes the service manual available online. You may notice that removing the fan seems to require all kinds of parts to be taken off the laptop since they seem to cover everything else first, but in my case, it only involved removing the keyboard, which turned out to be quite easy.

The steps were:

1. Remove battery and the cover for the memory (1 Phillips screw).
2. Remove 2 T8 Torx screws exposed after the memory cover is removed. These screws hold in the keyboard.
3. Slide four latches on the keyboard downward to release the keyboard.
4. Remove the fan (2 Phillips screws).

Although I removed the fan and keyboard cables, I found out later that I really didn’t need to do this to get at the heatsink, you can simply lay them over as long as you’re careful not to move them and put strain on the cables.

I’ve attached some images of the fan and heatsink below. Click on any image for a higher resolution version of it.

HP nx6110 fan

Removal of the keyboard exposes the fan/heatsink

As you can see from the picture above, the fan is exposed once the keyboard is removed. It doesn’t appear to be too dirty, but the dust is hidden between the fan and the heatsink.

HP nx61110 heatsink

Heasink with dust

Now that the fan has been removed, you can see that there is a lot of dust that has accumulated on the heatsink. You can use a brush to remove the dust and then blow it out with compressed air.

HP nx6110 heatsink

Heatsink after cleaning

The dust that had accumulated on the heatsink caused the air to be blocked and so the air that does get through is very hot since a smaller portion of the heatsink is being used to remove the heat. It can also increase the velocity of the air because it’s forced through a smaller restriction. Eventually, however, if it’s not cleaned, the heatsink will no longer be able to do its job at all and the computer could shut down due to overheating.

Once the heatsink was cleaned, the air that exited the vent was much cooler, and the fan didn’t need to work as hard to keep the CPU cool (around 45 °C). In doing some research, I found that the BIOS was using various CPU temperature thresholds to determine when to turn the fan on and when to increase its speed. In my case, the BIOS was original and it was turning the fan on at 40 °C, and so I decided to see if any improvements were possible by updating the BIOS. Sure enough, a newer BIOS available from HP’s website had raised this limit to 45 °C which turned out to be much better, since that is the temperature where the CPU tends to stabilize when it’s at idle and so the fan stays off unless you’re doing something that causes the CPU to become busy.

I have a friend with an HP laptop dv6 model and it had an overheating problem that was so severe that it would reach 90 °C and shut itself down whenever she used it for more than 15 minutes. After searching through forums for many weeks she finally came across a thread that suggested updating the video driver and the BIOS to fix an overheating issue. That turned out to be the fix in her case. Now her computer runs very cool. So make sure you’re running all the latest updates from the manufacturer.

If you clean your heatsink and your overheating problems persist, you may want to check and see if there are any processes that are keeping the CPU busy all the time. Any time the CPU utilization goes up, the fan will come on at a higher speed. You can use Windows built-in Task Manager to do monitor CPU utilization by pressing CTL-ALT-DEL keys simultaneously. A better solution than Task Manager for examining CPU utilization is the Process Explorer which is free for downloading from Microsoft. I also downloaded a free utility to monitor the CPU temperature called Core Temp. I found that I had multiple virus scanners running (you only need one of these) and some other processes I didn’t need, so I removed the software responsible for running these processes.

I found that although Core Temp was helpful, it sometimes interfered with the BIOS in reading the temperature of the CPU. A better program for measuring CPU temperature on this model of laptop was Speedfan.

can of compressed air
If taking your computer apart sounds frightening to you, or if you have a laptop where absolutely everything must be removed to get to the heatsink, then another option is to use a can of compressed air that you can buy at any office store and blow air backward through the fan’s vent. Feel for which direction the fan blows and determine where it’s exhausting the warm air. Then shut down the computer and aim the straw into the exhaust vents and if you see dust coming out through the intake vents, then you’re making progress. When dust collects on the heatsink, it continues to attract more dust like a log jam in a river. Blowing the air backward through the vent can clear this log jam.

Damaged Photo Restoration Service

Share

A few months ago, my friend Don showed me a picture he had of himself as a young boy along with his younger sister and older brother. Don will turn 80 this year and it appears he was about 5 in the photo, so it was about 75 years old. The photo had some damage from creases, missing areas, and a few dark spots and he wanted to get it restored but didn’t want to let go of the original since it was irreplaceable. He had an photo scanner sitting next to his computer, so I scanned in the original and emailed it to Jay Yozviak at Photography by Jay, who is the premier photographer in Northeastern Pennsylvania. I figured he’d know of a reliable service where the photo could be sent and restored to remove the defects it had accumulated over its 75 year life. You can see an image of the original photo here (you can click on images for higher resolutions versions of them):

Damaged photo needing restoration and touchup work

photo before restoration

I know that Jay is very capable with PhotoShop but didn’t realize that he also does photo restoration as part of his photography business. In a few days, Jay had restored the image and sent back the results. My friend was extremely pleased with how it turned out. As you can see below, the defects are gone.

damaged photo restored

photo after restoration

He also made up a framed version of the image in black-and-white:

old image converted back to black and whilte

Original image converted back to black and white

If you’d like to get a quote on getting your irreplaceable photos restored to their original condition, you can contact Jay at:

Photography by JAY
284 Dennison Street
Swoyersville, PA 18704
570-288-1706

If you’re curious how photo restoration is done, here’s a time-lapsed video of someone doing it on YouTube. The video is only a few minutes, but it shows about 6 hours of work: