The LightSquared Debacle in Layman’s Terms

Share

I’ve been reading about the LightSquared debacle for months. My aviation-related sources have been covering the GPS industry’s objection to LightSquared and how it would be disastrous for the GPS receivers, essentially causing a loss of satellite lock or at minimum causing accuracy issues that could lead to disaster. The story received a boost in interest when it was found that there was some political chicanery associated with the White House administration pressuring a reversal in the testimony of an Air Force general. It’s hard to ferret out the underlying reason how this problem got this far, with so much money being invested in a technology that LightSquared should have known would hit a wall during its deployment, namely when it produced interference with a critical service like GPS that is adjacent to its bandwidth allocations. So I decided to do some research and summarize it here.

The problem of radio interference isn’t new. The FCC and similar organizations in other countries were created primarily to help prevent interference problems by licensing radio spectrum and settling disputes among the radio spectrum’s users. All radio transmitters generate some amount of radio frequency (RF) energy on adjacent bands. All receivers are influenced by signals that are in adjacent bands because there is no such thing as a perfect filter to ignore nearby signals. So one must ask the question, is this an interference problem on the part of LightSquared, or a susceptibility problem for the GPS manufacturers? And since there is no such thing as a perfect filtering technique, how much can it help to apply filters to GPS receivers? Can the problem be solved with a 5-cent change to GPS receivers as suggested by LightSquared, a solution promptly dismissed as absurd by the GPS industry? I can tell you one thing that does not work, and that is to expect an industry to accept a problem introduced by some third party AFTER its products have already shipped and are in the hands of its customers. Sure, you can ask for a change to future products, assuming the change actually produces the desired result and isn’t too costly, but if an industry is entrenched, and I think that after 2 decades of shipping millions of products, GPS can be categorized as such, you can’t expect them to accept a problem that wasn’t a problem until your service came along.

Nor can you expect all existing customers to ‘upgrade’ their equipment just to solve some newly introduced interference issue. Yet this is apparently what LightSquared was expecting. And I find that attitude arrogant and ridiculous. Anyone whose money is invested in a technology that expected such a system to work should expect to see his investment lost by those who dismissed or talked around these issues when they were first brought up.

One might tend to lay the blame on LightSquared and its naivete, but I think the FCC is just as culpable. The FCC needed to realize that any service that occupied frequencies adjacent to GPS must necessarily be compatible with it. GPS satellites transmit signals from a distance of about 12,500 miles above the earth. Because of this vast distance, the signals are at a very low level once they arrive on earth, about -130 dBm (which is about 180 x 10^^-18 Watts). The land-based LightSquared 4G transmitters can use as much as 70 dBm (10,000 Watts). So you can see that there is a vast difference of roughly 2 x 10^^20 in signal strength between the two services. The low signal strength is one of the reasons why most Space-to-Earth signals require dishes or other types of high gain antennas pointed at the satellites to amplify only those signals and simultaneously ignore any signals originating from other directions. But GPS receivers cannot do that. First of all, the constellation of 24 satellites is in constant orbiting motion, and secondly, a GPS receiver needs an antenna that can receive from several satellites at once in order for it to do its job so it cannot use a directional antenna. A GPS receiver has none of the amplification and signal isolation benefits provided by a directional antenna. This means that the signals that a GPS receiver has to deal with are extremely weak, and are actually below the noise floor, and must be dug out of this noise floor using sophisticated signal processing techniques.

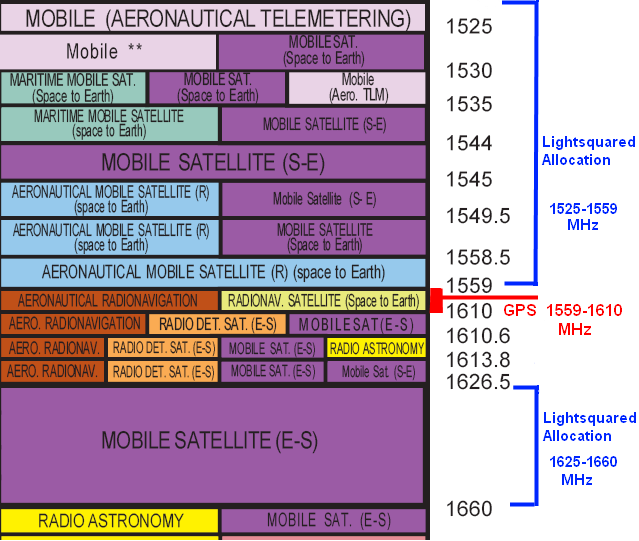
GPS and LightSquared satellite allocations

As shown in the graphic above, (source) the bands adjacent to the GPS spectrum were intended to be used for similar purposes, that is to send signals from space to earth or earth to space, and based on what I’ve been reading about LightSquared, this was how they intended to use the spectrum initially. But most broadband solutions that depend on satellites are not very compelling due to the 44,000 mile round trip the signals they need to make to the geosynchronous satellites. This trip adds about a half second delay which is too high a latency to provide a satisfactory experience compared with terrestrial broadband solutions, especially with modern Internet applications some of which cannot tolerate that kind of latency. People tend to use satellite broadband only when there are no terrestrial broadband offerings in their area.

In 2004, presumably to make its service more financially attractive, LightSquared’s predecessor lobbied for and received authorization by the FCC to deploy thousands of land-based transmitters in the same frequency range as their satellite-to-earth band. I think that this authorization from the FCC is where things went awry. LightSquared, when it was a space-based wireless service that could hypothetically offer 100% coverage over the U.S. had a formidable calling card, namely that it could provide mobile wireless service to previously under-served rural areas. Telling a government bureaucrat that you’re going to provide ‘service to rural and the under-served’ is tantamount to telling them you’re going to cure world hunger or help the blind to see. Everyone knows there is little or no profit in serving the under-served, it just makes for a good story to soften up government bureaucrats so they’ll grant you favors. Indeed, earlier this year, the FCC allowed LightSquared to offer devices with just the terrestrial capability, making them nothing more than just another mobile wireless provider, which might be viewed as a clever bait-and-switch maneuver since those devices would no longer have the large size and expense of a hybrid phone. This would allow them to rake in some real profits by taking business away from the incumbents of lucrative mobile wireless services rather than being just some quirky satellite phone and data service.

So more than any other factor, it was the decision to take its space-based frequency allocation and have the FCC re-authorize it for terrestrial transmitters that made it incompatible with GPS receivers. Even a very low-power transmitter that is in close proximity to a receiver will have signal strength that is many orders of magnitude stronger than one that is located 22,000 miles away. But if you can influence politicians by explaining away the problem, and hoping that the GPS industry looks upon it as an opportunity to force their customers to purchase new receivers that deal with the interference, then it would be a win-win for all parties, except those who have to buy new GPS receivers, namely consumers, who have no lobbyists to protect them. But it appears that all the hand waving about potential technical solutions may not make the GPS interference problem go away. There may be no filtering technique available at any cost that would fix it and still allow a GPS receiver to maintain the accuracy customers rely on. And so, in order for a company and its investors to enrich themselves, they appear to have no qualms about completely destroying another much larger industry that provides an invaluable service to many sectors of the economy. Some might think of this as free market capitalism. I think of it as sociopathic behavior so extreme that it makes me ashamed for the company and the politicians who did the company’s bidding.

I have to wonder whether it’s even possible to provide an economical hybrid mobile wireless device that can be used with geosynchronous satellites and land-based cells. Iridium provides mobile phone service based on satellites, although that service nearly went broke and was only revived when its multi-billion dollar investment in satellites was picked up for pennies on the dollar. But Iridium is a completely different technology since its satellites are in low earth orbit, just 485 miles above the earth, and so the distance is about 2% as far from the earth as a geosynchronous satellite thereby requiring much less power from the mobile device to establish a connection. But these phones and service are very expensive compared with standard mobile phones. The phones tend to be large and bulky and cost upward of $1200. The service is metered at $1.30/min or more in addition to a $50 monthly fee. Compared with standard mobile phones this would not be a competitive offering, so getting the go-ahead from the FCC to have terrestrial transmitters was a key win for LightSquared because a phone that communicated with geostationary satellites would be very large, power hungry, and costly.

The amount of power and antenna you’d need to communicate with a geosynchronous satellite would be difficult to implement in a handheld device that fits in one’s pocket, if it could be done at all, unless they intended for it to go through some form of a roof-mounted gateway. But then it wouldn’t really a true hybrid mobile device as this service had been promoted. And you couldn’t use a satellite handset from inside a car or house without a roof-mounted antenna and transceiver due to blockage of the satellite signals, making the service appear like something that may feel like a throwback to 1980’s technology.

Hughes has offered a satellite/terrestrial mobile phone solution called GMR1-3G for some time. The hardware looks like something you’d need if you were deployed to some remote corner of the earth. In fact, LightSquared initially had planned to use that service before switching to something called EGAL which stands for Earth Geostationary Air Link from Qualcomm. EGAL appears to be some new hypothetical hardware/service that has yet to be deployed. Interestingly, Qualcomm is the company that came up with the estimate of 5 cents for the filter that would fix the GPS issue.

It is usually not a good sign when a company gathering large sums from investors is basing its future success on a yet-to-be proven technology while simultaneously ramrodding its agenda by forcing a government agency to grant approval and thumbing its nose at its spectrum neighbors. These folks need a wake-up call. Maybe the sound of a few billion dollars of their investment swirling around a drain will provide that wake up call for Lightsquared and its investors and anyone foolish enough to embark on a similar venture in the future.

UPDATE (2011-11-11) If you would like to know more about the testing that was done that showed the significant interference on GPS receivers, the Coalition to Save our GPS has a complete list of test reports on their website. The summary is that during these tests, nearly all GPS devices tested couldn’t receive a signal when they were within a few miles from the tower, even though the LightSquared transmitter was operating at 10% of the power they would be permitted to use. In addition, LightSquared claimed that if they simply moved their signals to the first 10Mhz of their allocated bandwidth, then 99% of the GPS receivers would not have been affected, even though there is not a single shred of evidence from this test that would support that claim.

Panasonic Phone Cannot Find Base – solution

Share

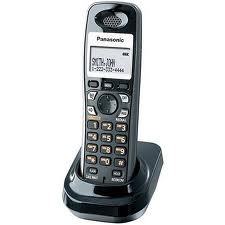
panasonic kx-tga931tWe got a set of 4 Panasonic DECT-6 wireless phones (Models KX-TGA931T) a few years ago and they worked beautifully at first. But after a while, the phones began to exhibit an annoying behavior when we attempted to answer a ringing phone where it would display a message that it lost its connection to the base after a single ring, making it impossible to pick up the call. The other phones continued to ring normally. Sometimes repeatedly pressing on the ‘Talk’ key would get it to answer the call, but it became are real annoyance because it always seemed to happen to the phone that was the closest to answer.

Upon searching the Internet, I found many people complaining about the same issue. I read through a number of forums and found that although it was a rather common problem, there was not a consistent sure-fire solution. One solution suggested unplugging the power to the base unit temporarily, but that didn’t fix the issue, at least in my case. Even the Panasonic website was of no help despite having numerous complaints of the problem in its reviews. I had tried replacing the batteries in one of the phones, but even the one with fresh batteries would still misbehave. However, I had used a cheap set of NiMH batteries from Harbor Freight that were a few years old, and so maybe I exchanged one bad set of batteries for another. The amount of talk time available when the phone worked didn’t seem to indicate the batteries were worn out. Sometimes one of the handsets would not charge fully, and it would be warm to the touch when taken out of the cradle. But then later, it appeared to charge to full capacity according to the battery icon.

Eventually, I grew so tired of the problem that I ordered fresh batteries for all 4 phones. I got them from Batteries America, by ordering the high capacity Sanyo AAA NiMH batteries (P/N HR-4U-1000). I’ve had good luck dealing with Batteries America, especially for things like rechargeable batteries for older ham radio and aviation hand held transceivers. They also carry custom rechargeable batteries for equipment that is no longer available even from the original manufacturer of the product.

I am happy to report that by changing all of the batteries, the problem has gone away. Better yet, the new batteries have 50% more capacity than the original Panasonic 650 mah batteries and will last many hours between charges.

These phones have this difficulty when one or both of the batteries wear out, which all rechargeable batteries tend to do after a year or two of use. It’s not unusual for a new rechargeable battery to be weak if it had been on the shelf too long prior to using it so make sure to purchase your batteries from a reliable source only when you need them. The charging circuitry in the phone is not effective at notifying the user of weak batteries. If you experience this issue, I’d recommend getting a new set of high quality NiMH batteries for all of the phones and keeping track of when you replace them, because when they wear out, the phone will not give you any clue about what’s wrong other than this inexplicable problem where its connection to the base becomes flaky along with contradictory evidence that would seem to indicate that the batteries are not the issue.

[UPDATE: 2013-01-20] I just wanted to follow up to say that after nearly two years of using the Sanyo batteries, we still have not experienced a single ‘cannot find base’ issue. So I’m even more confident that this issue was battery-related and compounded by the phone’s battery charge status to properly identify the problem.

Commuting Like George Jetson

Share

Jetsons flying car

I knew from watching the cartoon, The Jetsons that when I grew up, commuting would be fun. Surely, by that time all the technology showcased on that cartoon would have arrived. But sadly, much of the Jetsons technology is still missing, especially the flying cars. But lately, I’ve been using George Jetson’s approach to commuting that has made a 108 mile round-trip commute that I do several times a week not just tolerable, but enjoyable.

Here are a few rules I follow to make my commute more enjoyable:

  • Ignore roads, travel in a straight line.
  • Don’t take a route that has traffic lights, stop signs, or other commuters.
  • Travel at twice the maximum speed limit, say, 150 mph or so.
  • Stay 2000′ above other commuters.

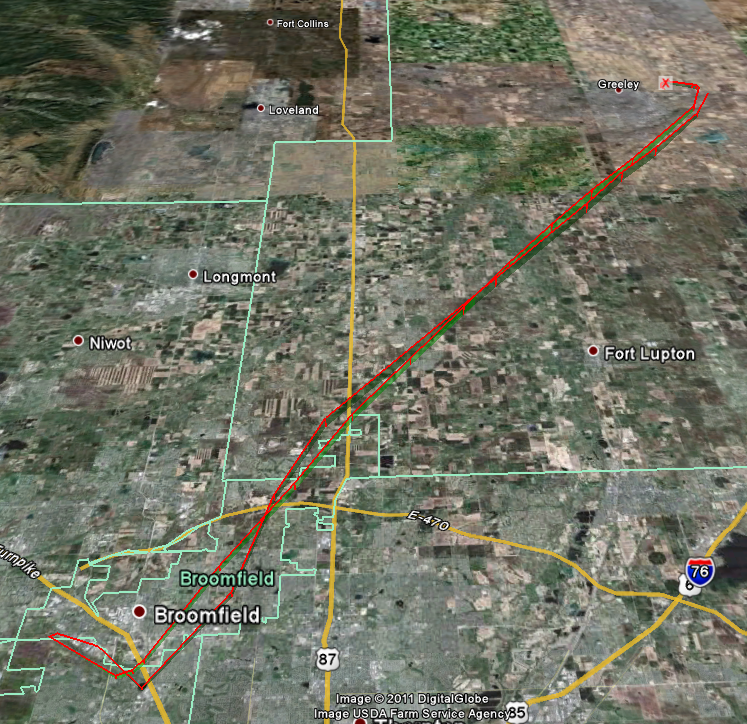
APRS Google Earth of k0lee

APRS track of my commute from Greeley to Rocky Mountain Metro Airport


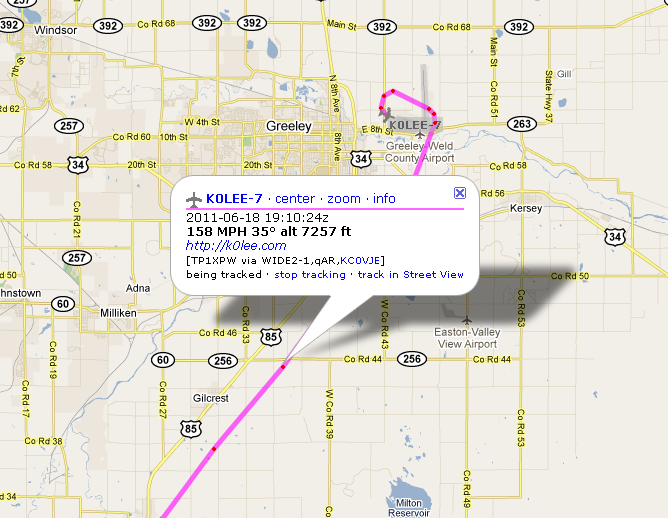
APRS of K0LEE-7 beacon

Note speed - 158 MPH

I guess you can tell by the images that I’m talking about commuting using my airplane. This works for me because one of my consulting clients is based at an airport so I don’t need ground transportation after I arrive. One of my colleagues actually lives on an airport, so he has the benefit of commuting door-to-door using his airplane alone. I have to drive 10 miles to the local airport first before I can hop in the plane…. but if I could only figure out how to take off from my back yard….:-)

Fixing a Sony Wega with a 6 or 7 blink code

Share

One day I returned home only to find that our Sony Wega TV (Model KV34HS420) was no longer working. It would respond to the remote control and begin to start to turn on, but then it would make a clicking sound and turn itself off before a picture appeared on the screen. After that, the standby/timer LED would continue blinking 6 or 7 times. This blinking LED is a diagnostic code, but its description of the potential issue provided little value. After reading a few dozen postings on the issue, a pattern began to emerge that made me hopeful that I could repair it myself.

We purchased this TV in 2005 while the jury was still out about which flat panel TV technology would eventually replace the tried-and-true CRT technology. Back then, the LCD and plasma flat panel displays still had viewing angle and reliability issues and cost 2 or 3 times as much as an equivalent-sized CRT model and so we just decided to replace our 15-year-old Sony CRT TV with a modern HD-capable CRT TV. I was hoping to get 15 years or more out of this $1500 investment before having to send it to the landfill. After all, this was a SONY, not some no-name brand that I’d expect to fail after only a few years. And tube TVs usually last a very long time. I have one in my basement I purchased in 1985 that is still working fine.

This TV has excellent picture quality and no restrictions in viewing angle, and other than its size and weight, I found it much better than what was available with flat panel technologies at the time. Its speakers provide excellent sound quality, much nicer than the tinny sound produced by some of the razor-thin flat panels. It sits in a corner and therefore takes up no more room than an equivalent size flat panel display. So, after only 6 years, I was wondering whether it would need to be replaced or if I could fix it. After a fair amount of forum reading, I found that this 6 or 7 LED blink code was a rather common problem, along with a common solution, namely to replace the MCZ3001DB integrated circuits known as IC8002 and IC6501 on the ‘D’ board. This chip is functionally identical to earlier versions of it known as MCZ3001D or MCZ3001DA. The forums had many people describing their success at making the repair, but pictures of this procedure were non-existent, hence the reason for this blog posting. Also, the level of difficulty and amount of work involved was not clearly described, so I hope to explain and show what I did so the reader can determine whether it is within his or her skill level to attempt this repair.

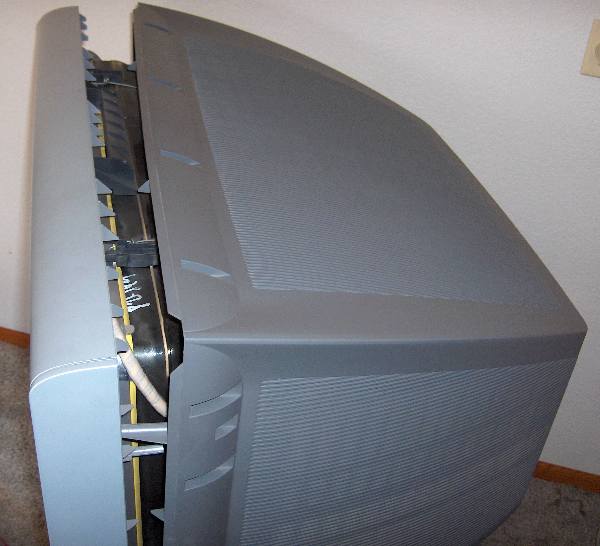
This TV weighs 200 lbs. I didn’t want to have to move it from its stand. Fortunately, it was possible to remove the entire back shell simply by removing all of its screws and sliding it off. There are a lot of screws, about a dozen around the periphery of the TV along with several more on the back panel, but fortunately, it’s a one-person job although it wouldn’t hurt to have a helper because the shell, although fairly lightweight, is bulky. Removing the shell allows access to the ‘D’ board.

After removing about a 17 screws, the rear shell can be slipped off.

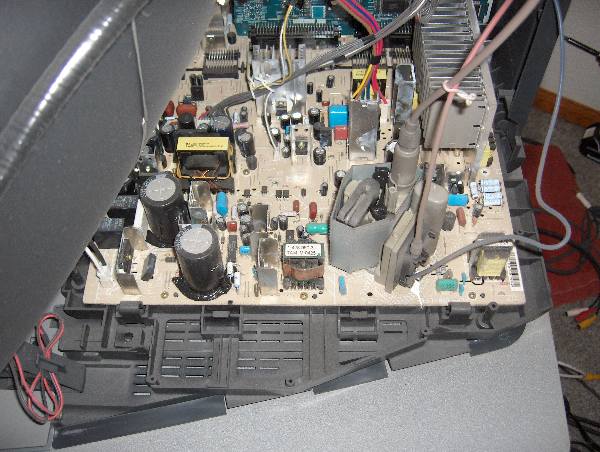
The ‘D’ board is the one shown in the picture below. I should mention that before removing the cover, you must unplug the TV and give it a few hours for the high voltages to dissipate so as to avoid shock hazards. It’s best to unplug it and wait overnight, since if the TV is not working so there’s no need for it to remain connected to power.

Sony Wega 'D' board

The 'D' board shown above is held in with about 8 screws.

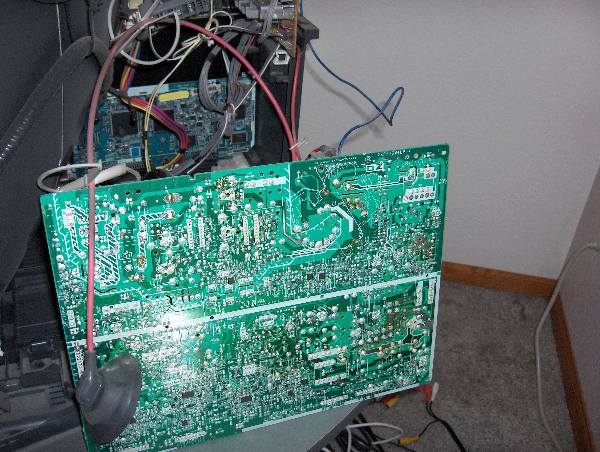
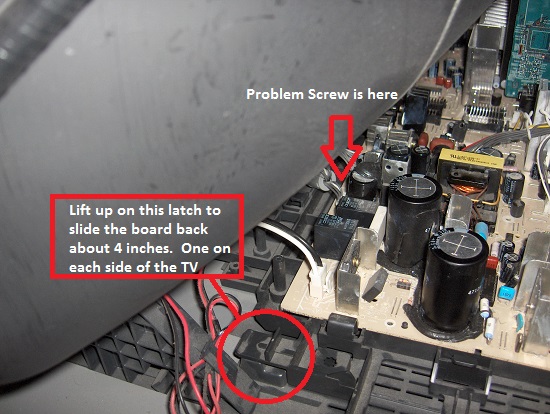
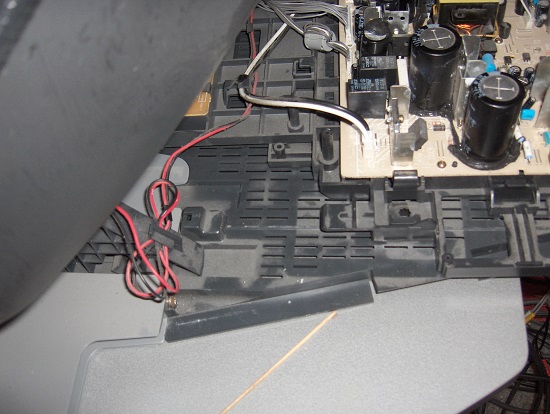
It wasn’t clear how to remove the board, or if it would be necessary to undo all of the wiring connections. Some of the connectors were easy to remove, but the 3 high voltage wires that connect to the CRT did not have easy-to-unplug connections. I eventually figured out that I didn’t need to remove those wires at all. There are a number of connectors that need to be flipped upward to disconnect the ‘D’ board from an adjacent board. It wasn’t clear at first how they worked, but if you feel around for a flange you can pull them upward, they’ll unsnap and pivot up 90 degrees like a draw bridge. Two of the connectors had latches on them that require squeezing the lever to unlatch it before they will come out. I unplugged all the other cables I could find, removed about 8 screws, and the board came out far enough to let me rotate it into a position where I could access the bottom of the board. It was necessary to use a stubby screw driver to remove one screw that was far forward, hidden between two connectors, and just under the CRT. To make that easier, you will notice that there are two plastic hooks, one on each side of the tray that the boards are mounted to that you can unlatch which allows all the PC boards to slide back about 4 inches. That makes the front screw easier to access, although you’ll still need that stubby screwdriver. (I’ve since added images of the latch and the board slid back at the end of this article.) After you get all the screws out, the board is still held in by a few plastic clamps on the edge which you can bend back a little to release the board. The board was still tethered by the high voltage connections, but I was able to fix it ‘in place’, by turning it over like shown in the image below.

Sony 'D' board shown flipped in repair position

Bottom of Sony 'D' board shown rotated in repair position. Note, it's not necessary to disconnect the wire with the suction-cup-like insulator on it.

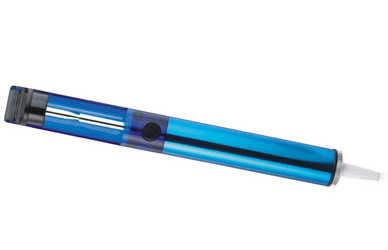
Unsoldering the two ICs is not difficult if you use a spring loaded solder sucker like the one shown below. Do not waste your time trying to use solder wick or a bulb-type solder sucker for desoldering the chips. Search for YouTube videos with the word ‘desoldering’ if you’ve never desoldered a chip before to see how it works. Also, make sure that the soldering iron is a low-wattage type, and not too hot to avoid lifting the copper traces.

Spring-loaded Solder Sucker

A spring loaded solder pump/sucker like this one works best to remove the solder.

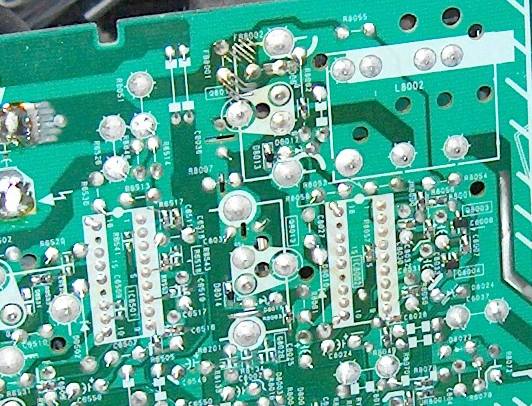
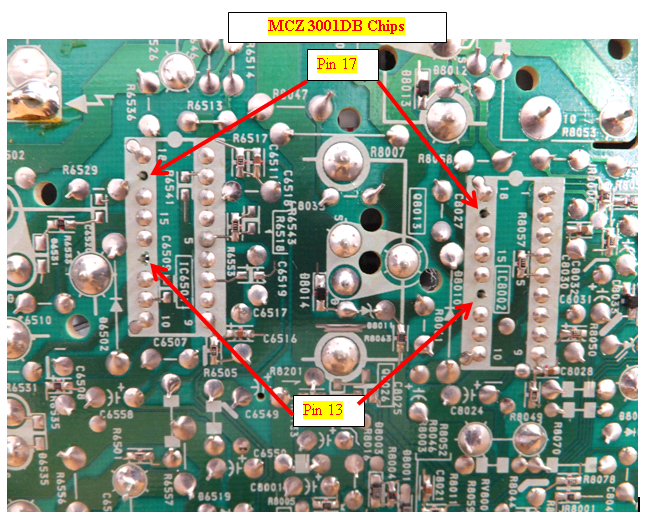
Close up of IC6501 and IC8002 from bottom of board. Note each IC has two unsoldered pins.

Do NOT solder pins 13 or 17. If you're using a socket, it would be best to clip the legs in those holes off the socket.

Be aware that each chip has two pins are not soldered to the board. This is normal and so don’t try to solder those pins or the fix will not work. Take note of the orientation of the chips since there is a notch on one end facing the closest edge of the board. You do NOT want to install the chips backwards. Also, don’t solder the new chips in directly to the board. Use sockets in case you ever need to do this repair again, since having to unsolder these chips is most of the work. If they were socketed in the first place, you could replace them without having to solder or even having to remove the D board.

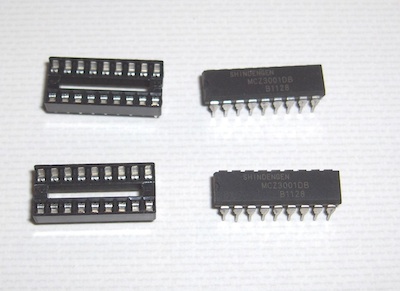
I wasn’t sure of the best way to purchase the ICs, since forum participants mentioned purchasing them on Ebay, where there are several China-based vendors offering MCZ3001DB chips but the shipping times from China vary considerably and can take from 10 days to 3 weeks. The vendor I chose was TriState Module because I wanted a U.S.-based company. They sent me a pair of ICs for around $20 including shipping charges. However, they no longer have these parts in stock and they are getting harder to find. I also needed a pair of 18-pin dip sockets which I found at the local Radio Shack for $.59 each. They look like the parts on the left in the image below:

pair of mcz3001db with pair of 18-pin dip socket

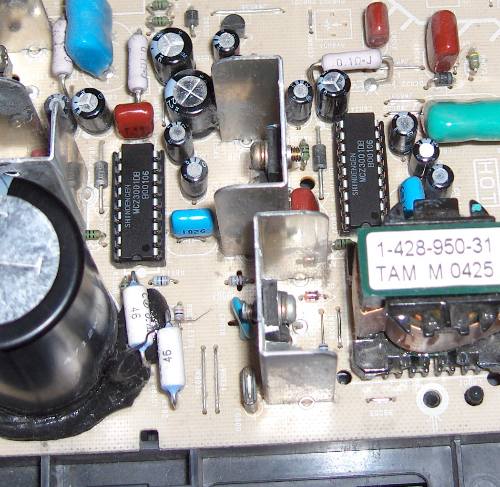
After replacing the ICs with sockets, you’ll need to install the replacement ICs. Odds are that only one of the chips is bad, but since you won’t know which one, it’s best to just replace them both. It is necessary to squeeze the pins together to get the legs aligned with the holes in the sockets. This style of IC has its legs spread out by default, and so they won’t automatically align unless you pre-bend them inward just a little to align with the holes in the socket. Carefully examine the chips after you install them to make sure all the legs made it into the socket and that the little half-circle notch at the end of the chip is facing toward the near edge of the board as shown in the photo below.

MCZ3001DB chips in sockets

IC8002 and IC6501 installed in their new sockets.

After re-installing the board and attaching all the cables, it would be a good idea to test it to make sure the repair worked before reinstalling the cover. If you unlatched the tray and slid the boards back to make access easier, you’ll need to put them back in position or else the remote control and on/off button won’t reach the board. With luck, your TV will be back up and running, avoiding a premature trip to the landfill. I can’t guarantee this fix will work for you, but the consensus on the forums is that it frequently fixes the 6 or 7 blink code problems on the Sony Wega flat screen CRT models.

I found the repair to be of intermediate difficulty, and the result was very gratifying when the TV turned on again. Our TV has now been working like new for more than 2 years, and if it ever happens again, I could fix it more easily thanks to the sockets that are installed. It felt good to resurrect a TV that has great picture and sound quality and, hopefully, a lot of life left in it.

And, in the event it doesn’t work for you, then maybe getting one of those new and improved flat panel TVs is your best alternative. 🙂

[UPDATE 2013-11-15] I mentioned earlier about the difficulty of finding and removing one of the screws under the CRT. Some of these TVs, including the model I repaired, have a set of latches that allow you to release the board and carrier and slide it back about 4″ to make that screw much easier to access. You can see it in the images below:

Sony D-board latches

The D-board and its carrier have latches on both sides that can be lifted to slide the assembly backward about 4 inches.

D-board repair position

D-board slid back 4″ into the repair position.