Using a Drill Press like a Lathe to make a Center Hole

Share

My friend was building a Stirling engine and when he found out that I owned a small lathe, he asked if I’d machine a piston and cylinder for him. Having some materials on hand like copper tubing for the cylinder and some solid aluminum rod for the piston, I agreed to make the parts. Another one of the parts he needed was a 7/16″ bolt with a hole drilled down the center of it. He had tried to make the hole with his drill press, but ran into a problem where the hole he drilled was not centered. This became apparent only after the hole was finished, of course, as it exited the far end of the bolt off center.

I had an idea about a procedure for drilling an accurate center hole in a cylindrical part with a drill press by first aligning a drill vice to hold a drill bit stationary while using the drill chuck to grip and spin the work piece. My drill’s chuck can hold a drill up to 1/2″ in diameter, which would be more than sufficient to grip a 7/16 bolt on its shank. I thought I’d run a quick experiment and document the procedure for anyone else who may want to try using a drill as a lathe for making a center hole in a cylindrical part.


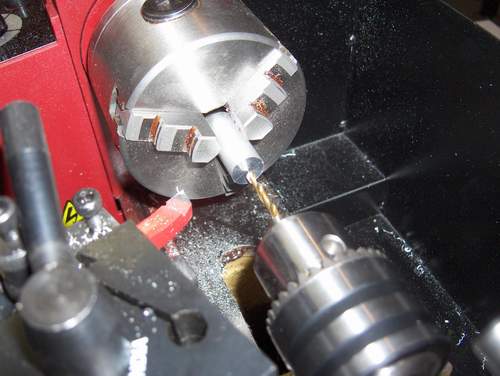
A lathe is most often used to turn a part using a cutter that can either remove material from the diameter or from the part’s face. But it also has a very nice feature when a drill chuck is inserted in the tailstock, and that is to accurately drill a hole precisely down the center of the part. An example of that is shown below.

Lathe with drill

Normally, you would use something called a center drill to start the hole and then swap it out for the drill of the proper diameter. If the hole is large, you may have to drill with several drill sizes to get it up to the finished diameter. In this case, the hole I wanted to make was just .125″ in diameter so it was possible to do with just a single drill in one step. The procedure I describe below would need to be modified by resetting the alignment for each drill if you need to open the hole up in several steps.

If you didn’t own a lathe but had a drill press and a drill vice, here is a procedure for drilling a center hole in a cylindrical part.

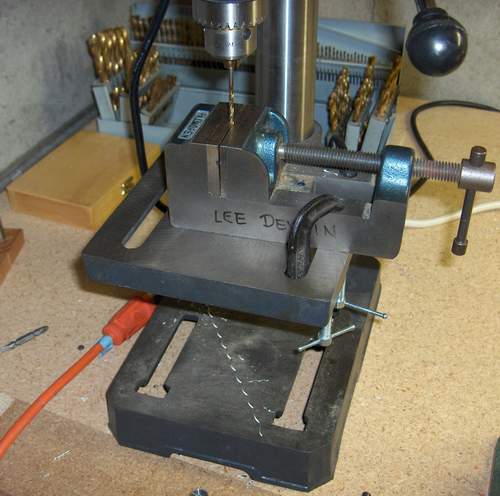
Aligning drill and drill and vice

First, you put a drill of the desired diameter in the drill chuck and tighten it. Then gently raise the drill table, clamp the table to set its height, and then and move the drill vise to the bit and clamp the drill vice down on the bit. The drill vice must have a ‘V’ groove one its jaws to align it vertically on the drill bit. This is important for a subsequent step. After everything is aligned, then use a pair of ‘C’ clamps to hold the drill vice to the table so it cannot slide from side-to-side. Then un-clamp the drill bit from the chuck and the drill vice and turn the bit upside down and clamp it in the vice’s V-groove again so that its tip is facing upward. Then clamp the workpiece in the drill chuck. In this case, I’m using a .5″ diameter section of aluminum rod as the workpiece.

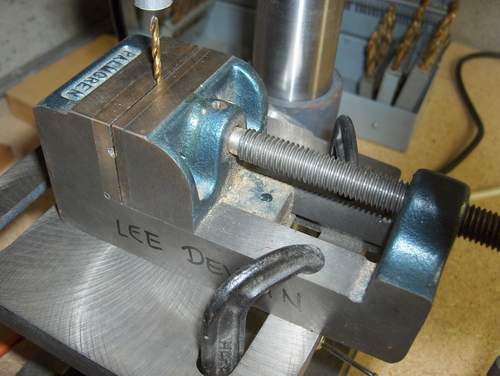
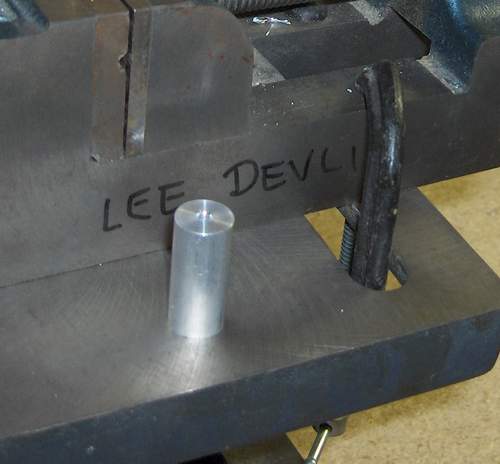
drill bit clamped into drill vice

Here the drill is clamped in the vice pointing upward and the workpiece is just partly visible and clamped into the drill’s chuck.

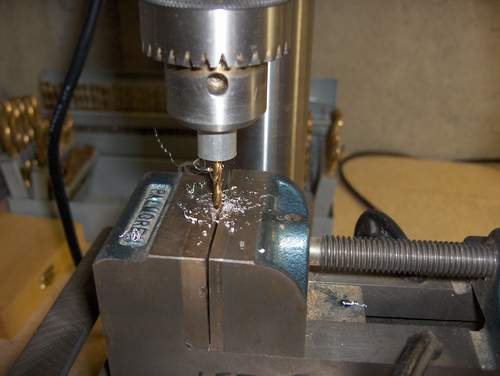
Then turn the drill on. Just like on the lathe, the drill bit will be stationary and you can lower the spindle with workpiece and it will drill the hole accurately through the center of the part. Remember to lift up on the spindle periodically to clear out the metal chips. If you got everything aligned correctly, the drill will make the hole directly in the part’s center. In my case, the hole was within .002″ of being concentric with the outside diameter of the part on both ends of the part. That’s about as accurate as you would get with a lathe so the technique works well.

Drill as lathe making chips

It may not be apparent but the part is spinning, the drill bit is stationary.

drill as lathe finished part

Here’s the finished part with the hole perfectly centered.

Fixing a broken latch on the Yaesu YSK-100 Separation Kit

Share

I’ve maintained the Yaesu FT100 FAQ for about 10 years. For those of you not familiar with ham radio, the FT100 is a popular mobile transceiver. I’ve talked to people from all over the world on it. As time went on, the FAQ stabilized and I rarely have to do much updating to it now other than to fix broken links. This FAQ still sees a fair amount of traffic.

My FT100 is mounted in my Durango using a YSK100 separation kit. The separation kit makes this radio easier to mount in a vehicle by separating the user controls, called the ‘head’, from larger body of the radio. The head then can be installed on a faceplate that is connected to the radio’s body with long cables. The body of the radio can be installed wherever you find room in the vehicle. Mine is hidden in the center console.

About a year ago, the latch that holds the head on to the face plate of the YSK-100 separation kit broke while I was removing the head.

I’ve never been happy with the YSK100 faceplate design since the latch requires an excessive amount of force to deflect when installing or removing the head. Without the latch, the radio could still be used, but it would fall off easily whenever I brushed against the head. Since the radio has been out of production for a few years, spare parts hare hard to find. So I decided to fix it myself.

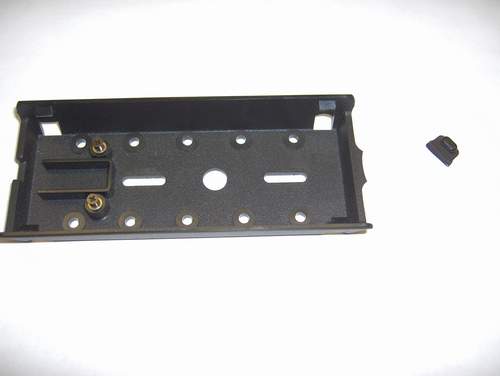
YSK-100 faceplate with broken latch

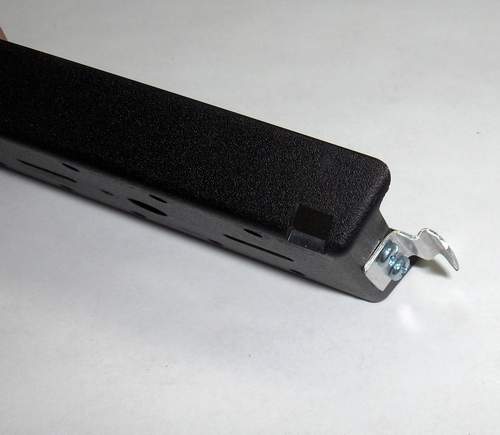
The plastic latch had cracked off of my faceplate.

There had been several reports of this problem on the FT100 Yahoo Group, but no one had ever reported figuring out a fix for it. You can’t just glue it back in place, because the part is highly stressed and a glue joint would not hold up to those extreme forces.

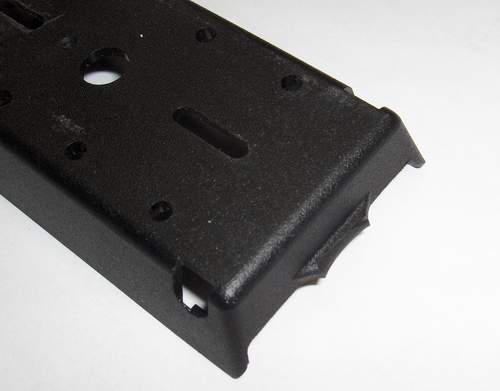
YSK with cracked latch

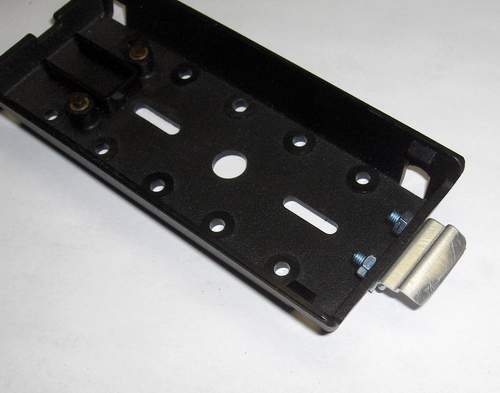
As you can see in the above image, a small portion of the latch is still on the wall of the faceplate. I sanded this off with a small belt sander. Next I took some measurements and started bending some .032″ thick aluminum sheet metal to make my own latch. I have a small metal brake/shear, but in this case, I just ended up using a vice to bend the sheet metal since the brake has a limit on how small the bends can be. I drilled some small holes and with attached it with M3 screws and nuts.

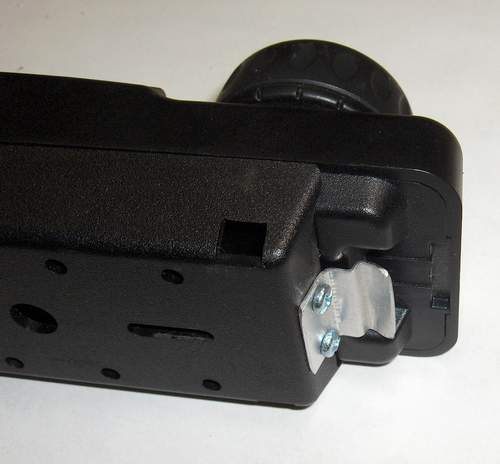
Sheet metal replacement latch for the YSK100

Here is a top view of the latch.

It works pretty much like the old latch in that it’s very stiff and holds with a lot of force. I suppose a thinner material, perhaps a lighter gauge steel, might have worked better, but this one can be bent to get the desired feel. If it ever breaks again, I know how to make a new one.

Here is a side view of the latch.

YSK-100 with metal latch

New metal latch with head installed.


Now that the radio is fixed, I plan to spend more time using it. When it was in that state of falling off the faceplate whenever I touched it, I frequently removed it all together and stowed it so it wouldn’t get damaged. But now I’m looking forward to having a properly functioning radio again. I tend to avoid using something that doesn’t work the way I want it to and then when I get around to fixing it, I wonder why I didn’t do it sooner.

I hope that others are able to take advantage of my description and pictures to help them to fabricate their own latch in the event that they break the plastic one that comes on the faceplate.

Putting Tire Sealant in Presta Valve Tubes

Share

I got a new bike earlier this summer (a Kona Dew Deluxe) and it’s a sort of cross between a mountain bike and a road bike. It uses the narrow 700 cm road tires and so I’m learning to deal with Presta valves whenever I need to inflate the tires. That requires putting an adapter on the valve stem since my air compressor is set up for much more common Schrader valves.
kona-dew-deluxe
One of the annoyances of bicycling on the Front Range of Colorado is the abundance of thorns called ‘goat heads‘. They will easily puncture bicycle tires. I learned this many years ago when I purchased my first bike in Colorado only to get two flats tires on the same day I took it for its first spin. When I returned to the bike shop, they asked if I had put TR tubes in it yet. TR tubes? “What are those and why didn’t you let me know about this when I bought the bike?” I was new to Colorado and never heard of TR tubes. “TR” stands for thorn resistant and their outside wall is about 4 times thicker than that of standard tubes and so the goat heads generally cannot penetrate in far into the tube wall enough to puncture it. After installing these tubes, I didn’t have any more problems with flat tires from the goat heads on my mountain bike.


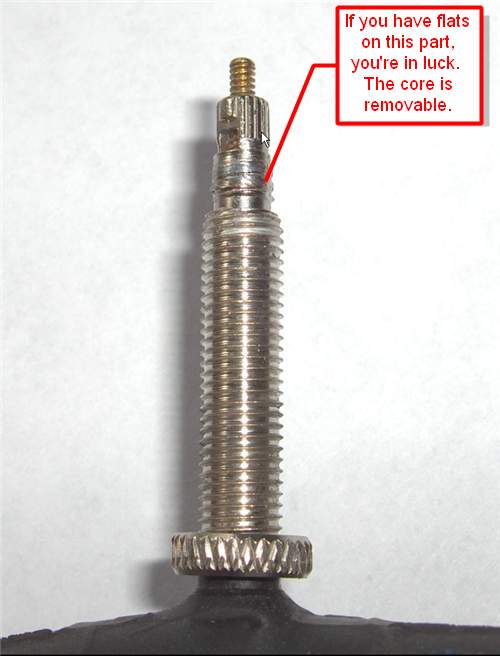
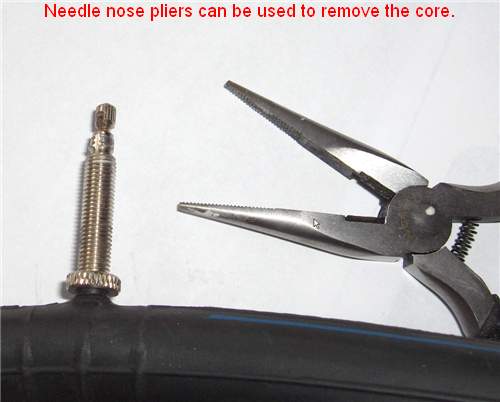
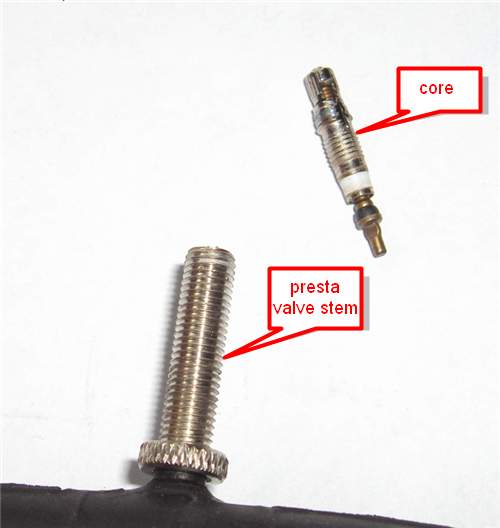
However, with my new bike, despite putting TR tubes in it before leaving the bike shop, I’ve had several flats from goat heads. I guess it’s because the rubber on both the tire and the tube is thinner to begin with than standard 26″ mountain bike tires. So I needed another plan. I see a lot of Slime tube sealant for sale these days in bike shops, and I was wondering if there would be a way to get it into tubes that had these newfangled Presta valves since the cores didn’t appear to be removable. I looked on the Internet and found several websites that talked about a method of using cutters to clip off the last few threads on the part that holds on the nut you need to loosen to put air in Presta valves. This causes the threaded part to fall into the tube which allows enough room to put the Slime in the tire. Then you have to push the threaded part back up into the stem and secure it with the nut, which now has no locking thread to keep you from unscrewing it all the way. I was hoping that I would not have to do that. I found that I was in luck because my tubes had Presta valves that allowed me to remove their cores. If you look at the part of the valve that has the threads to hold the valve cap on and it has flats on it, then that means the core can be unscrewed.

presta-valve-1

This Presta valve above has flats on the threaded part that holds on the cap which means the core can be unscrewed from the valve stem.

presta-valve-2

presta-valve-3

In my case, I already had some Slime but my local bike shop guy, Mark at International Bike in Greeley, is a strong proponent of True Goo. He believes that this product is easier than Slime to put in the tire due to its lower viscosity and that it seals better too.

If you search on the Internet, you’ll see a lot of people telling you these tube sealants don’t work. I think the reason for this is that it’s still possible to get a flat even with tube sealant, especially if the hole is so big that the sealant comes out so fast it can’t solidify. Also, people are much more likely to post a rant about a product that let them down rather than to take the time to post a positive review. In addition, when tire sealant works, you don’t really have hard evidence to let you know that you would have gotten a flat if you didn’t have the sealant in the tube. So it’s hard to measure tube sealant’s effectiveness.

In my case, I had the perfect experiment. My rear tire’s tube was losing nearly all its air every 2 days. It meant that each time I wanted to go for a ride, I needed to put air in the tire. I had debated on whether to patch or replace the tube, but then I realized that it would be a great experiment to see for myself whether tire sealant actually works, especially on slow leaks, which are the kind you generally get from the tiny holes that goat heads put in the tubes.

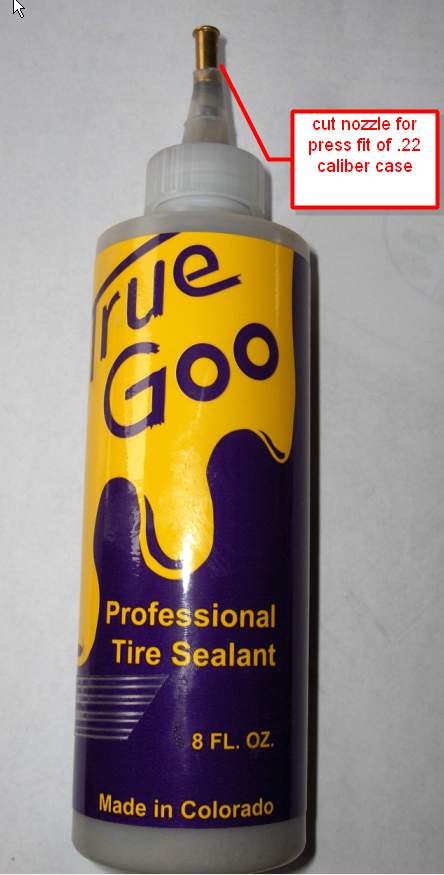
In order to put the sealant in the tire, my bicycle guy gave me some good advice. The rubber transfer tube that comes with these sealants is sized to be a press-fit on Shrader valves, which is much too large in diameter to seal on Presta valve stems. However, if you gradually cut the top of the cone-shaped nozzle until it is a press-fit for a .22 caliber cartridge, it will also be a press fit on a Presta valve which is about .235″ in diameter. You can also use the .22 bullet as a cap because the red cap that is included with it will no longer fit after you cut that much of the tip off the nozzle. You can use a spent .22 caliber casing or something else that is similar in diameter if you’re worried about using live ammunition to seal the bottle. Here’s a picture of what it looks like:

True Goo tire sealant

True Goo tire sealant

If your Presta valve has a removable core, you can even put the sealant in when the tire is on the bike. Just rotate the valve to the top, insert the nozzle on the valve stem, and rotate it back around to the bottom. Squeeze in about 3 ounces of fluid, rotate back to the top, remove the bottle. Then replace the valve core and fill it with air.

I found that my tire that leaked down every 2 days consistently has now held its pressure for several weeks, which leads me to believe that this stuff actually works as advertised.

Ubuntu 9.04 upgrade and flash boot

Share

I upgraded 3 dual-boot PCs to Ubuntu 9.04, (aka Jaunty Jackalope) over the weekend. One of the motivations for the upgrade was that I heard that it booted in less than a minute, and I can happily report that it really does. I found that it was easier to just download the CD image via bittorrent than to let each computer try to pull down a complete update individually. I had one computer that was still running Ubuntu 7.10, and needed the 8.10 CD to upgrade it first. One of the benefits of Ubuntu is that the updates are easy, but you do have to boot and run the computer periodically because you generally can’t upgrade to the latest release until you have all the updates for the previous release. On a dual boot computer that is only booted to Ubuntu infrequently, it’s easy to get behind a full release, which is what happened in the case of my computer with version 7.10. Having a physical CD has another benefit which I’ll get into later.

I’ve noticed that my Windows computer becomes like a ship at sea, collecting software much the same way that a ship collects barnacles. It also appears to have the same effect: it slows everything down. My friend Chris gets around this problem by completely reinstalling Windows every day. OK, that’s a bit of an exaggeration, but he rarely goes for a month without doing a fresh Windows install. This keeps his Windows boot times down to less than a minute, which is what my boot times were when I had a fresh XP install. How I long for those days. But the OS is just a small part of what I use on my Windows computer. The applications I have would take a day to re-install so re-imaging the OS every month is not practical. And all my customizations would similarly take time to reconfigure. For example, what ever motivated Microsoft to hide file extensions by default? I think that ranks up there as the dumbest idea ever brought to us by our friends from Redmond.

My Windows XP boot times and shutdown times on my main desktop are getting so long that I tend to leave it on all the time. In case you think I’m a Luddite for using XP, I have tried Vista and found that it provided no advantages over XP and hid everything I knew how to find previously. I watched my productivity plummet as I struggled to find all the useful things you need on a Windows computer (like a DOS prompt ;-). I will wait for Windows 7 and see if they fix that egregious error, i.e., a gratuitous rearranging of menus and locations of utilities. Now that Linux is booting in less than a minute, I may use it instead of Windows for many of my computing needs. I may even turn it off at night. The majority of what I do on the computer is related to editing, email, and Internet access, which Linux does just fine. I switched over to Thunderbird and Firefox more than a year ago and don’t miss Outlook or IE at all. I’ve also been relying more on Gmail to consolidate most of my email addresses and it works great on Thunderbird, or the web browser, or even on the iPhone.

Who wants to wait for 5 minutes to look up something on the Internet? Not me, and I know I’m not alone. More and more people are leaving their computers on all day (and sometimes all night) to avoid having to endure a long boot time. Leaving a computer on 24×7 wastes energy, of course, but it saves time. The wasted electricity will be less than the cost of lost productivity if you’re continually waiting for the computer to reboot because you shut it off whenever you don’t need it. A typical desktop uses about 1 cent in electricity per hour (assuming a 100 watt average draw) or about a fifth of that for a laptop. Even at the U.S. minimum wage of $6.55/hour, a person’s time is worth more than a 10 cents every minute. But if you leave several desktop computers on all month long, each one would add about $7.30 to your monthly electric bill, so even though a penny an hour doesn’t sound like much, it does add up over time, especially if you’ve got some fire-breathing gaming PC with 10 fans trying to keep it cooled, like some people I know.

The culprits that seem to really slow down the computer in my case are those annoying yet necessary programs that have services that run all the time in the background. The instant messenger clients have become particularly bad over time, with Yahoo and MSN loading up many unrelated items to try to get you to visit their sponsor’s websites. I have found pidgin on Linux helps consolidate multiple chat clients into one that isn’t a constant source of spam or other distractions.

I like to use Linux because it doesn’t seem to be much affected by the performance-robbing effect of adding programs like Windows does. Perhaps Linux programs just work better together and go to sleep when not in use. And they don’t seem to affect the shutdown time as much either. In Windows, it invariably has to wait for programs that are no longer responding during a shutdown (and then kill them) and it takes a while to get through the list. It’s no wonder people dread a reboot when installing software on Windows. The Ubuntu systems shut down completely in about 15 seconds or less. I often wait for several minutes for my Windows systems to shut down. It seems like the shutdown time increases in proportional to the time the computer’s been running.

I can go for many hours sometimes without having to use Windows. But I don’t think I can use Linux exclusively. Invariably, there’s a program that I’ll need to use that only runs on Windows. Also, I don’t want to be one of those annoying Linux bigots who haughtily dismisses anyone who uses Windows (or Macs).

One of the other issues associated with having multiple computers is that no two will be alike. For example, your bookmarks, applications, plugins, files, email, etc., all tend to require local data and settings that don’t propagate through to the other computers. The proposed solution to that, of course, is to move all your data and applications to the ‘cloud’. I have done that with my bookmarks, using Google’s bookmark app and toolbar, but it’s hard to get everything into the cloud. Also it is not without its own set of issues, and one of them is that you need to have a persistent Internet connection without which you can’t get anything done. You also place a lot of trust in the vendor who runs the cloud, perhaps too much trust, in keeping your data safe and private. So far, many cloud services are ‘free’, but in the future, you may have to pay some fee to keep using them, but they’ll only implement that policy after you’ve become completely dependent on them.

I’ve experimented with using a combination of portable computing approaches over the years including a flash drive (both U3 and PortableApps) but I’ve been thinking that a flash drive with the OS and everything else like your programs and data on it would be even more useful. Well, there is a feature on Ubuntu that allows you to take a live CD and make a complete bootable operating system with a USB thumb drive. Now that flash drives are getting big enough to store not just data, but all the applications as well as an entire operating system, it just may be time for the flash-based virtual computer. I made up a Ubuntu boot flash drive yesterday and found that I was able to boot perfectly on 4 separate computers. It usually takes a bit of fiddling with the BIOS to get it to work, but it comes very close to having a total computing enviroment that fits in your pocket and remembers its state and all the other things that a truly ‘personal’ computer will remember.

USB flash memory isn’t as fast as a hard drive, taking several minutes to boot to the OS, but it’s actually quite usable. But putting all your data on one device is like having all your eggs in a single basket. If you lose the flash drive, it’s almost as bad has having your computer stolen, and so it needs to have a workable backup solution too, but that shouldn’t be too difficult if you could copy your data to a networked backup drive whenever you were working. You don’t really need to copy the applications or OS, since those can easily be downloaded again.

I really like the idea of the USB bootable flash drive. It had been a few years since I last experimented with it using DSL (damn small linux) which, at an image limit of 50MB, was just too ‘DS’ for me. But with an 8GB flash drive, I easily fit a complete Ubuntu 9.04 distribution on it, and I put Apache, MySQL and PHP on it as well. Imagine that, a server that fits in the palm of your hand! Well, almost, since you still need a motherboard to run it on. Next time, I’ll write about my new low-power computing platform built from an Atom Mini-ITX board and chassis.