

A few months ago our whirlpool washer wouldn’t spin. It did everything else, but it was pretty worthless without the spin function because the clothes would just be sitting at the bottom of it completely soaked after a wash. Of course, the first thing I did was go to Google and type in “Whirlpool washer won’t spin” and got a lot of hits on some great websites. Most of them were repair websites and forums sponsored by kind individuals who freely share their knowledge such as fixitnow.com. Others are sponsored by companies who sell parts to DIY homeowners, like repairclinic.com.
The forums always suggest the most common and easy fixes first, like the lid switch, which wasn’t my problem. So I had to start disassembling the washer because the next item on the list was the coupling on the motor. Fortunately, these websites have directions on how to get the washer open, which takes very little effort, as long as you know which screws to remove and in what order. I knew that the coupling was unlikely to be the failed item because the agitator was still working and it would be unlikely that a failed coupling would allow that to work. Then I started looking at the clutch/brake mechanism and that also looked OK. Finally, I figured it had to be the transmission, one of the hardest items to remove. I had the entire washer torn apart and moved to the kitchen because our laundry room is more of an alcove in the entryway between the garage and the kitchen.
After pulling the transmission, I was faced with the prospect of taking it apart, knowing it would be filled with heavy oil.
To pull your washer’s transmission, you need to remove a bolt at the top of the shaft holding it to the agitator. To expose that bolt, you have to pull off the plastic cap on the top of agitator as well as another translucent seal below it. Note the translucent cap has an o-ring seal on it. Make sure to put it back in properly when you re-assemble the washer to keep water out of that bolt’s compartment or it will rust and fuse with the shaft.
I carefully took out all the screws holding on the transmission’s top cover and drained the oil into a jar. This was going to a really messy job and so I put on some vinyl mechanics gloves.
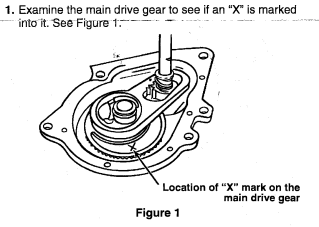
I was amazed at the complexity of the transmission. It has to perform several functions, all without any input other than the direction the motor. For instance, it has to agitate, spin, and also go into neutral without any shifters or solenoids. The same motor is simultaneously running the pump from a portion of the drive shaft that comes out the other end. The transmission uses a rather complex plate of pawls, gears, and cams on something called the ‘rack retainer’. I was trying to simulate spinning the motor forward and backward and thus I could shift it from spin mode to agitate mode, but I couldn’t get it into spin. It was then that I realized that something called a ‘shoulder pawl stud’ was broken off at its threads and the rack retainer was spinning freely. This pawl stud works as an axle and also as a way of getting the plate to spin along with the spin gear, but it was broken with its threads embedded in the main gear. So I had to find a new pawl stud and figure out a way to extract the threads from the hole they were in. I was pretty sure that the threads had some locking compound on them and they weren’t going to come out easily.
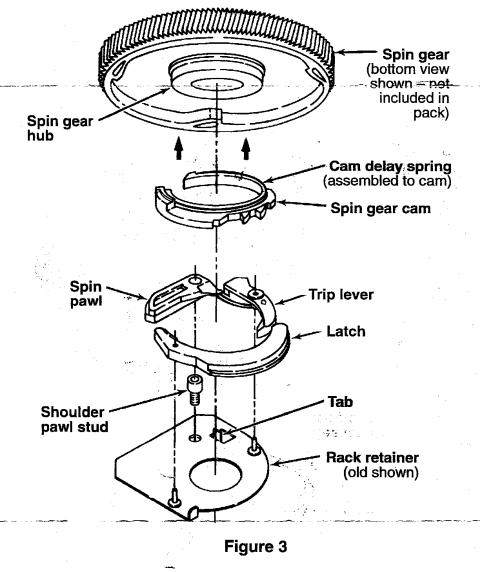
The pawl stud wasn’t available as a separate part, but there was something called the Neutral Drain Pack from Repairclinic.com which included a lot of parts, including 2 different studs, since Whirlpool evidently beefed up the threads for the newer models, no doubt because it was a weak point. The upside to that is that if I ruined the threads extracting the broken stud, I could drill and tap it for the larger stud and newer rack retainer. So as my wife headed off to the laundry mat with a load of wash, I order the parts on line. The neutral drain kit was about $17 + $6 shipping. In the meantime, I tried to drill the screw threads out of the main drive gear. I broke a drill bit doing it, but got enough of a hole down through the middle of the broken screw shaft that I thought I’d have success with an ‘easy out’. I took it into work and borrowed an easy out and with the help of an arbor press to apply pressure to the easy out, I extracted the broken screw without doing any damage to the threads.
A few days later, the parts arrived. The kit contained a lot more parts than I needed. I replaced all the old parts with new ones, figuring after 15 years of service, there was no point in reassembling things with old parts when I had new ones right there. Getting everything back together required some head scratching, but after thinking it through, I was able to manually operate the transmission and check the agitate and neutral modes.
After a little fiddling everything went back together and I ran a cycle through without clothes and was very happy when the spin mode began working again. Now it’s been working for a few years, I figured that the $23 and my time was worth it because if I had a repairman do it, I’m sure it would have been over $300 because he would have likely replaced the whole transmission. That would be beyond the value of the washer. It was also better than throwing it away and buying a new one for somewhere between $600-900. I generally don’t fix things myself just for the savings because if you consider my time, it’s not really saving me that much. I do it more for the educational experience and the satisfaction of knowing that if it ever breaks again, I can choose to either fix it myself or buy a new one, if we think it’s time for its retirement.
I’ve included the meager set of instructions for the Neutral Drain Pack in pdf format here.
UPDATE: 2009-01-07 I continue to get comments and emails on this posting. I just got one asking about getting the transmission apart and so I’ve uploaded a new picture that shows what a messy job this is. Click on it for a higher resolution image.
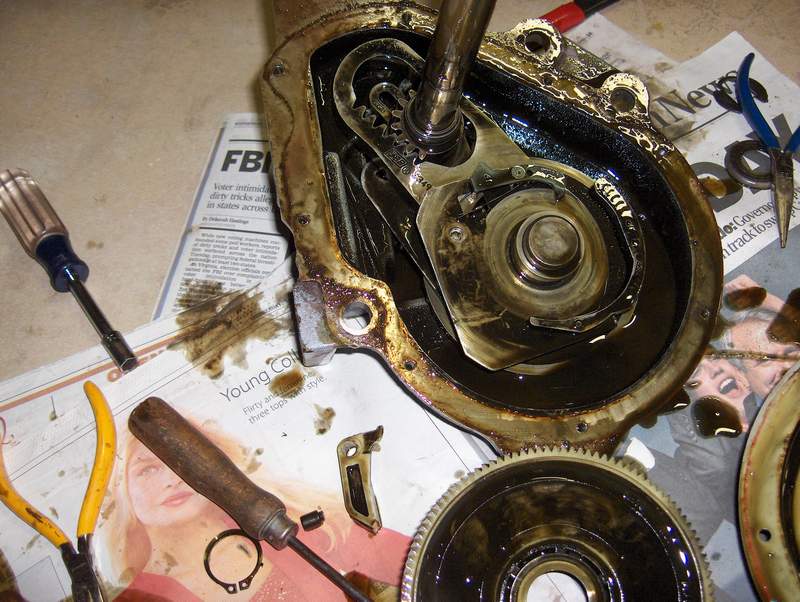
The snap ring (shown next to the screw driver laying on the newspaper) needs to be removed from the shaft to get the top cover off of it. I can’t recall if I had the proper snap ring pliers or if I used needle nose pliers ‘in reverse’ to spread open the snap ring by its holes. I managed to save all the oil and reuse it afterward, but if you lose some or it looks dirty you can get more from an appliance service center or use SAE 90 weight gear oil if you can’t find a service center.
There is also the possibility that your washer is caked with mud, so if the basket won’t spin, it may be clutch that is worn or can’t overcome the friction of mud caked between the basket and the tub like the image below:

This photo was sent to me by a reader who found mud stuck between the basket and tub. His washer wouldn’t spin because the clutch couldn’t overcome the friction caused by the mud. If your spin cycle is intermittent, then this could be the potential cause of it.
Another resource you may find useful if you’ve gotten this far is this .pdf file for the service manual for a Whirlpool direct drive washer. It’s got the schematics, troubleshooting instructions, parts list, etc., for the whirlpool washer.
Lee I appreciate your site and the forum where others can ask questions and provide feedback. I have a 10 year old whirlpool and it is not wringing all of the water out of my clothes. The repairman gave a solution and price that is discussed in your link. I am not confident to replace the transmission myself but feel more comfort that the transmission is the problem with my machine. Thank you for sharing your knowledge and patience.
Hi DRME, If your washer is spinning, but just not at the right speed, i.e., too slow to wring out the clothes, it may also be related to the clutch/brake mechanism which will slip when it wears out. That part is not as expensive to replace as the transmission, but it likely to take the same amount of labor since you have to take off the motor and transmission to get to it.
Rick wrote you on January 20 2010 and spoke of hammering out the input shaft. He never mentioned getting any parts from anywhere and I cannot find them. This is the best site I have found discussing gearcase issues but no one has discussed this anywhere else like Rick did. Do you recall if someone has these parts? The best I can find is a whole new or rebuilt gearcase and that is about $185.00 plus special shipping.
On my gearcase the nylon spacer closest to the outside of the housing has worn away. I don’t know if this is adding to any issues though the oil level was low when I opened the cover and I have gear grease on the floor. So maybe changing the seal would help with the leak. It seems the leak is very very slow. I am going to replace the neutral cams and levers for good measure though they seem to be in good shape. Maybe after cleaning thing up, changing the parts and new 90 weight oil the unit will stay in neutral while the water pumps out.
What are your thoughts?
Kind regards,
Louie Schaefer
Hi Louie, I didn’t see a posting from January 20, 2010, from Rick, but I did find one from February 20, 2010. He talks about removing the input shaft. In an earlier posting from Nov 17, 2009, one commenter mentioned removing the seal using a self tapping screw as shown here: http://www.davesrepair.com/drsn/JanFeb08bi.htm
It talks about removing and replacing the lower seal which would be necessary if your transmission is leaking.
Great Site, just wanted to share my experience with my Whirlpool washer / dryers in case it’s helpful for someone else to know:
Bought these machines new about 1995. From what I’ve read the Whirlpool was some one the most reliable and easy to work on for the price and now nay modern machines are extremely unreliable and problem prone (just read amazon reviews). So I plan on keeping these working for many years more.
I know things can go wrong one after another when these machines get a certain age but once those items are fixed, they should be very dependable for many years.
My Washer:
Just installed my 3rd motor coupling. The second had the improved metal sleeve but now the gear box input shaft is a bit rounded. Here’s the fix I hope lasts: When I installed the new coupler half on the shaft, I first filled the coupler hole with a small amount of plumber’s putty freshly kneaded. I then used a socket and hammer to make sure the coupler half was all the way seated, then I used the hammer and a screw driver handle to bang in the putty to fill any voids between the shaft and the coupler shaft-hole. I let the machine sit for 2 hours while the putty cured hard. Hopefully this will last. If anyone else has a better way to deal with a rounded shaft, please let me know here.
The back of the machine was not level one day and I found that the self leveling rear legs were stuck. I was able to get them working like new by adding some grease to the connecting bars contact points.
I had the agitator dogs go out last month needing replacement, very easy and cheap repair.
The washer is been good through the years, I did have to replace the lid switch twice. I used the plug from the first bad switch for a temporary bypass plug for the lid switch when trouble shooting the machine with the cover off for repairs.
I did replace the motor 3 years ago, was a bit pricey, like $85, but worth it.
Those are all the repairs I remember.
I did read somewhere that when the clutch starts slipping, a metal(s) washer can be installed on the clutch spring end(s) to give the spring more tension. Someone may find that trick helpful here.
Under tighten those screws for the plastic end caps of the machine’s control panel or the plastic will crack.
Gas DRYER:
I recently had to replace the timer switch because it was not always heating in the auto cycle. This was expensive, like $95 but I had taken it apart and found burned contacts from the years of use and after trying to repair the contacts, gave up and the replacement appears to have upgraded contacts. If you order one, make sure it’s the right one.
I replaced the gas valve 2 solenoids before I discovered it was the timer switch but the part was cheap and many times goes out eventually many say.
Whenever I’ve opened the dryer up, I oil the idle wheels the drum rolls on as I know these can dry up and fail over the years.
Two great machines!
I encourage everyone to Please consider how much and how you wash and dry your fabrics.
Our planet and the plant and animal life is being destroyed by us.
Don’t believe me, believe all the scientists and reporters around the world trying to educate us about the massive problem.
You can save yourself time and money and reduce your impact on your machines and our planet by at least these things I’ve discovered:
PLEASE Consider and adjust your habits to do:
Wearing clothing more or hand spot cleaning if needed before washing them, they will last longer too before fading and falling apart, and your body’s natural scent is a natural expression of yourself, your loved ones should appreciate and find it desirable, otherwise use cologne and perfumes, our bodies are made from this planet but we have reached such a separation in our minds, advertisement has convinced us to be afraid of dirt, don’t be brainwashed,
Reduce the water level and detergent settings to only what is needed for the size load and dirt level, read your machine’s owner’s manual, you’ll be surprised how much your machine is designed to wash at once, and don’t believe the detergent’s directions on how much to use, they want you to spend more and most of us have desk jobs these days, not digging holes.
Stop buying white fabrics that show dirt in no time, permanently stain easily, and even using bleach, large amounts of detergent, super hot water never gets them as white as when they were new, why put yourself through such struggle,
Almost always buy cotton blends or 100% synthetics (polyester/nylon etc.) instead of 100% cotton, you’ll find they’re much more stain resistant, clean easier-less detergent & less heat, dry faster, wrinkle much less, fade much less and are more durable fabrics,
This may not be for everyone, but hang your clothes when possible skipping the dryer, buy a clothes line, the outside air and sun make clothes so so fresh and crisp smelling, you’ll love fresh sunshine sheets,
Avoid buying oversized towels if your body does not need it, smaller towels are way more sexy and practical especially when it comes to washing and drying,
Instead of washing area rugs, shake and/or vacuum them, if needed, steam clean as you do attached carpet. The washer is too hard on them, tearing or melting the non slip backings off making them unsafe, you don’t wash attached rugs, you shouldn’t need to wash area rugs, it’s obsessive,
Choose cold or colder water settings when it will wash just fine.