Does Google Throttle Search Impressions?

Share

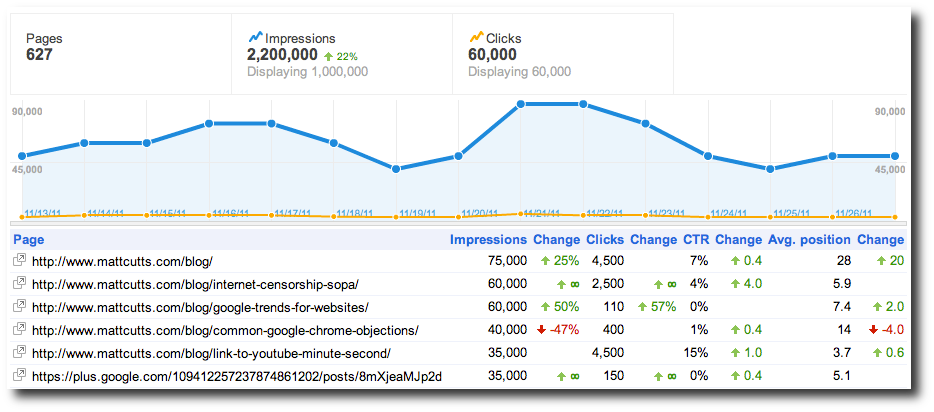
A few months ago, I read an excellent posting by Lisa Irby about how to use Google’s Authorship feature. This feature was also mentioned in a blog posting on Google’s Webmaster blog as way to see your search impressions and clicks on articles for which you claimed authorship.

I had been curious about how some bloggers were getting their faces to appear next to their articles in Google’s search results so I was eager to give it a try. Upon following Lisa’s instructions, it appeared to do the job of claiming authorship for me, but my image was not appearing next to the results. The image I had on my Google Plus account at the time (and many other places for that matter) was of myself sitting in my LongEZ like the image shown to the right. Lee in his LongEZI began to ponder whether this was part of the problem since Google specifically requests a ‘recognizable’ headshot and I’m not very recognizable in that photo. I noticed that was a consistent feature of the faces that were appearing next to the articles, i.e., it was a headshot, not an icon or a image of their whole body. It was almost like Google was running the image through a facial recognition algorithm and if there wasn’t a recognizable face, then nothing would appear. So on my last visit to PA, I asked my brother-in-law, Jay Yozviak, Northeastern PA’s premier photographer, if he’d take a professional head shot for me. Whenever I tried to take a headshot of myself, it ended up looking like a mugshot, or at best, a namebadge ID photo. It seemed like no sooner did I upload my pro headshot to my Google Plus account than it started appearing next to my articles in a Google search.

Google search results with author photo

This is how a Google search that finds one of my articles shows up now.


Later, I began to look at the number of impressions that were appearing in Google’s Webmaster Tools under Labs/Authorship stats and I noticed a graph that appeared to be bumping up some sort of ceiling of 8000 impressions per day. (You can click on the image below make it bigger.)

My website is hosted with GoDaddy on an IP address that also resolves to many other websites and it’s no speed demon. Sometimes it loads very fast, other times it can be downright slow. But I can’t complain about the price. For $7/month, they allow 150GB of storage and unlimited websites and bandwidth. On domaintools.com, I see that my IP shows over 4500 websites resolve to that server. Now, I expect that it’s not a single server, but a bank of servers that automatically do load balancing and all kinds of other cloud-like behavior, but I know that when Google was measuring my performance in the Webmaster’s tools, my site loaded slower than 80% of other sites and I can’t help wonder if Google intentionally will back off on the search impressions they show based on trying to keep the target host from getting overloaded if they detect a slow server.

The line across the bottom is the 20% percentile for all websites monitored. Therefore, my site with an average page load time of 5.8 seconds is slower than 80% of all sites.

Google’s all about speed, and if they find a slow server, they may just give it some kind of throttling in search impressions so as not to provide a bad customer experience. I’ve tried all the various tricks to make the site faster, caching, various pagespeed recommendations, db optimization, etc., but sometimes the site still takes a while to respond and load.

Going with a dedicated server costs a minimum of $100/month and I don’t know if there’s any guarantee that a single dedicated server will perform any better. And of course, that unnatural looking ceiling may be completely natural. There may be exactly that many searchers for the kind of results they’d find on my website every day for weeks at a time, but it just looks suspicious. In looking at the result for Matt Cutts’s blog which was used in an example in the posting mentioned above, he sees a much more varied number of impressions for his content over time, by a factor of two at least, without any apparent ceiling even though he’s getting 10x the traffic I am getting. But he’s also on a dedicated server. And.. He’s Matt Cutts :-).

I can’t say for sure what’s going on here, but I know what clipping on an analog signal looks like and I’d say there is some kind of clipping going on with my number of impressions per day. I also understand that my graph is rounded off to the nearest 500 impressions, which can add quantization effects and make a line graph look unnatural as well. But I’ve also see a graph of someone who has fewer impressions per day than I do, and Google appears to resolve the impressions per day to fewer than 500 and I don’t see any clipping going on there. To me it looks very ‘natural’.

This graph was from someone on an seochat forum complaining about getting too few impressions per day, but I don’t know how he was able to deduce any pattern from the data, other than it never got above 2500.

Maybe Google is trying to do me, my hosting company, and my visitors all a favor, by limiting traffic to a reasonable volume. But if they are doing it, it would be nice to know about it for sure. And if you know how I can make a GoDaddy.com host (or shared/cloud server) that has thousands of other sites hosted on it run faster without having to pay 1400% more per month for a dedicated server, please leave a comment below.

Replacing the plug on an Etymotics headset

Share

I’ve owned an Etymotics ER6i in-ear headset for several years now and have been very satisfied with it. I use it for motorcycling, bicycling, mowing the lawn, and any other activity where ambient noise would otherwise drown out the audio from a standard set of earbuds.

Recently the left earphone began cutting out. By wiggling the wires near the plug I determined that the problem was near or inside the plug. I briefly contemplated purchasing a replacement headset, but then I recalled how much they cost, and it was close to $100.

There were a few resources on the web that showed how to fix a bad connection inside the etymotics earbuds, but I found nothing about how to replace the plug, so I decided to write up my experience here.

I already had a solder-on 3.5 mm plug in my parts bin and, although it was a 4-conductor plug, I figured it would work fine with my iPhone, since it uses a 4-conductor jack to mate with the Apple headsets with integral microphone. I just wouldn’t need to solder anything to the microphone ring. If I didn’t already have a plug, I would have used a 3-conductor stereo 1/8″ (3.5 mm) plug, which is available at RadioShack for a few dollars.

The ER6i cords are independent, but I didn’t know what to expect when I cut them off and stripped them. If I had to deal with coaxial braid, that was going to be a pain, but upon cutting the plug off and stripping the wires, I was pleased to find that each cord contained a pair of conductors, both made with fine stranded wire. Each cord had one wire that was color coded along with a bare copper wire carrying the ground. Upon some testing, I found that the red and green wire carried the right and left channels, respectively.

The green and red stranded wires are coated with an insulating material much like magnet wire that’s so thin you can see through it so even though the colored wires looked metallic and like they would be conductive, they were not. You need to tin the colored wire with a small solder blob to simultaneously burn off the insulating material and make a point where you can solder to. I was worried that the red/green wires would touch each other or the ground wire and short, but they won’t short as long as you don’t tin too much of the insulating material.

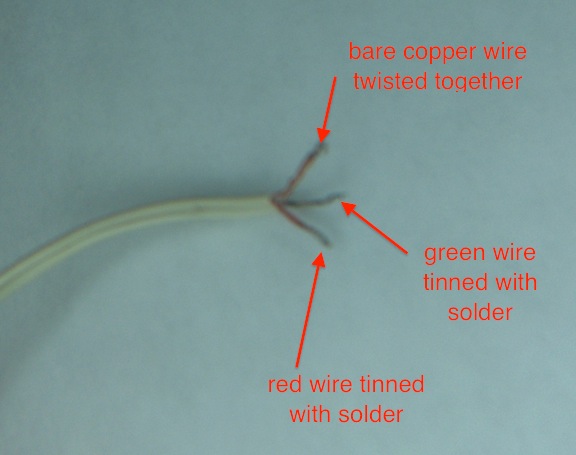
etymotics cords with conductors

Both copper wires can be twisted together (sorry for the picture focus)

This is what the wires looked like before I soldered them into the plug. The bare copper wires from each cord are twisted together and will be soldered to the ground lug.

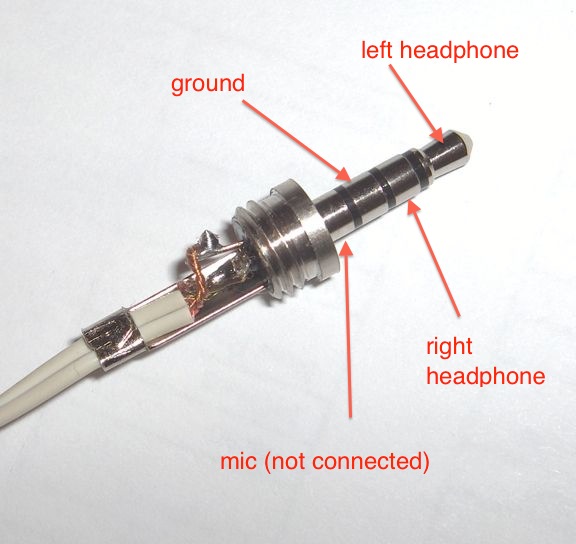
iphone jack pinout

You need to use an ohmmeter to confirm which solder tabs are connected to the rings and tip of the plug prior to connecting each wire with a small amount of solder. I found it best to put a small amount of solder on the wires and on the solder tabs on the plug first and then just bring the wire and lug together and touch it with a very sharp-tipped soldering iron.

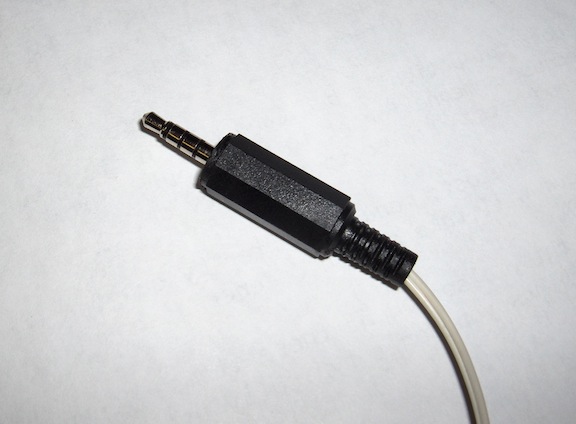
Plug strain relief installed.

Finished repair, good as new.

It was great to have a working set of earbuds again and if it ever breaks, I won’t hesitate to repair it again.

Replacing a bulb in the OBC on a BMW E36

Share

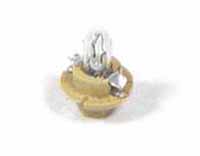
The On Board Computer in the BMW 3-series produced between 1991 and 1999 has a series of bulbs behind its LCD display that will burn out over time. If it’s one of the bulbs behind the long display on the left, it will cause some dim characters on the left, middle, or right part of the display. If it’s the bulb behind the clock that has burned out, you won’t see anything where the numbers for the clock are typically shown.

The bulbs are available from on line sources like BMW Parts Web for less than $1 (just search on p/n 62-11-1-391-260). On other BMW parts sites, they sell for $12 for a pack of 4 and so you need to spend nearly $20 after you take shipping into account.

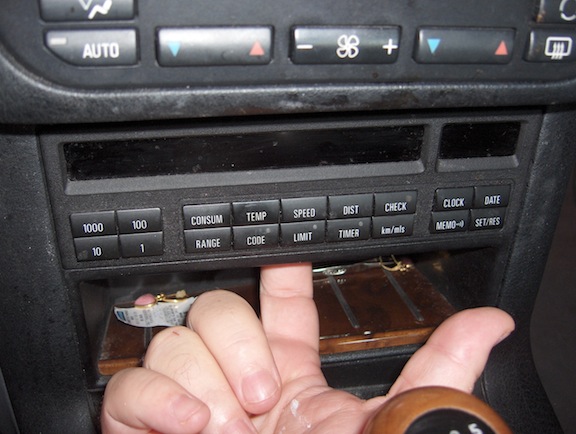
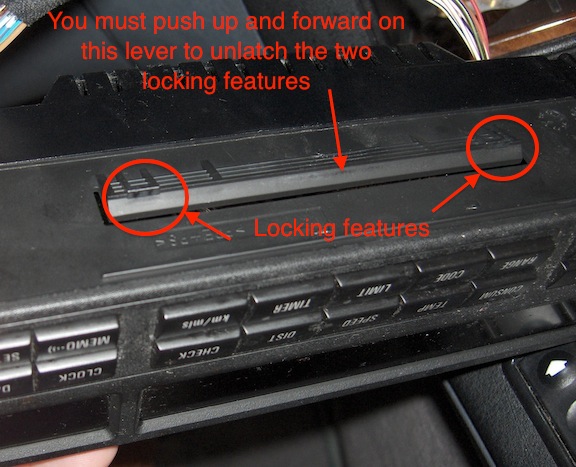
Fortunately, these bulbs are easy to change if you know the tricks of getting the OBC out of the panel. To remove the OBC, you need to reach into the sunglasses tray under and feel around for the hole in the upper part of it. This hole is under a lever that you need to simultaneously push up and forward. This takes a fair amount of force, and if you have long fingernails, you may want to have someone else do it for you, lest you break a fingernail. Once you can see the OBC come forward a little, you have probably unlatched it and can reach your finger around behind it to pull it out the rest of the way.

Feel under the OBC for a hole in the upper sunglasses tray

Feel under the OBC for a hole in the upper sunglasses tray

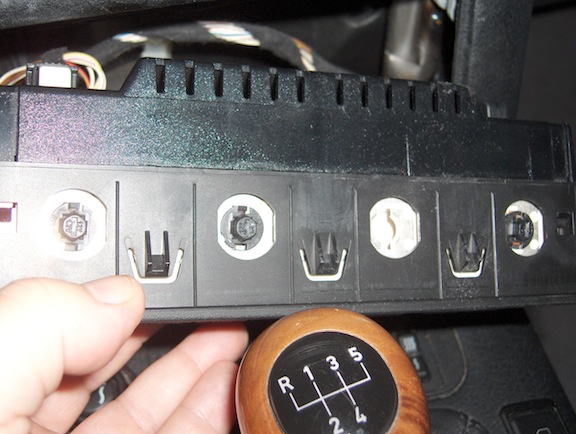
Bottom of OBC with locking features

Bottom of OBC with locking features

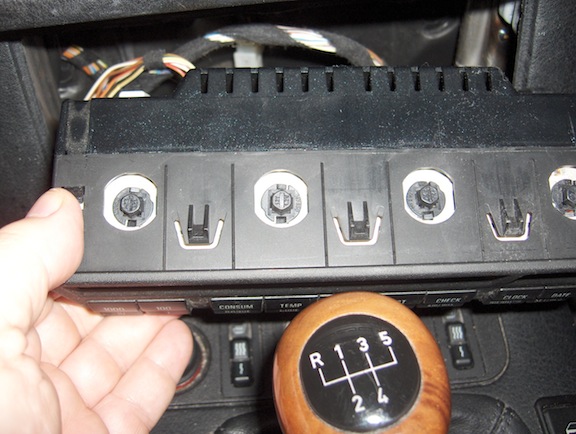
Once the OBC is out, there’s no need to unhook the cables on the back of it. All the bulbs are accessible from the top. You can use a flat bladed screw driver or needle nose pliers to rotate the burned-out bulb 1/4 turn and it will pop out. Installing the new bulb the same way, place it in the hole and turn it 1/4 turn. Make sure to test it before putting the OBC back in its slot.

3rd lamp removed

OBC with 3rd lamp removed (1/4 turn to remove)

Top of OBC showing 4 replaceable lamps

Top of OBC showing 4 replaceable lamps

In the case of my wife’s BMW, she complained that the clock was no longer working, so when I inspected it to see what had happened, I noticed that it had its own bulb. So I ‘borrowed’ a bulb from the other portion of the display while I waited to get the new one from BMW Parts Web. Borrowing the bulb caused the display to have a few dim characters, but it was still readable so it was a reasonable trade-off to have the clock working again.

Replacing the Electric Door Lock Actuator on a BMW E36

Share

The BMW 3-series cars manufactured from 1991-1999 are getting to the age where the electric door actuators are wearing out and there’s nothing more frustrating than a door lock that won’t respond to the key fob. My wife’s BMW 328i passenger door had this problem a few years ago and I recalled replacing one of the actuators with instructions I found on the Internet. However, when her driver’s side door began having the same issue, the instructions that I found on the Internet seemed to be lacking in the important details, and it had been long enough that I had to ‘re-learn’ the tricks I had forgotten since I last tackled this project. So I decided to write up this article to help anyone who is contemplating this as a DIY project.

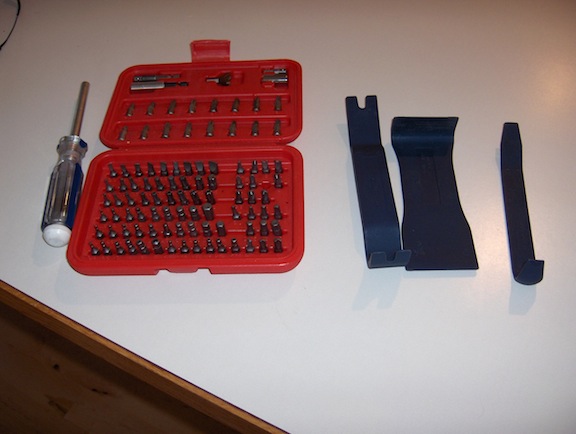
You will need the following tools: Torx driver with T-20 and T-27 bits, non marring pry bars and (possibly) a set of vice grips.

Useful Tools, non marring pry bars and a Torx set (only need T-20 and T27 bits).

Useful Tools, non marring pry bars and a Torx set (only need T-20 and T27 bits).

BMW door actuators are available from several on-line retailers. The best price I’ve found for OEM actuators was at BMW Parts Web. Just search on p/n 67-11-1-387-726 (front actuator) or p/n 67-11-8-353-011 (rear actuator) for E36 models. Just be sure to get the correct one since the front doors use a different connector that has 6 pins whereas the rear actuators have only 3 pins. The ones I got were aftermarket units that I can’t find anymore.

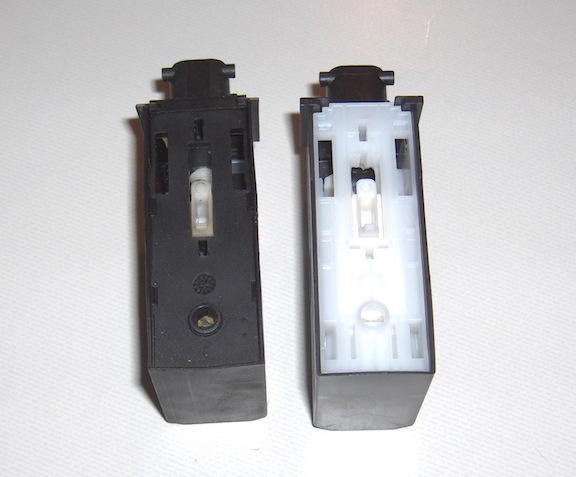
Original (left) and replacement (right) door lock actuators.

Original (left) and replacement (right) door lock actuators.

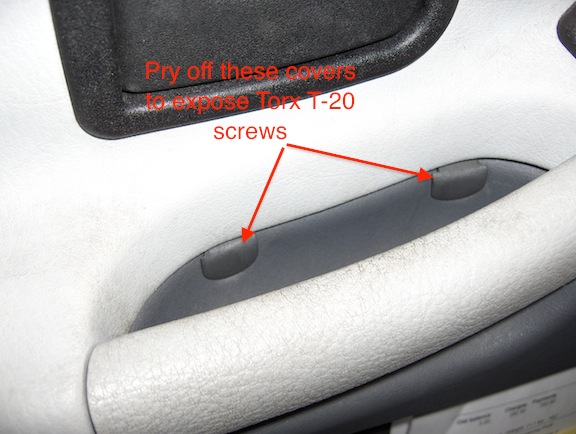
The door panels on the E36 are not hard to remove, you just need to pop off two screw covers behind the inside handle, and remove the screws they covered with T20 torx driver. Each screw was a different length, which I didn’t notice until I was going to re-install them. The longer screw goes in the hole toward the front of the handle.

These covers expose two screws you must remove.

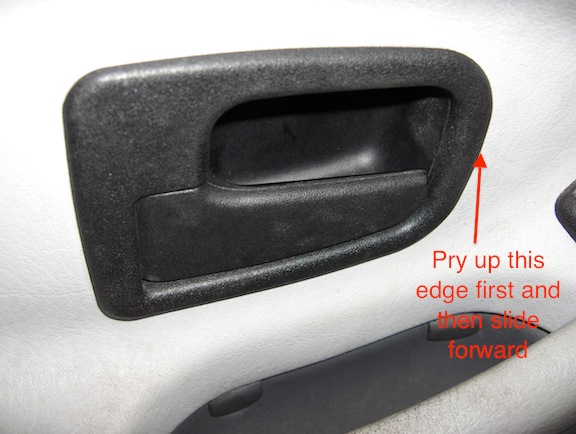
Then you have to remove the dish behind the door pull and this is where I ran into trouble. Evidently, a lot of people break this part, assuming that it comes straight out. The advice is to push it forward. However, until you pry up the front of it, there’s no way it will move forward, so that is the step everyone seemed to leave off. First pry up the front, and THEN push forward.

Push forward, but only after prying up the front part.

See how latches need to be pushed forward to release.

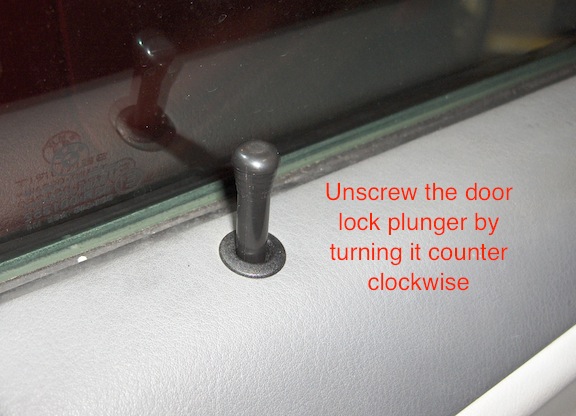
Next you remove the door lock plunger by unscrewing it (counter clockwise), and you may need some pliers to gently grab it and get it started because it’s hard to grasp by hand and apply any torque.

Door lock plunger

Door lock plunger

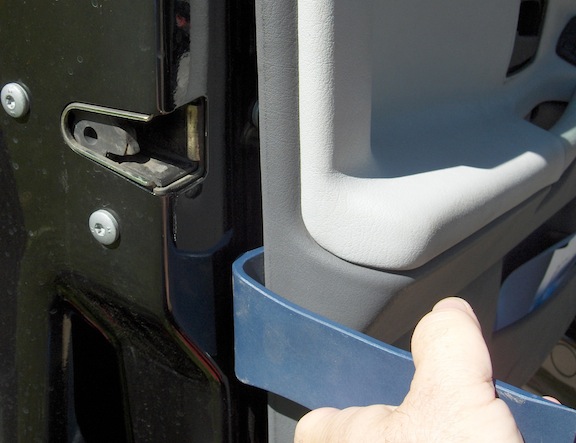
The next step is to pry off the door panel using a non-marring pry tool and gently pop out all of the plastic fasteners as you work your way around the door. You’ll need to rotate it up to get it off of the door lock plunger push rod.

Prying BMW Door Panel away from door

Prying BMW Door Panel away from door

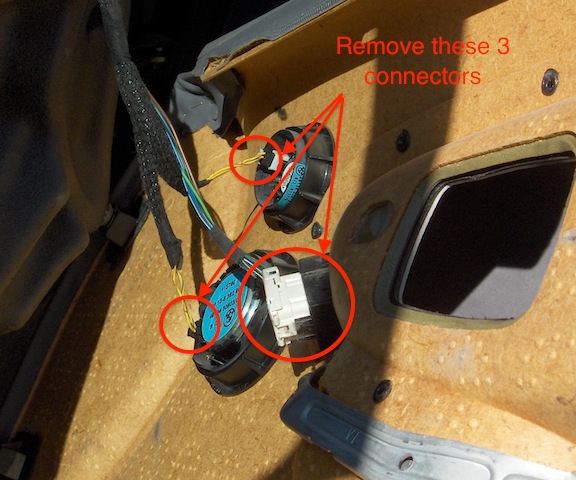
When the door panel comes off, it will still be connected by the wires connected to two speakers and to the buttons that are used to adjust the mirror (if it’s the driver side door). The connectors are held in with friction, so you don’t have to find any hidden latches to free them, just pull them out. They are keyed so you can’t install them backwards.

Disconnecting BMW door cables

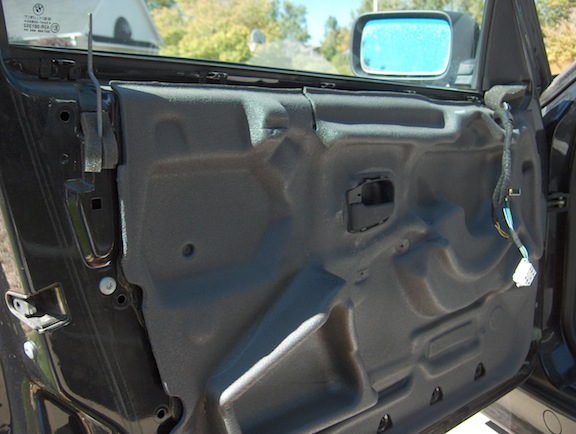
After the door panel is free, you’ll need to peel back a foam sound insulator that is held in place by some very sticky black adhesive. It’s best to peel it half way off and then use some duct tape to hold it out of the way. Be careful around the black adhesive, since it will get over all over you if you touch it.

Internal Door insulation

Internal Door Foam Insulation

Peel back foam insulation about half way and hold in place with duct tape.

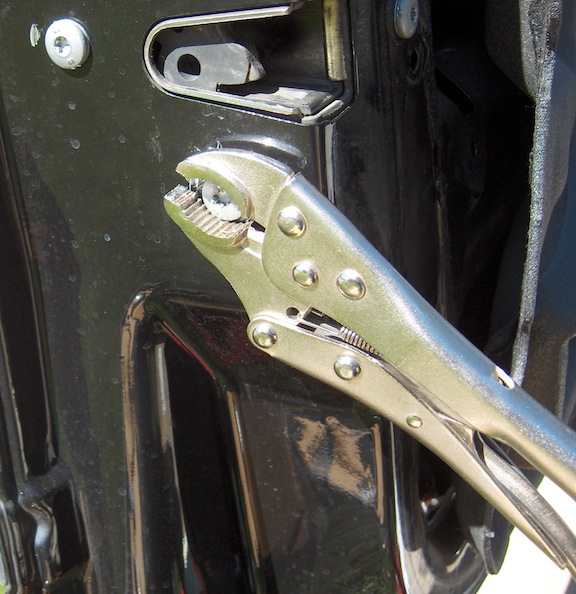
Next you need to loosen 3 screws that hold in the door lock mechanism with a T27 torx driver. However, these screws have thread locking compound on them and I soon realized that I was either going to destroy the Torx recess or break the driver bit unless I loosened them with vice grips first. Fortunately this is easy to do. Use adhesive tape over the adjacent paint around the screw heads if you want to avoid scratching it with the vice grips.

Using vice grips to loosen screws

These screws were in so tight they need help to get them started.

There is a rod that goes to the door opening latch and the latch can be removed with a T20 driver. I don’t have a picture of this, but it’s pretty self-evident how to take it off and disconnect the rod. Mine had a Tinnerman type nut that fell off the back, so be careful to catch the nut as you loosen the screw. Removing the latch allows you to move the locking mechanism with a bit more freedom.

Once you’ve done this, the mechanism can be wiggled about inside, but there’s not enough room to get it out of the door. Cut off any tie wraps on the wires going to the actuator to gain a bit more wiggle room. This is where the confusion ensued. All you really need to get out is the electric actuator, but it wasn’t obvious how it was held on and whether I’d be able to install the new one working in the blind, so to speak. I even got desperate enough that I removed what I thought was a simple stiffening bracket that was in the way that turned out to be the curved window track. In retrospect, it didn’t give me much more freedom to move the lock mechanism about and I worried that it would be hard to reinstall, since its upper end mated with another part that was up inside a blind recess. If I were to do it again, I’d try to avoid removing the window track.

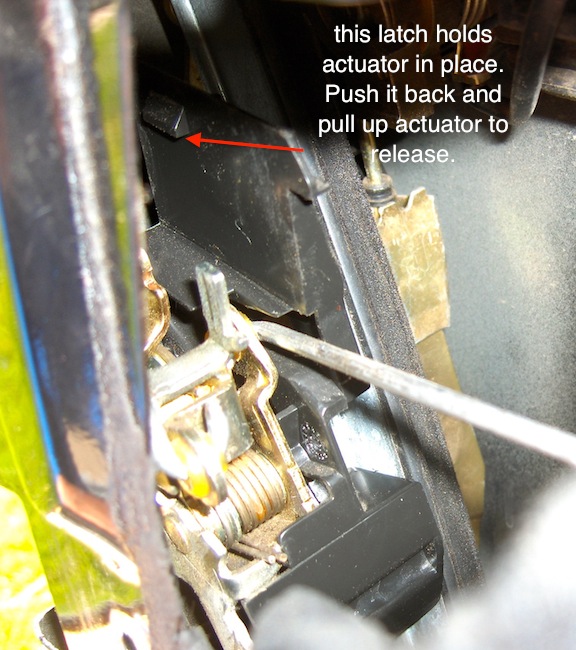
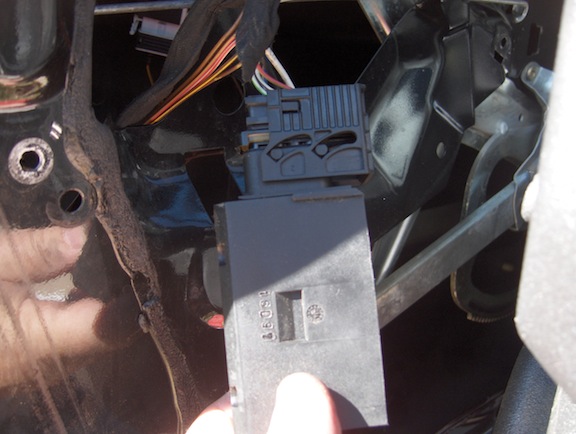
The electric actuator is held in place by a cantilevered plastic latch that grabs a recessed depression on its housing. You need to feel around for this latch, pull it back and lift the actuator up and away from the door latch mechanism. Once you do this, you can bring the electric actuator out into the open so you can disconnect the connector.

This latch holds actuator in place.

Latch recess on door actuator

Latch recess on door actuator

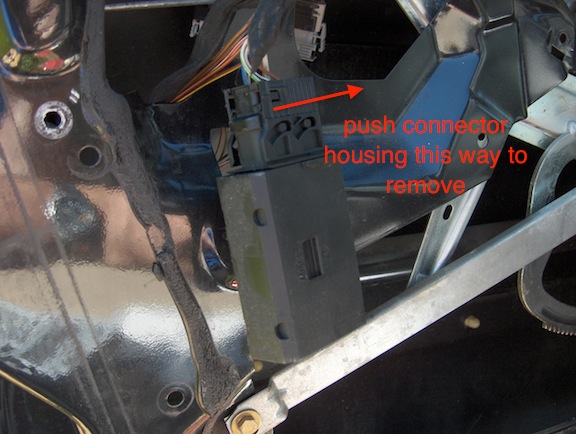
The connector is one of those unique to BMW where you push a mechanism down and it forces the connector outward over some pins that follow a curved track in a cam mechanism.

Removing the cable from the actuator

Push cable lock this way to unlatch it.

Removing cable from BMW door actuator

Removing cable from BMW door actuator

The re-installation of the new actuator on to the cable is just the reverse. You have to push the latch mechanism all the way down, and then align the cam pins in their slots in the connector and then pull the mechanism up to draw the connector into its recess.

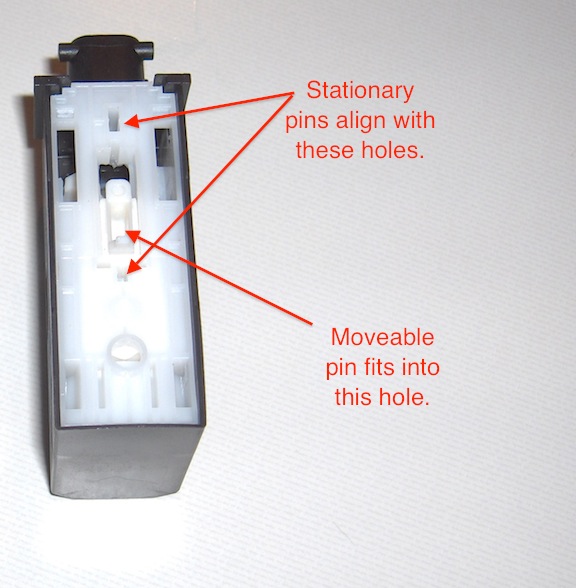
Once you’ve got the new actuator in place on the cable, the challenge is to get it back on the door latch mechanism by a sense of feel. There are 4 flat metal pins that need to mate up with holes in the actuator. Three of these are in line with each other and they have specific holes they need to mate with on the actuator. The two end ones go up into rectangular alignment holes and the middle one goes into the part of the actuator that moves back and forth. Make sure the middle hole is aligned with actuator pin by either pushing it forward or backward. When installed on the cable, this action will either open or close the door locks as you do it if you’re working on one of the front doors since they control the behavior of all other locks in the system.

Note holes for accepting stamped metal pins in door lock mechanism.

Note holes for accepting stamped metal pins in door lock mechanism.

In order to get the door lock actuator to align laterally, you will have to apply some sideways force since the cantilevered plastic latch will be pushing against it and you need to spring it outward a bit. Once the metal stampings are aligned in their respective holes, you can push the actuator down on the latch mechanism until the latch snaps in place. This was the hardest part of the whole project. I assumed I was going to be able to get the door latch mechanism out in the open or at least in a place that was easier to see, but it ended up being more of an exercise in working in a confined space with very limited visibility and access.

After I got everything back in place, there was a panicky moment where I had somehow gotten the door latch mechanism into a locked state even though the door was still open. Then door would not close. There was just a loud thud as the hook and latch banged into each other when I attempted to close the door. I was thinking I might have to re-open everything again, but I started playing with the lock, the key, and manually trying to open the lock by hand and I eventually got it all back in the proper state so the door would close normally.

It was with a great sigh of relief when everything was back together. These parts generally fail over time, and my wife had been experiencing problems for months where it was intermittent. Finally, the cold weather made it happen nearly 100% of the time, so she was very grateful to have a working set of locks again.

The BMW electric door actuators are available on-line from suppliers like Bavarian Auto for around $90 each + shipping but the best price was from BMW Parts Web and that was true of most BMW parts I’ve checked on.