

One of the biggest expenses of building a plane is the engine. Typically, this can account for up to one third of the cost, especially when you factor in the accessories like the starter, ignition, and fuel injection system. A rebuilt or new aircraft engine can cost between $20,000 to $40,000 depending on where you purchase it. If you can get a ‘run-out’ engine just about ready to be rebuilt, and the main components such as the crankshaft and case are in good condition, you can save about half the cost by just replacing items that wear out such as the cylinders, rings, and bearings.
A few months ago I was reading my email and noticed that someone from a local EAA chapter was interested in selling a Lycoming IO-360 that he was no longer going to use for a kit plane he had decided to sell. I emailed him immediately and told him I’d be interested in the engine because I am getting to the point where I want to start mounting my cowlings on the plane and you really can’t do that until you know which model of engine you’re going to use. In this case, the engine came out of a Mooney and had sat for the past 10 years awaiting a time when it made sense to rebuild it. The price was reasonable for an angle-valve IO-360 which, despite having 20 extra horsepower (200 HP vs. 180 HP), is not as sought-after as the straight-valve models which tend to be about 40 lbs lighter. Of course, I intend to lighten the engine with a lightweight starter, alternator and ignition. The IO-360A1B6D has an odd arrangement of magnetos, using a single shaft to drive a pair of magnetos mounted in a housing, unlike the more common arrangement of one on each side of the engine. This might be a deterrent for some people, but I’m planning on running dual electronic ignitions with a backup electrical system, so it’s not as much of a concern for me as it might be for someone else.
My biggest concern in buying a used engine was that it had a prop strike that was not recorded in the logbook. This would not be the first time a damaged engine was quietly removed and sold to a broker and passed through enough hands that all hope of finding out the origin of the engine is lost. A prop strike generally ruins the crankshaft, the single most expensive part of the engine. But this engine had a logbook with it, along with a tail number of the plane from which it had been removed. So I tracked down the plane in the government database and called the owner and asked if there ever was a prop strike that he knew about because if a gear had collapsed and caused a prop strike, that event would have likely made it into the logbook of the aircraft, even if it was missing from the logbook of the engine. In talking with the owner, he told me that the previous owner decided to go with a factory new engine because he felt it would more than pay for itself with the increased resale value of the airplane. I had to agree with that logic because it also allowed him to get the more convention arrangement of magnetos, which also increases the perceived value of the plane. So the engine logbook history appeared to be legitimate.
I decided to buy the engine. One of the advantages of getting a local engine is that you don’t have to worry about how to get it shipped across the country which on a 300 lb engine that is quite bulky can get very expensive.

The next step was to figure out how to move it to my hangar. I figured it would fit in my Durango, but I didn’t know where I could borrow an engine hoist to lift it and put it in and then remove it when I got it to my hangar. I looked through Harbor Freight’s website and found that they had a lift that was very reasonably priced that appeared to fold up and come apart quite easily. That was important to me because I knew I’d have to put it in the back of the Durango along with the engine. As you can see from the photo, the engine fit nicely into the Durango. That SUV has now transported every large part of the plane to the hangar, including the fuselage, wings, canard, canopy, turtleck and engine. I worried when I sold my truck that I’d really miss it, but the versatility of the Durango continues to impress me.
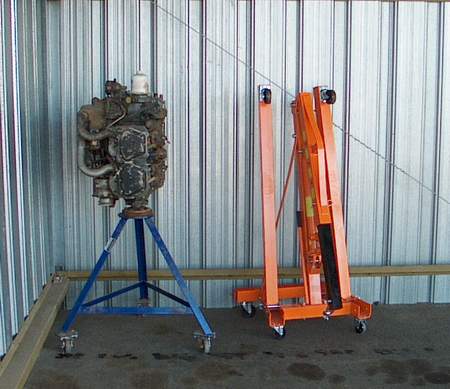
Here’s the engine sitting in the hangar. The next step is to get the engine mount so that it can be fitted to the firewall and then the cowlings fit around it. I will have some surgery to do on the cowlings because this engine has tuned intake manifolds and they take up more space than ordinary intakes and are largely responsible for that extra 20 HP.
