Fixing a broken latch on the Yaesu YSK-100 Separation Kit

Share

I’ve maintained the Yaesu FT100 FAQ for about 10 years. For those of you not familiar with ham radio, the FT100 is a popular mobile transceiver. I’ve talked to people from all over the world on it. As time went on, the FAQ stabilized and I rarely have to do much updating to it now other than to fix broken links. This FAQ still sees a fair amount of traffic.

My FT100 is mounted in my Durango using a YSK100 separation kit. The separation kit makes this radio easier to mount in a vehicle by separating the user controls, called the ‘head’, from larger body of the radio. The head then can be installed on a faceplate that is connected to the radio’s body with long cables. The body of the radio can be installed wherever you find room in the vehicle. Mine is hidden in the center console.

About a year ago, the latch that holds the head on to the face plate of the YSK-100 separation kit broke while I was removing the head.

I’ve never been happy with the YSK100 faceplate design since the latch requires an excessive amount of force to deflect when installing or removing the head. Without the latch, the radio could still be used, but it would fall off easily whenever I brushed against the head. Since the radio has been out of production for a few years, spare parts hare hard to find. So I decided to fix it myself.

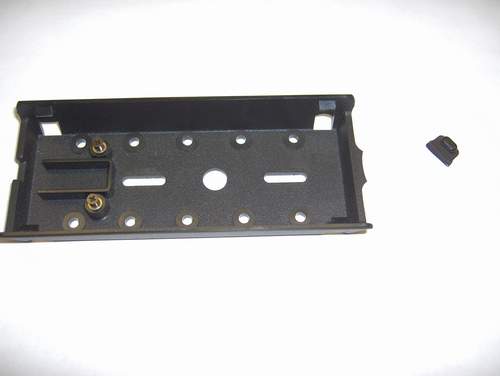
YSK-100 faceplate with broken latch

The plastic latch had cracked off of my faceplate.

There had been several reports of this problem on the FT100 Yahoo Group, but no one had ever reported figuring out a fix for it. You can’t just glue it back in place, because the part is highly stressed and a glue joint would not hold up to those extreme forces.

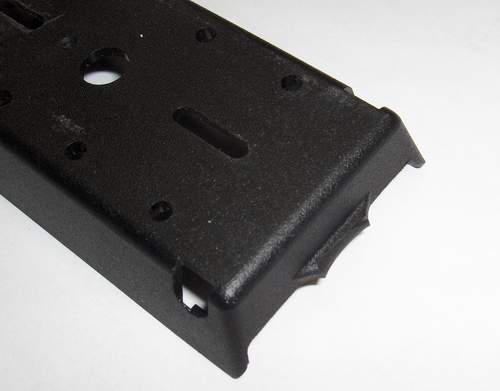
YSK with cracked latch

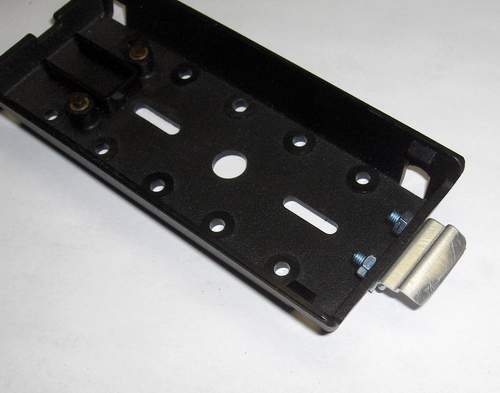
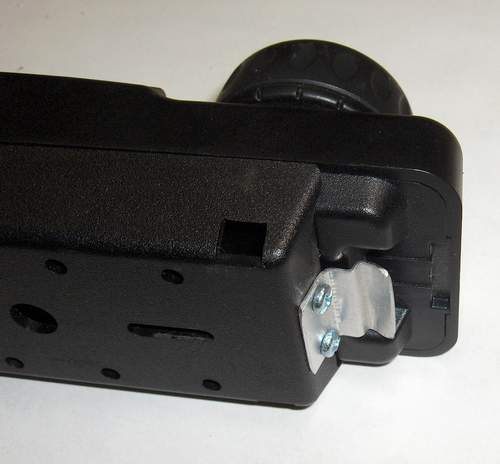
As you can see in the above image, a small portion of the latch is still on the wall of the faceplate. I sanded this off with a small belt sander. Next I took some measurements and started bending some .032″ thick aluminum sheet metal to make my own latch. I have a small metal brake/shear, but in this case, I just ended up using a vice to bend the sheet metal since the brake has a limit on how small the bends can be. I drilled some small holes and with attached it with M3 screws and nuts.

Sheet metal replacement latch for the YSK100

Here is a top view of the latch.

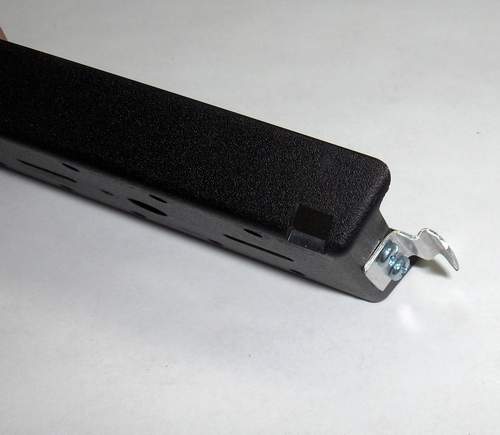
It works pretty much like the old latch in that it’s very stiff and holds with a lot of force. I suppose a thinner material, perhaps a lighter gauge steel, might have worked better, but this one can be bent to get the desired feel. If it ever breaks again, I know how to make a new one.

Here is a side view of the latch.

YSK-100 with metal latch

New metal latch with head installed.


Now that the radio is fixed, I plan to spend more time using it. When it was in that state of falling off the faceplate whenever I touched it, I frequently removed it all together and stowed it so it wouldn’t get damaged. But now I’m looking forward to having a properly functioning radio again. I tend to avoid using something that doesn’t work the way I want it to and then when I get around to fixing it, I wonder why I didn’t do it sooner.

I hope that others are able to take advantage of my description and pictures to help them to fabricate their own latch in the event that they break the plastic one that comes on the faceplate.

Finding the OBD port on a BMW E36

Share

A few weeks ago my wife’s 1997 BMW 328i illuminated the ‘check engine’ light and she called me asking if she should immediately take it to the dealer to see what was wrong. Since I had just changed the battery on the car and thus the electrical system had lost power a few times, I thought that it might be a false alarm and told her I’d like to look at the diagnostic trouble code (DTC) on its OBDII port before spending any money at the dealer. Taking a car to the dealer with a ‘check engine’ light is giving them permission to charge your for an hour’s labor for what might turn out to be nothing.

I had purchased an OBD scan tool at Amazon.com that hooks up to a USB port on a computer and it’s based on the ELM327 chip, which means it can read any of the standard protocols available on the OBD connector. However, when I first tried to use it on the BMW just to satisfy my curiosity after purchasing the tool, I recall not being able to locate the connector. On U.S.-made cars like my Dodge Durango, these OBD connectors are located under the driver’s side dash and are usually exposed and thus easy to locate. In looking through a few BMW forums for help on where the port is located, I found some conflicting advice about the port being under the hood and having a special round plug that was unique to BMW. Some forum responses assured me it was down there under the dash next to the clutch but it was covered.

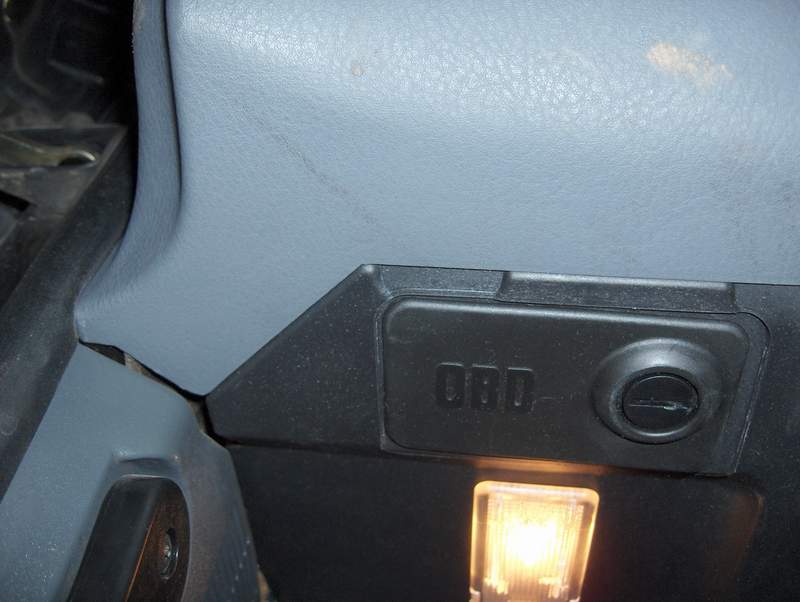
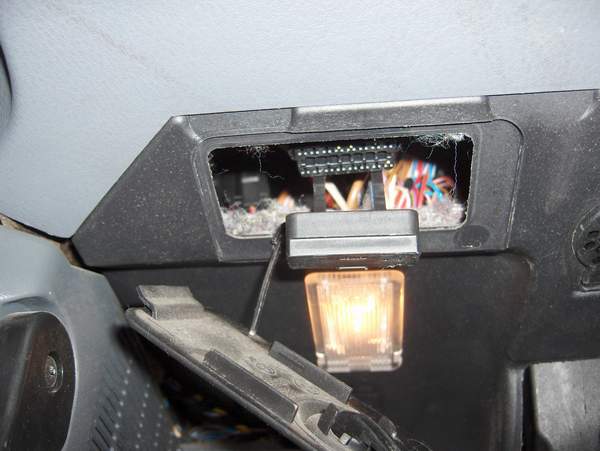
After getting a flash light and putting my head under the dash, it was almost embarrassing that I didn’t find it sooner. BMW put a cover on it that was clearly labeled OBD, but unless you’re a contortionist and get your head under the dash, you won’t be able to read that cover. The cover is easily opened by turning a screw head with a coin and the cover will hang down from a tether. Similarly, the connector itself has a cap over it which can be pulled off and it is also tethered. After pulling off these covers, the OBD plug was plainly visible.

Please note, the photos below are taken from the driver’s side floor looking up at the bottom of the dashboard.

BMW OBD port under dash

The BMW’s OBD port is covered

BMW OBD port opened

BMW OBD port shown with covers open

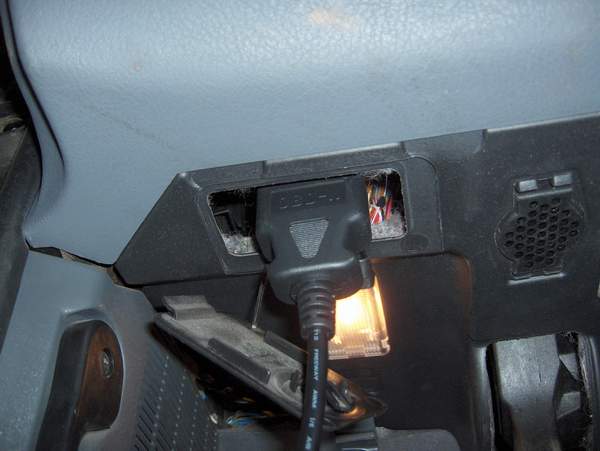
BMW port with cable attached

BMW OBD port with cable attached

After connecting the scan tool and running the software to check the codes, I found out the check engine light was complaining about a past event where the coolant sensor had reported too low a value. I checked the radiator fluid level and everything looked fine. I figured the car’s computer may have gotten confused when I was replacing the battery. I used the scan tool to turn off the check engine light. It’s been a few weeks and the light has stayed off, so the little device has paid for itself several times over just for that one usage.

I wanted to document this here in the blog in case someone goes searching for how to find the BMW’s OBDII port since a few pictures of it sure would have been helpful to me.

Replacing a Seiko Kinetic Watch Battery

Share

I’ve owned a Seiko Kinetic model 5M62 watch for about 8 years and I really liked the fact that it never needed batteries and would run for days without winding. The Kinetic watch is self-winding, and instead of using a spring to store the energy, it converts the mechanical motion into electricity and stores it instead. This gives it the convenience of a self-winding watch along with the accuracy of a quartz movement. However, a few weeks ago I noticed that it would stop running if I took it off for a few hours. Sometimes, when I was just typing on the computer and not moving my wrist around, it would stop running. Below is a picture of the watch.
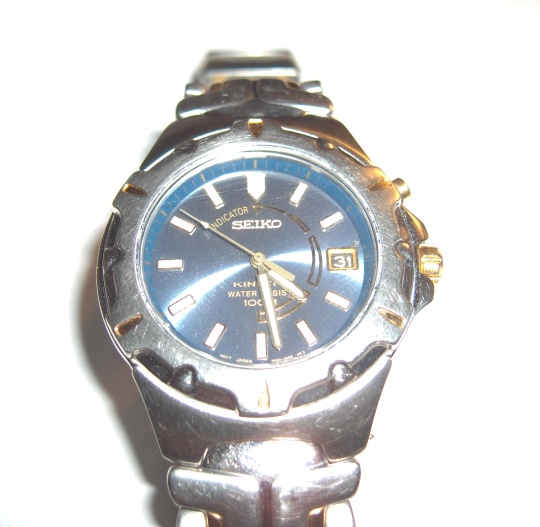
Seiko Model 5M62

I figured there was something wrong with the energy storage system, possibly a dead battery or bad capacitor. After a web search, I found out that the watch does have a battery, which is sometimes referred to as a capacitor, but it is indeed a battery. All rechargeable batteries eventually lose their ability to hold a charge and after 8 years, this one had simply worn out. The problem with changing it is that the Seiko Kinetic battery is not one of those standard watch batteries that you buy in a store and easily change by yourself. However, I found that it could be purchased from vendors on Ebay or other on-line websites like Swatchbattery.com for around $20.

In our disposable society, I’m sure this issue could have been an excuse to go shopping for a new watch. But once you become attached to a watch, and this one is water proof so I hardly ever take it off, it sort of becomes a part of you. I hated the thought of replacing it, especially because I felt it had many more years of service.

I started reading a few of the websites that talked about replacing the battery as a DIY project, but wasn’t sure if I was up to the task or had the necessary tools. I never had taken the watch apart and looking at the back of it, I didn’t think it would simply pop off like my previous watches that had user-replaceable batteries. I talked with the jeweler where I bought it and they told me that they would have to send it away for repair and thought it might cost $65 or more to replace the battery. The local jewelery repair shop had a similar assessment. So, being an adventurer and inveterate fixer, I decided to do it myself.

You can see from the image below that the watch had notches on the back of its case. This meant that it needed a special case opener wrench.
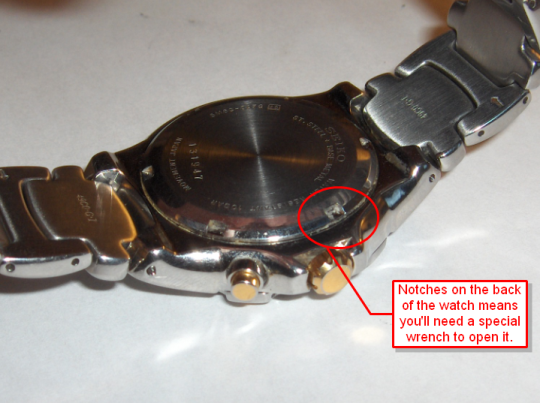
Watch with notches requiring a watch wrench

I decided to get a Jaxa style opener (shown below) which clamps down on three notches since it seemed like it would do the job better than the openers that only grabbed the case on two notches. These can be found on the Internet or at Harbor Freight for less than $10.
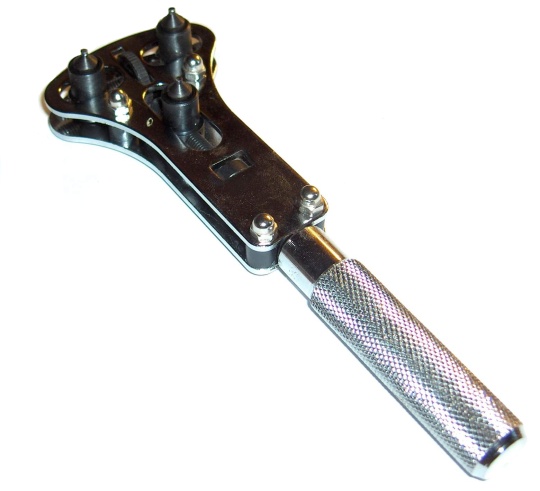
Seiko watch case wrench

To make things easier, I decided to remove the watch band. Most of the watches I’ve owned had spring-loaded pins that were pretty easy to remove, but this model had pins pressed in that held the watch band in place. I was able to push them out with the tool shown below.
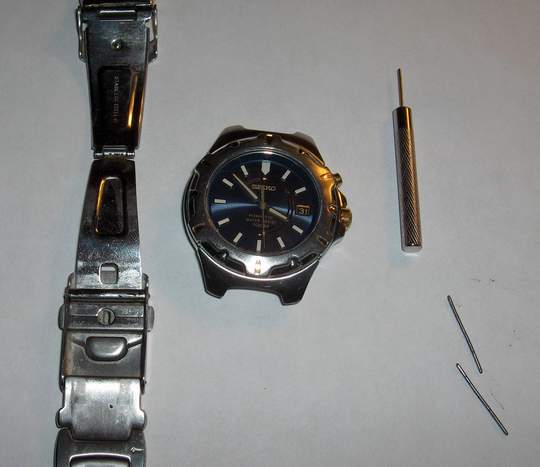
removing the pins from the Seiko watch band

I used a paper towel to protect the watch and gently gripped it in a vice and was able to unscrew the back with the watch opener. It took a fair amount of torque to loosen the case back. In the image below you can see what it looks like inside. The battery is the brass-colored part in upper side of the image below. To get to it, you need to remove three very small screws. I had several small jeweler’s screw drivers around the house, but these screw slots are so tiny that I found it necessary to use a file on one of my screw drivers to make a very sharp tip in order for it to fit in the slots of these screws.
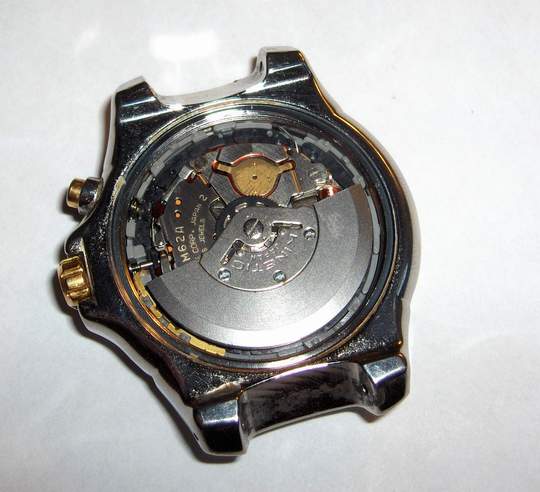
inside view of Seiko Model 5M62

The center screw holds the winding weight and gear in place. These items can only go one one way as the shaft is keyed. Actually, they can go on two ways, but both ways are correct. However, you can put them in upside down, so pay attention to how they are installed as you remove them. The gear must mate up with a smaller gear so make sure that it does before installing the winding weight and screw.

removing seiko watch rewiding weight

When you get all the parts out, they look like the image below. There are 3 small screws, the winding weight, a gear, a red mylar insulator, a battery hold-down clamp, and the battery. To re-assemble them, just (carefully) put them back together they same way you took them apart. You’ll find a pair of sharp tweezers useful to handle the screws and other parts.
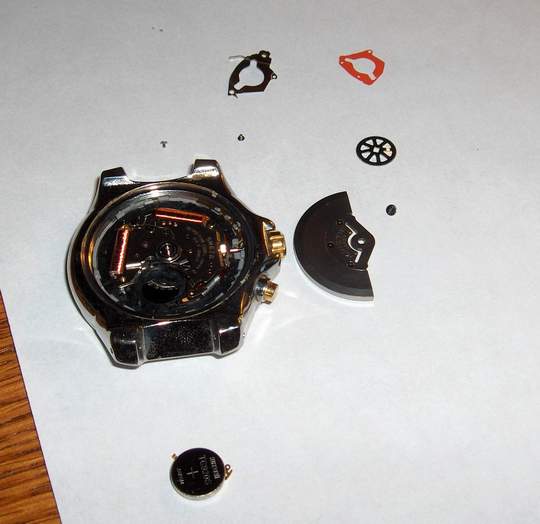
disassembled view of seiko 5M62 watch battery

Here is the package I got from an online retailer. It came with a red mylar insulator, a hold-down bracket, and the Maxcell TC920S battery.
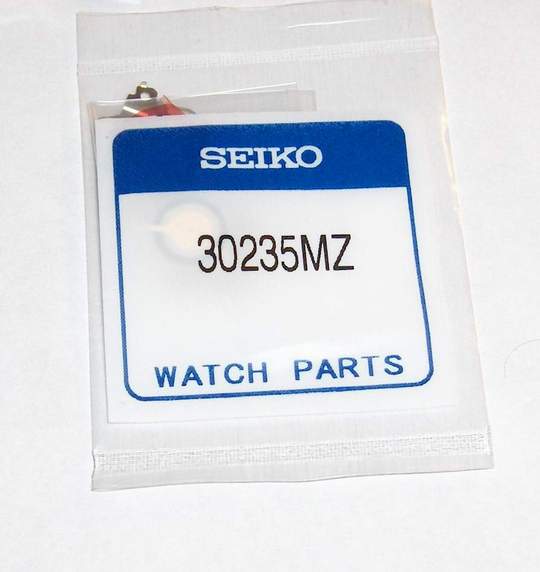
Seiko 3023-5MZ replacement battery

In addition to the tools mentioned above, I also used the magnifying headset shown below which I highly recommend. I think that the magnifying headset (with built-in LED lights) was instrumental in allowing me to work on such a small device. They can also be found on the Internet for less than $10.
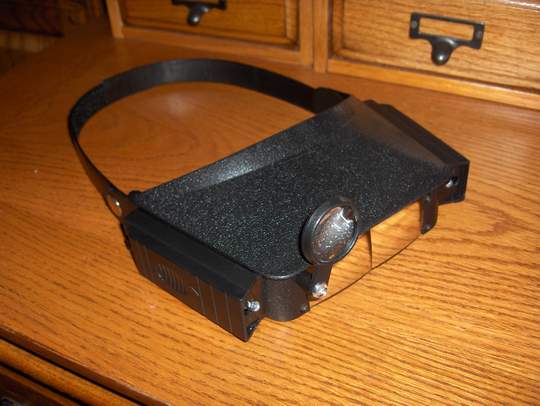
lighted magnifying headset

If you’ve stuck with me this long, I’m going to give you a bonus. I mentioned that I had owned the watch for 8 years so now I have a confession. I always wondered what the push-button at the 2-o’clock position was used for. Sometimes it would advance the second hand 5, 10, 20, or 30 seconds and then it would sit there and stop. Then it would start running after the time had caught up with it. I had no idea why it did this because I had never read the owner’s manual and don’t even know if I still have a copy of it. So, in case you’re wondering, here is a copy of the page from the owner’s manual I found online that explains it (hint: it’s a sort of ‘gas gauge’ for the battery):
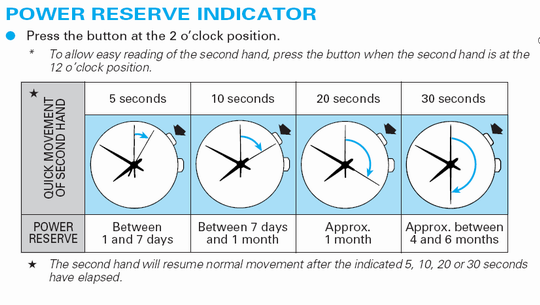
Seiko reserve indicator explanation

Incidentally, when the watch battery had begun to fail, it was impossible to get the reserve indicator to advance the second hand more than 5 or 10 seconds even after vigorous winding. Now with the fresh battery, it jumps forward 30 seconds whenever I push it.

Would you like to know how to correctly wind the watch and how much it takes to keep it moving for a day? If so, here is the explanation, again from the Seiko manual:
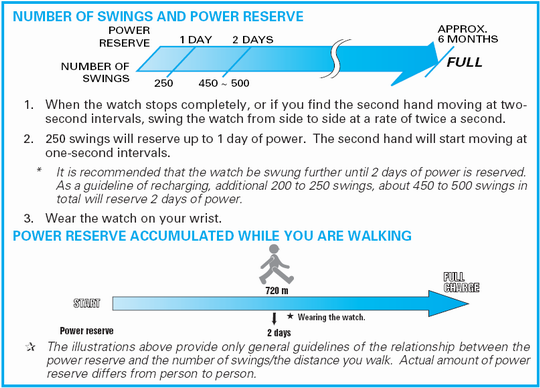
winding a seiko kinetic watch

It would appear that if you walk more than 720 meters (about 1/2 mile) you’ll impart enough energy to keep it going for a two days. Here’s another interesting tidbit: If you see the watch second hand jumping 2 seconds at a time, that means the battery is low and that you have less than 24 hours of charge left on it.

So, there you have it, a way to resurrect a watch that should last for decades. If you have one of these Seiko Kinetic watches sitting in a drawer gathering dust because of a dead battery, I hope my explanation gives you the motivation to get it working again for minimal cost. Please feel free to leave a comment if you have any questions or just want to share your experience with other readers.

Does it seem like too much trouble or beyond your skill level to do this repair? If so, you may want to get in touch with John Safranek at KineticRepair.com in Denton, TX or call him at 940-239-9888. He’s a Seiko Kinetic expert and performs these battery changes starting at just $49.95.

Putting Tire Sealant in Presta Valve Tubes

Share

I got a new bike earlier this summer (a Kona Dew Deluxe) and it’s a sort of cross between a mountain bike and a road bike. It uses the narrow 700 cm road tires and so I’m learning to deal with Presta valves whenever I need to inflate the tires. That requires putting an adapter on the valve stem since my air compressor is set up for much more common Schrader valves.
kona-dew-deluxe
One of the annoyances of bicycling on the Front Range of Colorado is the abundance of thorns called ‘goat heads‘. They will easily puncture bicycle tires. I learned this many years ago when I purchased my first bike in Colorado only to get two flats tires on the same day I took it for its first spin. When I returned to the bike shop, they asked if I had put TR tubes in it yet. TR tubes? “What are those and why didn’t you let me know about this when I bought the bike?” I was new to Colorado and never heard of TR tubes. “TR” stands for thorn resistant and their outside wall is about 4 times thicker than that of standard tubes and so the goat heads generally cannot penetrate in far into the tube wall enough to puncture it. After installing these tubes, I didn’t have any more problems with flat tires from the goat heads on my mountain bike.

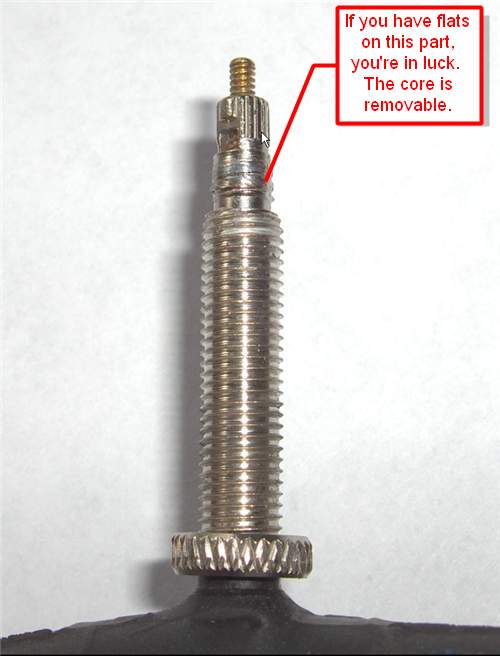
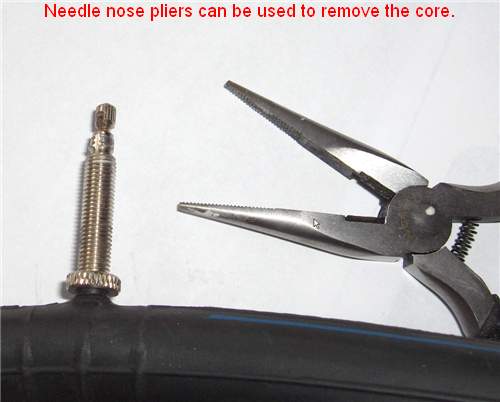
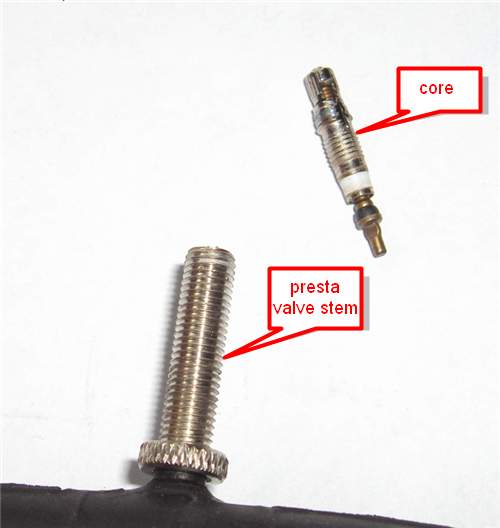
However, with my new bike, despite putting TR tubes in it before leaving the bike shop, I’ve had several flats from goat heads. I guess it’s because the rubber on both the tire and the tube is thinner to begin with than standard 26″ mountain bike tires. So I needed another plan. I see a lot of Slime tube sealant for sale these days in bike shops, and I was wondering if there would be a way to get it into tubes that had these newfangled Presta valves since the cores didn’t appear to be removable. I looked on the Internet and found several websites that talked about a method of using cutters to clip off the last few threads on the part that holds on the nut you need to loosen to put air in Presta valves. This causes the threaded part to fall into the tube which allows enough room to put the Slime in the tire. Then you have to push the threaded part back up into the stem and secure it with the nut, which now has no locking thread to keep you from unscrewing it all the way. I was hoping that I would not have to do that. I found that I was in luck because my tubes had Presta valves that allowed me to remove their cores. If you look at the part of the valve that has the threads to hold the valve cap on and it has flats on it, then that means the core can be unscrewed.

presta-valve-1

This Presta valve above has flats on the threaded part that holds on the cap which means the core can be unscrewed from the valve stem.

presta-valve-2

presta-valve-3

In my case, I already had some Slime but my local bike shop guy, Mark at International Bike in Greeley, is a strong proponent of True Goo. He believes that this product is easier than Slime to put in the tire due to its lower viscosity and that it seals better too.

If you search on the Internet, you’ll see a lot of people telling you these tube sealants don’t work. I think the reason for this is that it’s still possible to get a flat even with tube sealant, especially if the hole is so big that the sealant comes out so fast it can’t solidify. Also, people are much more likely to post a rant about a product that let them down rather than to take the time to post a positive review. In addition, when tire sealant works, you don’t really have hard evidence to let you know that you would have gotten a flat if you didn’t have the sealant in the tube. So it’s hard to measure tube sealant’s effectiveness.

In my case, I had the perfect experiment. My rear tire’s tube was losing nearly all its air every 2 days. It meant that each time I wanted to go for a ride, I needed to put air in the tire. I had debated on whether to patch or replace the tube, but then I realized that it would be a great experiment to see for myself whether tire sealant actually works, especially on slow leaks, which are the kind you generally get from the tiny holes that goat heads put in the tubes.

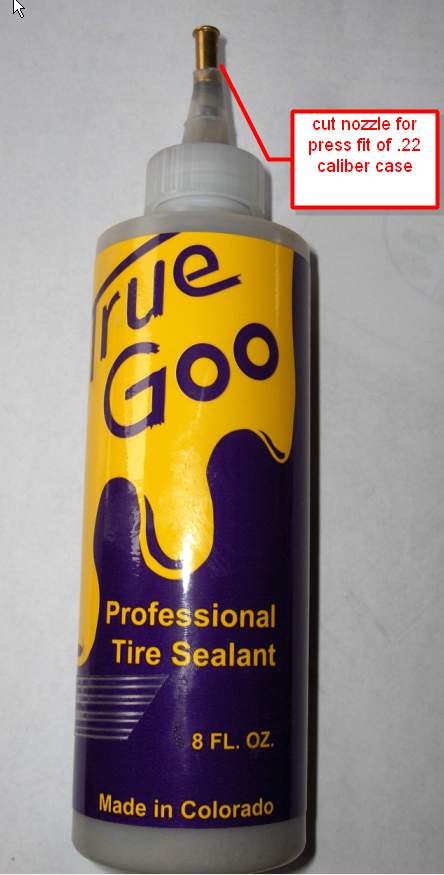
In order to put the sealant in the tire, my bicycle guy gave me some good advice. The rubber transfer tube that comes with these sealants is sized to be a press-fit on Shrader valves, which is much too large in diameter to seal on Presta valve stems. However, if you gradually cut the top of the cone-shaped nozzle until it is a press-fit for a .22 caliber cartridge, it will also be a press fit on a Presta valve which is about .235″ in diameter. You can also use the .22 bullet as a cap because the red cap that is included with it will no longer fit after you cut that much of the tip off the nozzle. You can use a spent .22 caliber casing or something else that is similar in diameter if you’re worried about using live ammunition to seal the bottle. Here’s a picture of what it looks like:

True Goo tire sealant

True Goo tire sealant

If your Presta valve has a removable core, you can even put the sealant in when the tire is on the bike. Just rotate the valve to the top, insert the nozzle on the valve stem, and rotate it back around to the bottom. Squeeze in about 3 ounces of fluid, rotate back to the top, remove the bottle. Then replace the valve core and fill it with air.

I found that my tire that leaked down every 2 days consistently has now held its pressure for several weeks, which leads me to believe that this stuff actually works as advertised.