Replacing Remington and Norelco Shaver Batteries

Share

I came to the realization that I’ve never worn out a Norelco or Remington razor yet I’ve owned a number of them over the years. But I have worn out a number of shaver batteries. My first Norelco razor was a plug-in only model. I was lured into buying a battery-powered model that would let me shave without being tethered to the wall outlet. Over the course of a year or so, I noticed that the charge on the battery wasn’t lasting very long and so this eventually became no different than the model that had to be connected to the AC outlet all the time. I bought a replacement when I was planning a camping trip and would not have dependable access to an AC outlet. Over the course of a few years, this model did the same thing, i.e., its batteries wore out and it also had to be plugged in all the time.

At the time, I priced a service that would replace the batteries and figured out, like many others, I’m sure, that it wasn’t much more expensive to buy a new razor than to repair an old one. So I opted to get a Remington R9190 model that I could clean by running it under the water tap. What would they think of next? It had amazing capacity, providing 60 minutes of shaving on a single charge. However, after about 18 months, it too, needed to be left plugged in all the time.

I figured that these razors only needed new batteries, but knew that it would require getting the right kind of batteries, and then having to do some unsoldering and re-soldering. I found a website that sold shaver batteries and would provide the correct ones for the razors based on their model numbers. In this case, the razor model numbers I wanted to fix were a Norelco 6843XL and a Remington R9190. I found the battery packs at Electricshaver.com. In the case of the 6843XL, I received a single AA 600 mah NiCad battery with solder tabs at a cost of $9.95. The R9190 battery pack contained a pair of AA NiCads with solder tabs that were joined together at one end. I had to cut these apart to actually install them so it probably would have been better if they just provided two AA solder tab batteries. That battery pack cost $14.95. I realized afterwards that I could probably just have just ordered 3 regular solder tab AA NiCad batteries from any of a number of Internet sources for around $3.00 each and saved about $15. Live and learn.

The Norelco 6843XL came apart quite easily. I just removed two screws (although I did need to use a torx driver) and then popped its snap joints apart. The battery tabs of the single AA battery were soldered through the PC board, but with a solder sucker and some solder wick, they were easily removed and the battery was replaced.

The Norelco 6843XL was easy to take apart. It contained a single AA solder-tab battery.

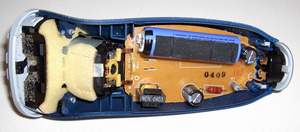
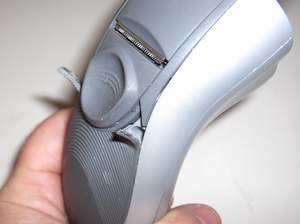
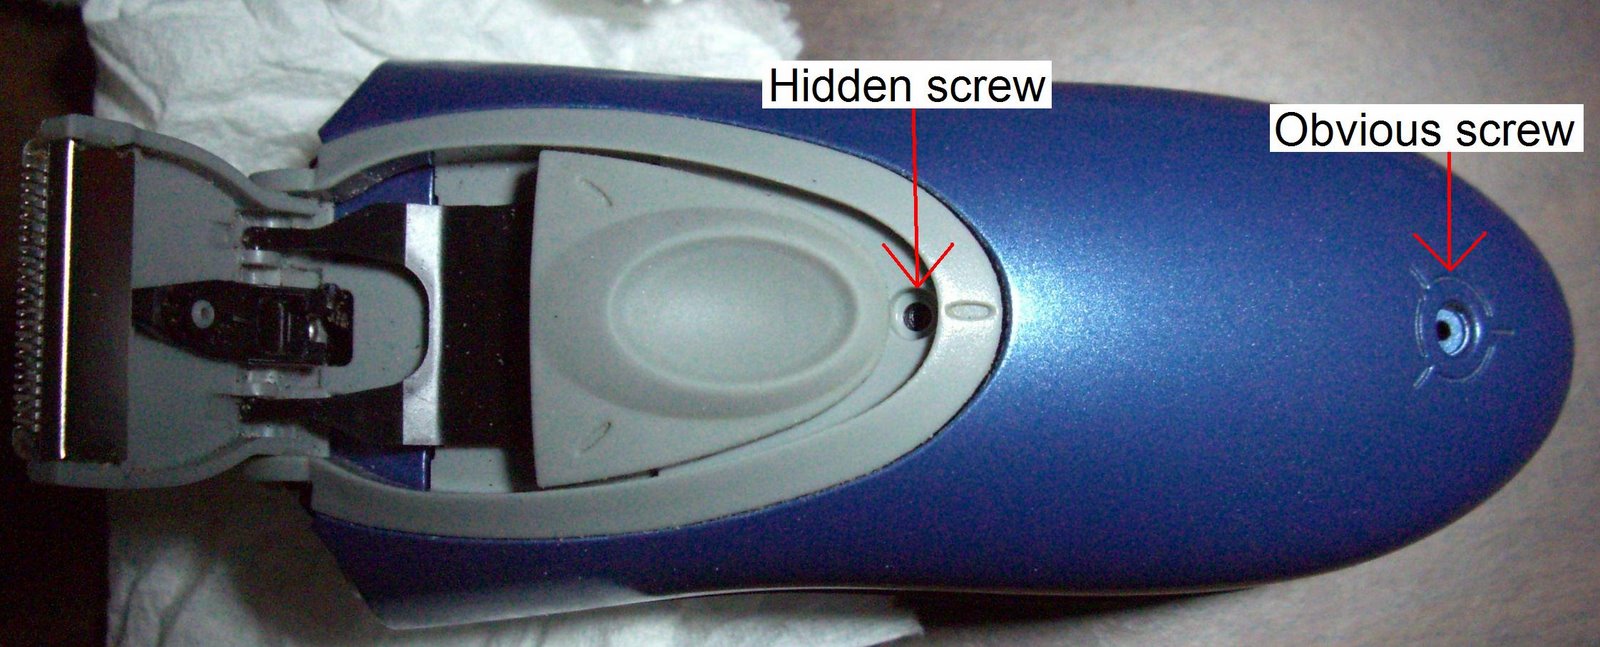
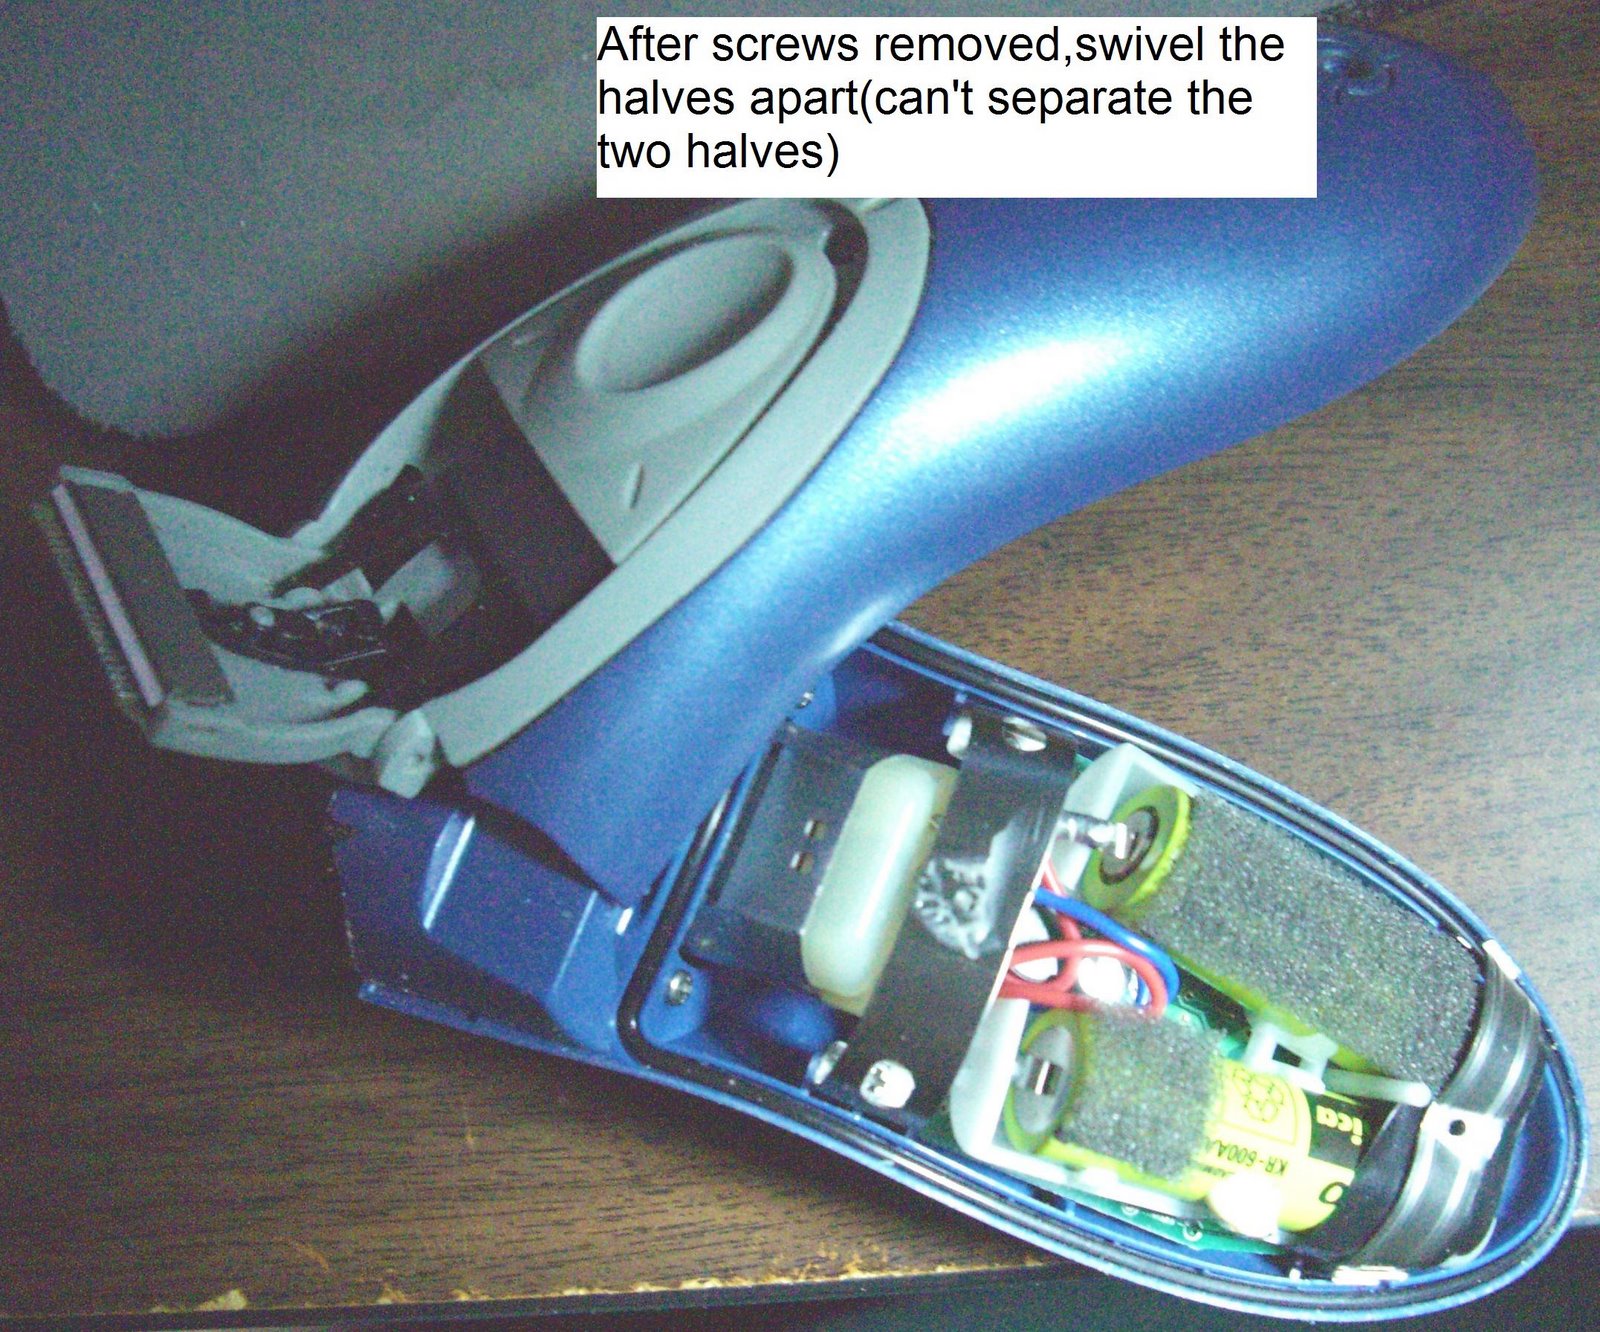
The R9190 wasn’t as easy to disassemble. There were 4 exposed phillips head screws which I removed, but the casing still would not come apart. After a lot of time fiddling, I found that there were two more hidden screws under the rubber backing and once these were removed, everything came apart. It was first necessary to pry up the corners of the rubber backing which was glued down on the back of the shaver (as shown in the photo) to expose the hidden screws. I came close to giving up on it. It’s the reason you may have found this posting, because searching for ‘Remington R9100 R9190 R9200 shaver battery replacement’ came up with nothing on the Internet. So I figure that within a few weeks of posting this, it will start to get hits because if I’m having this problem, chances are pretty good that others are as well.

The R9190 had two hidden screws keeping it together. After prying up the rubber as shown in the photo, the screws were exposed.

The main reason I’m posting this is because I know how much I appreciate it when I find some obscure piece of information on the Internet that allows me to fix something that I’d otherwise have to throw away. I’m disappointed that Norelco and Remington continue to build products whose batteries cannot be easily serviced. I’ve read recently that many cellphones get replaced when their batteries goes bad after around 18 months of use. I find that to be extremely wasteful, and in the case of most cellphones, completely unnecessary because the batteries are generally easily replaced (unless you have an iPhone) . Of course, the battery packs sometimes have excessive markups on them when purchased from the manufacturer so that probably contributes to it as well.

I think that building batteries into a product in such a way that they cannot be replaced by an end user is unacceptable. Rechargeable batteries are only good for around 500 charge cycles and then they must be replaced. I wouldn’t want to be associated with a product where the batteries are so difficult to replace that the battery life determines the useful life of the product.

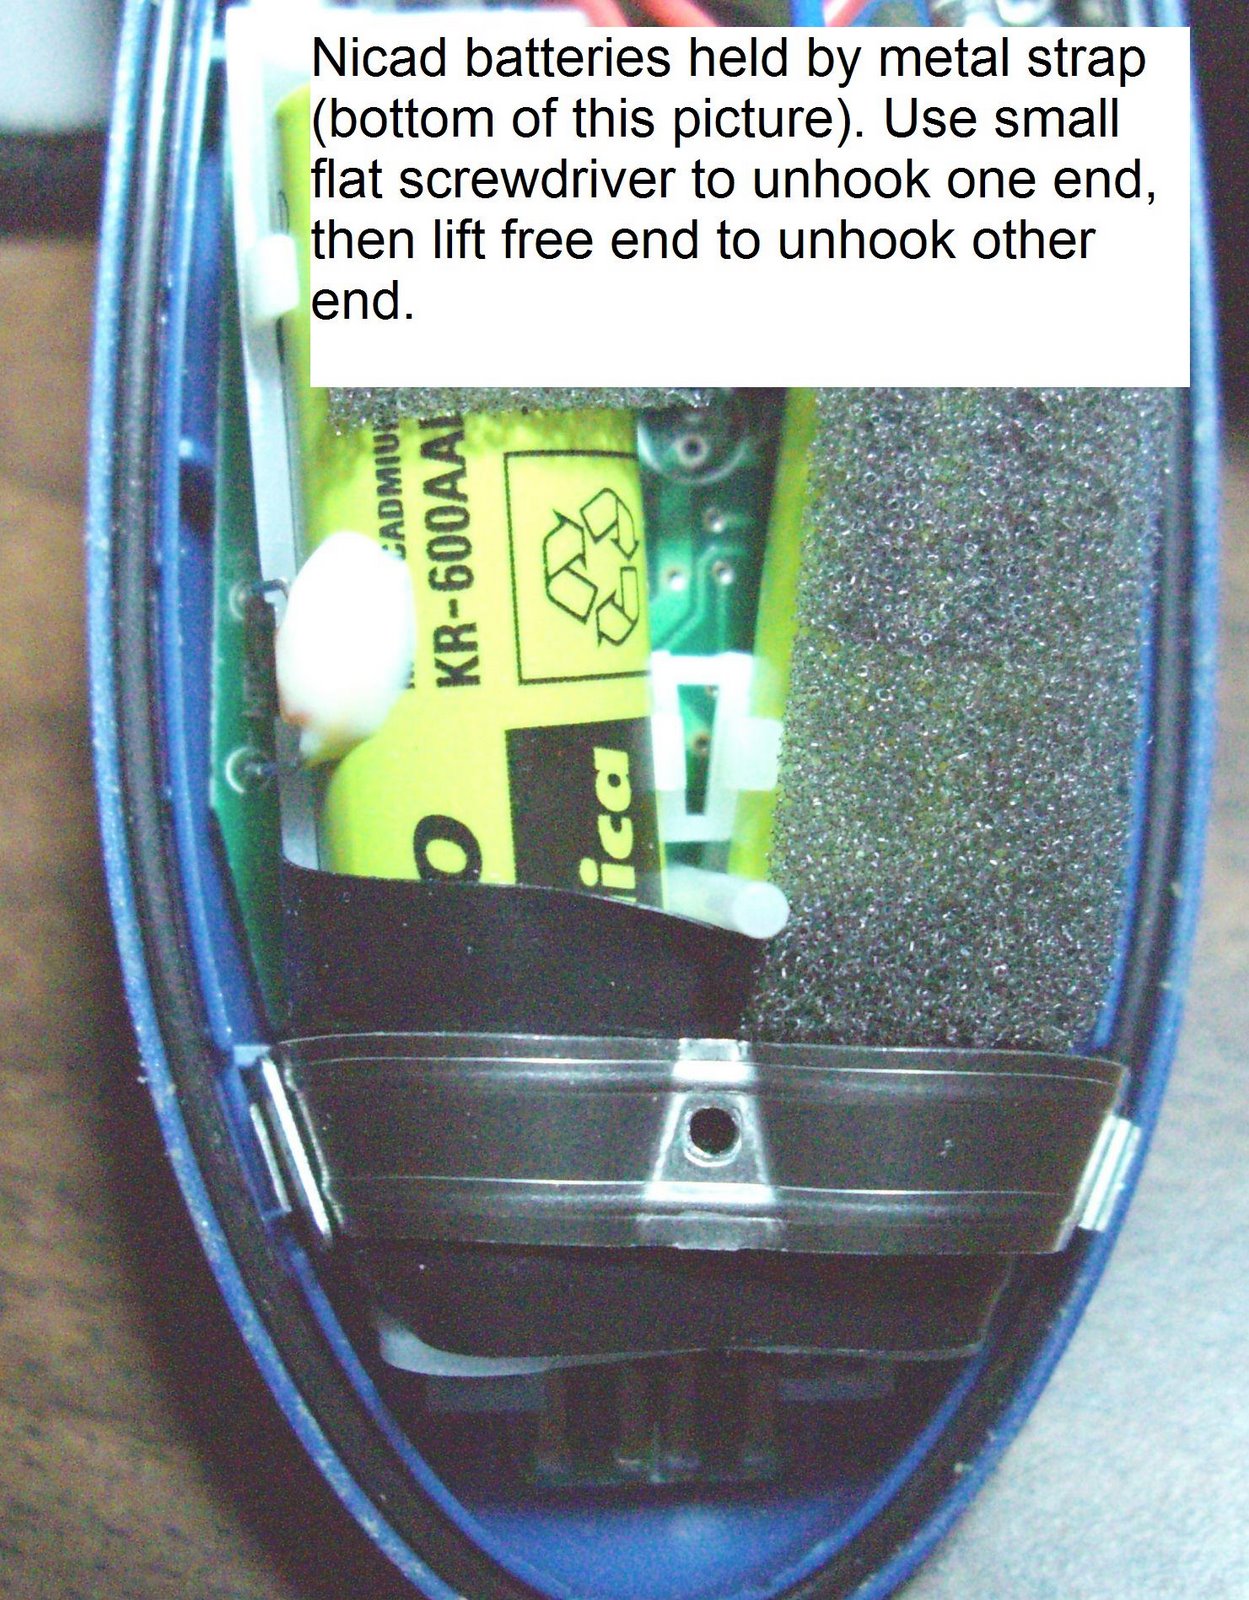
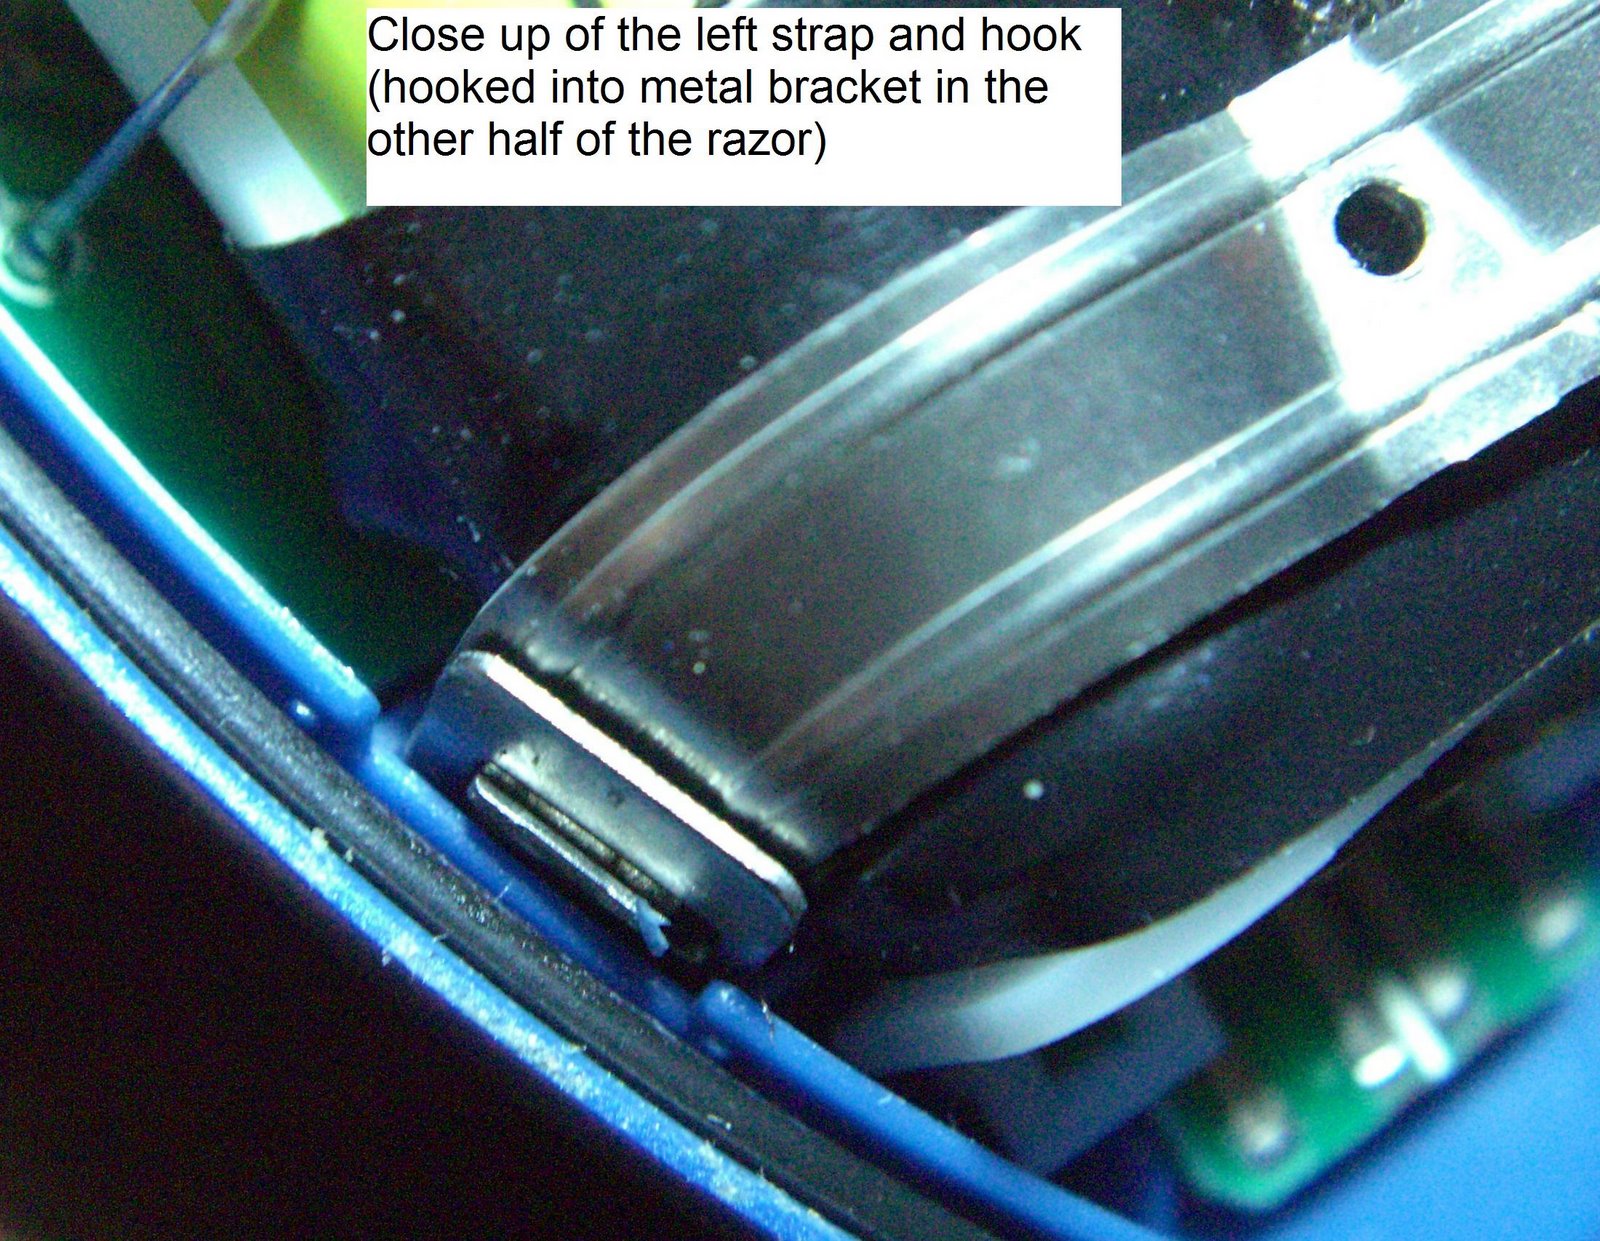
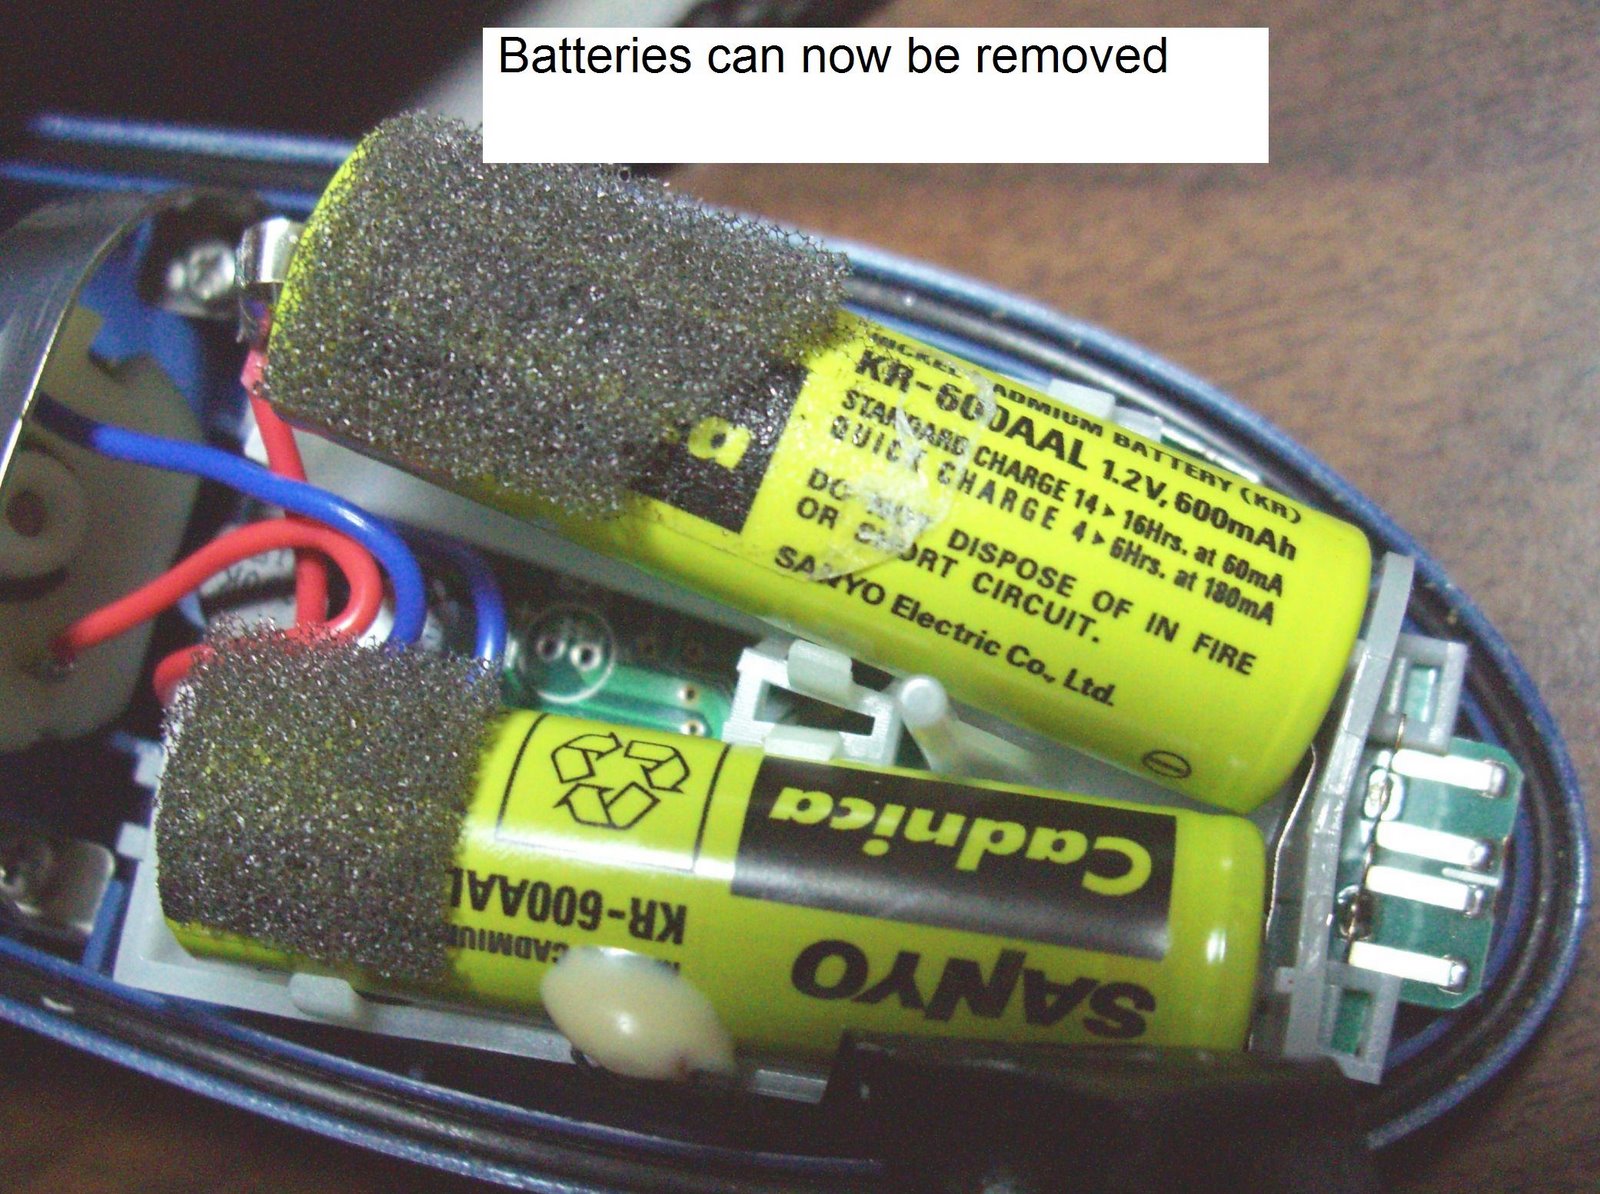
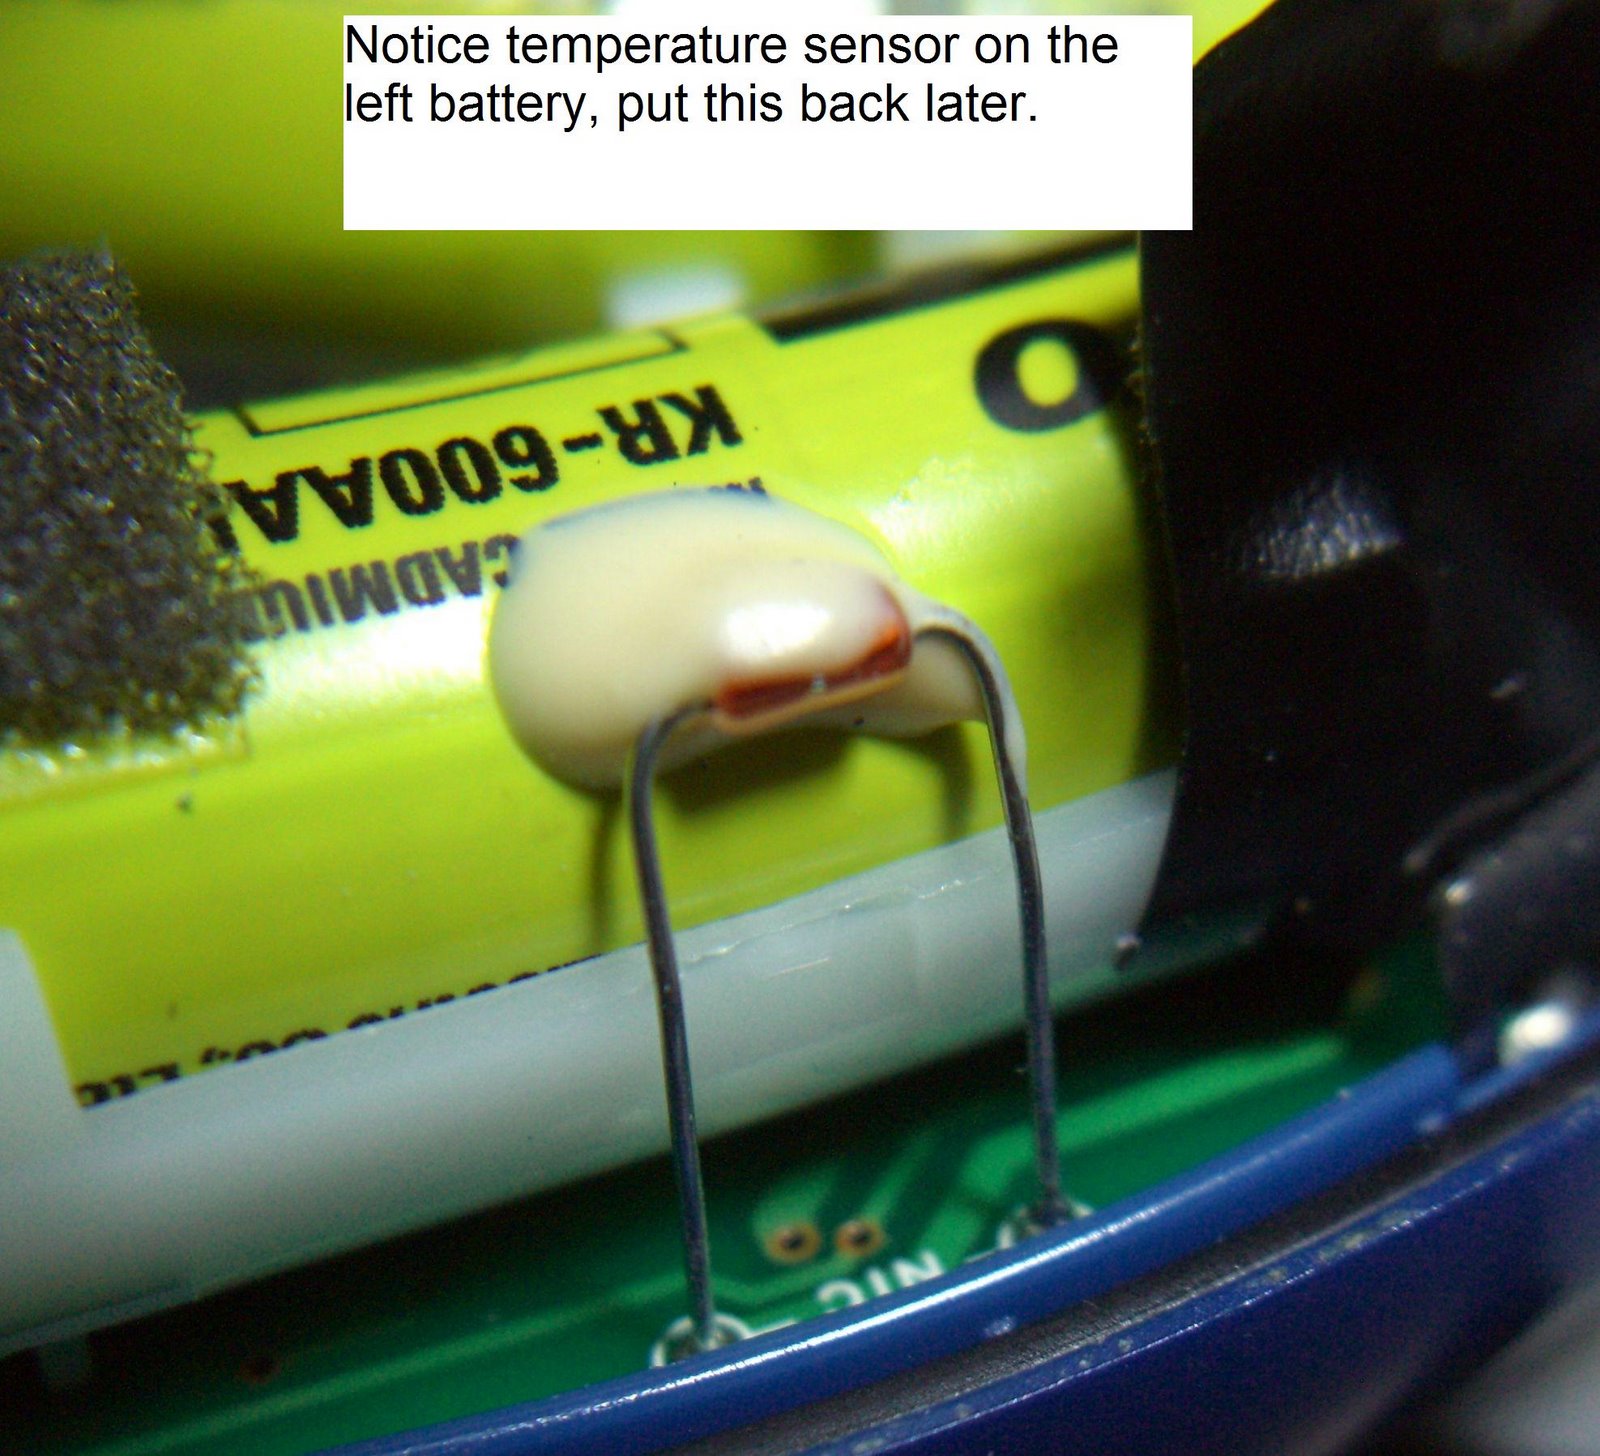
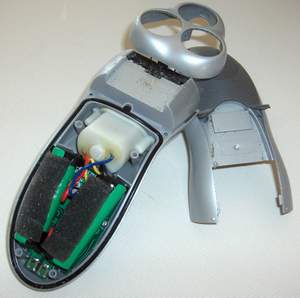
The R9190 has two AA NiCad batteries soldered together with some wiring. They are relatively easy to replace once you figure out how to get the case apart.

Both shavers are working great now and I can again enjoy the experience of untethered shaving.

UPDATE 2009-01-25

I continue to get a lot of hits on this web page so I can only imagine that many people have encountered the same problem, i.e., a razor that is still working, but with batteries that have gone flat. A very nice gentleman sent me the images below complete with annotations to show how he repaired his Remington Model 8100 razor. He replaced the solder tail AA batteries with holders for AAA batteries. Even though AAA batteries are much smaller, and usually have half the capacity of AA batteries, he found some that had nearly equal capacity to the AA batteries he replaced. The best part of his repair is that the next time they go flat, it will be very easy to replace them because it will require no soldering.

UPDATE 2012-02-26: I continue to have readers send me tips and photos on razors that are a bit different than the ones shown above. In this case John H. was kind enough to put together an 8-step sequence on how to get to the batteries on the Remington M280 M290 style razors:

MS-290_Step1.jpg

MS-290_Step2.jpg

MS-290_Step3.jpg

MS-290_Step4.jpg

MS-290_Step5.jpg

MS-290_Step6.jpg

MS-290_Step7.jpg

MS-290_Step8.jpg

PC Resuscitation

Share

I get a lot more satisfaction out of fixing things than I do replacing them. Part of it is the challenge, part of it is the learning experience, and part of it is the savings. But I think the biggest part of it may be genetically programmed into my DNA.

I do realize that sometimes it’s cheaper to replace something than it is the repair it. The other day I was looking over a broken electric can opener that we had replaced for the princely sum of $15 and realized that it was not worth repairing. I didn’t know what I’d do with an extra used electric can opener if I did repair it when they are available new for as little as $6 at Target.

I got an inquiry last week from my cousin in Pennsylvania about whether a power supply for a Compaq PC manufactured in 2002 should cost $185. I am usually able to pick up PC power supplies for as little $15 to $25, and so this price seemed way out of line. Upon further investigation I found that back in 2002 Compaq was using a non-standard connector and case size in their desktop power supplies. This makes the power supply rare and therefore very expensive. After looking over the pinout of the motherboard connector for the Presario 5000 model, it appeared that the majority of the pins were consistent with the ATX standard, but there were enough changes that it would take some fiddling to adapt a standard power supply to work like the Compaq model. The failure mode didn’t seem consistent with a normal power supply failure though. Usually when a PC’s power supply fails, the computer will show no signs of life. In this case, the computer would power on, but in a short time would shut itself down. This made me suspect that perhaps there was a bad electrolytic cap on the motherboard that would short and cause an over-current condition after things warmed up. If that were true, even a new power supply wouldn’t fix the problem.

My uncle is quite handy designing and fixing all things electrical and mechanical and offered to help. Despite having very little experience with computers, in a relatively short time, he and another relative were able to determine that the power supply’s fan had stopped spinning. That would explain why it was powering on but shutting down after a while. He went to Radio Shack and found a similar fan but it would not fit inside the power supply’s case. No problem, he mounted it outside the computer’s case over the power supply vent. It still fulfills the need of moving air through the power supply to prevent it from overheating. The fix worked and the PC has been successfully resuscitated.

It may be his nearly 70 years of ham radio and tinkering experience that came to the rescue because once you understand how things work, you can fix them even if you’ve never done a repair exactly like it before.

And then, of course, there’s that DNA thing too.

Zen and the art of deck repair

Share

Lately I’ve been trying work on my Zen habits and one of the tenets of this philosophy is to get rid of things that you are no longer using. An item in our lives that added cost and complexity and was no longer providing equivalent value was our hot tub. It came with the house and we used it for a while, but got out of the habit after a few years. It just continued to require energy, chemicals, and periodic repair that was out of proportion to the value we were getting from it. So we decided to give it away. I removed the decking surrounding it and with the help of a sawsall and eventually a chainsaw, I eventually liberated the deck structure that had been built around it. An ad for a functioning free hot tub on Craigslist resulted in 9 eager takers in less than 4 hours. Two people arrived for it around the same time and after a coin toss, the tub had a new owner. I wrote up a blog entry about it in July.

If you’re ever considering whether you should put a hot tub on top of your deck or build it into your deck, please choose on top of the deck. You’ll be much better off in the long run. Hot tubs require maintenance and building the tub into a deck makes maintenance much more difficult.

So for a few months, the gaping hole in the deck stared at me and I stared back at it wondering what would be the best way to fill it in. We joked about putting in a fish pond to entertain the cat and quickly realized that it would contain water and pumps and probably be a bigger maintenance headache than a hot tub. Thus it would definitely not be aligned with my desire to be more zen-like.

After removing the hot tub I soon realized that the deck had an oddity to it that wasn’t apparent prior to the tub’s removal. The main joists where the decking met were not aligned on the opposite sides of the hot tub. I wondered if this would present a problem if I were to have visible mismatch where the joists met in the middle or if it might look artsy. I drew it up in Autocad and realized that it would be very strange looking as you can see in the image below.

I decided I probably had to do some more surgery on the deck to get the main joists in alignment. After making another drawing, this time with the joists meeting at a center, I was much happier with the result. I removed the misaligned joists so that new ones could be installed that would align with the other joists.

I had previously met a handyman through Craigslist when I needed some work done on my siding. He was very professional and let me provide a lot of input, buy the materials, and didn’t charge me any extra for my help. I decided to hire him again for the deck work because I knew with some professional help, the job would go very quickly once it got started. A colleague of Terri’s joked that I must have been in the corporate world too long because I was outsourcing my handyman jobs. Maybe, but I know good help when I see it and I’m more than happy to pay for it.

The hole in the deck left by removing the hot tub.


I was in charge of the design and the materials. Here we have the pressure treated 2 x 8 joists and the 2 x 6 redwood planks.


Here are the joists with the redwood decking just starting to be installed. The joists were supported every 2 feet on the concrete pad in case anyone ever wants to put another hot tub on top of the deck. I also left the access door for the electrical wiring in the deck.

And here it is, all finished and looking like new. As the wood ages the colors will blend in. Right after a pressure washing, all the wood looks new like the new decking in the middle. That will be job for next spring.

UPDATE 2007-Dec-05:

We received a pleasant surprise in our electric bill today. It was 40% less than last year’s bill for November. The electricity cost to run a hot tub was one of those things that I never really wanted to contemplate when we owned it. Now that it’s gone, I’m only too happy to know what the savings will be. Based on some web research, a reasonable estimate for hot tub energy consumption appears to be between $400-$600/year and much of that is incurred in the winter when the difference between the outside temperature and the water in the tub is at a maximum. The cost of the chemicals and periodic repair added up too, easily adding a few hundred more per year to the overall cost. So the missing tub is already beginning to pay for the deck repair with negawatts and also by eliminating the cost of chemicals and maintenance.

Removing a hot tub from a deck

Share

Last weekend Terri asked me to work on finding a new home for our hot tub. The hot tub came with the house that we purchased in 1994. We enjoyed it for a while, but then got out of the habit and thought it would be best to sell it or give it away to someone who would use it. Paying to heat and maintain a hot tub can be expensive, particularly when it needs repairs. Our last repair bill was nearly $800 because it required replacing the heater box, recirculating pump, and some of the tubing. It was also leaking and that was repaired at the same time too.

I put an ad on Craigslist and attached the picture above letting anyone know that if they wanted the tub, they could have it for free if they moved it themselves. Prior to placing the ad, I had called the hot tub store and asked what it cost to have it professionally moved and they told me it would be around $300-$500 depending on the complexity and about $100/hour for every hour extra they need to spend. They also told me the model of hot tub I had weighed about 900 lbs. In about 4 hours after placing the ad for a free hot tub, I had 9 responses from interested parties. That evening a guy stopped by to look at it and while he was here another guy showed up also wanting to take the tub. I suggested a coin toss to which they both agreed and that resulted in a winner. The coin toss winner said he’d come back with some friends and equipment to retrieve the tub a few days later. I told him I’d work on removing some of the decking to make it accessible.

The main problem was that the hot tub was built into our redwood deck. Actually, the deck was built around it like a jig saw puzzle because the hot tub was installed on a concrete pad before the deck was built. The floor boards on the deck are attached with long wood screws, so I didn’t anticipate a problem removing them…. until I actually tried to do it. Most of the screws were screwed well below the wood surface, up to a half inch deep in some places, which caused the screw head to disappear below the surface of the deck. This also caused the holes to fill with dirt and wood, so before I could remove most of the screws, I had to first excavate them. I used a drill with a Forstner bit to remove the wood above them, then an exacto knife to clean out the dirt in the screw heads and then a right angle screw driver to provide enough leverage and get them started so that I didn’t strip out the heads. It took me a good 5 hours working in the heat to get enough boards out of the deck to find out that a much bigger challenge lay ahead. The hot tub had a massive frame built around it and I would have to remove that frame before the tub could be lifted because we couldn’t get anything under the tub to lift it out with the frame in place. I removed a few more floor boards and then used a Sawzall to cut the joists, which worked for the stringers, but there were a few parts of the frame that required cutting through stringers that had been doubled or tripled, so I pulled out my chainsaw. A chainsaw is an interesting tool to use for working on a beautiful redwood deck. But in a surprisingly short time, I had severed enough joists and members in the frame so that Terri and I could lift the frame away from the hot tub.

After we got this taken care of, our buyer showed up with 3 friends along with a flat bed trailer and a pair of flat dollies. He was well prepared with various tools, and yet we were still unsure of how we would lift the 900 lb tub up out of the hole it was set down in. One guy suggested we just try to lift it as he had done with his hot tub. I thought that couldn’t hurt as long as we took it easy so between the 5 of us we found that it was in fact possible to lift the tub. We got one end of it up on the deck only to find we forgot to remove the wiring. Oops. We put some wood under the dangling end of the tub while one guy took care of unwiring it. Then we tilted it up on end, on to the dolly, so it would fit out through the gate which was about 4 feet wide. One guy had built a small ramp with bricks and plywood to roll it safely down the one step between the patio and the sidewalk and then we wheeled it out to the flat bed trailer. The whole ordeal took less than 20 minutes and would have take half that had we remembered to unwire it first. It was quite a relief.

Now the tub is on its way to a new home where it will no doubt see much more use that it had here. And I have a large hole in my deck that I had to fill in and you can read about it here.