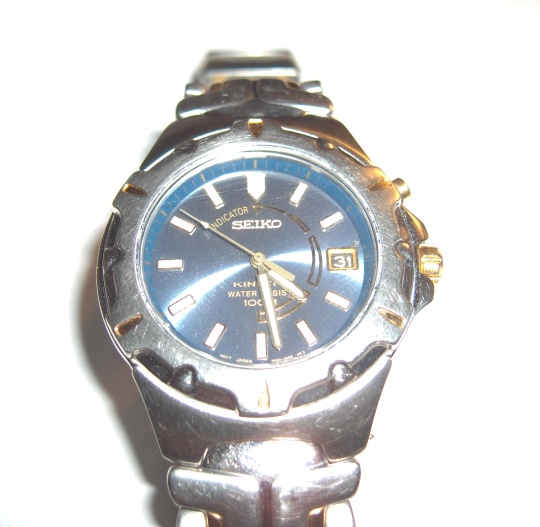
I’ve owned a Seiko Kinetic model 5M62 watch for about 8 years and I really liked the fact that it never needed batteries and would run for days without winding. The Kinetic watch is self-winding, and instead of using a spring to store the energy, it converts the mechanical motion into electricity and stores it instead. This gives it the convenience of a self-winding watch along with the accuracy of a quartz movement. However, a few weeks ago I noticed that it would stop running if I took it off for a few hours. Sometimes, when I was just typing on the computer and not moving my wrist around, it would stop running. Below is a picture of the watch.
I figured there was something wrong with the energy storage system, possibly a dead battery or bad capacitor. After a web search, I found out that the watch does have a battery, which is sometimes referred to as a capacitor, but it is indeed a battery. All rechargeable batteries eventually lose their ability to hold a charge and after 8 years, this one had simply worn out. The problem with changing it is that the Seiko Kinetic battery is not one of those standard watch batteries that you buy in a store and easily change by yourself. However, I found that it could be purchased from vendors on Ebay or other on-line websites like Swatchbattery.com for around $20.
In our disposable society, I’m sure this issue could have been an excuse to go shopping for a new watch. But once you become attached to a watch, and this one is water proof so I hardly ever take it off, it sort of becomes a part of you. I hated the thought of replacing it, especially because I felt it had many more years of service.
I started reading a few of the websites that talked about replacing the battery as a DIY project, but wasn’t sure if I was up to the task or had the necessary tools. I never had taken the watch apart and looking at the back of it, I didn’t think it would simply pop off like my previous watches that had user-replaceable batteries. I talked with the jeweler where I bought it and they told me that they would have to send it away for repair and thought it might cost $65 or more to replace the battery. The local jewelery repair shop had a similar assessment. So, being an adventurer and inveterate fixer, I decided to do it myself.
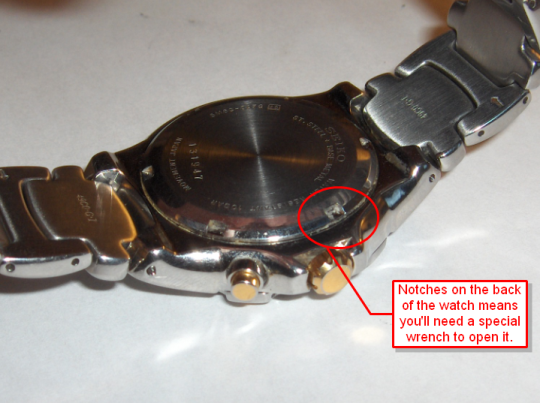
You can see from the image below that the watch had notches on the back of its case. This meant that it needed a special case opener wrench.
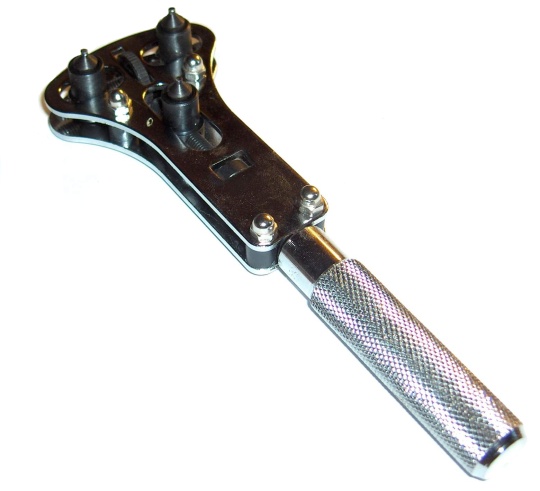
I decided to get a Jaxa style opener (shown below) which clamps down on three notches since it seemed like it would do the job better than the openers that only grabbed the case on two notches. These can be found on the Internet or at Harbor Freight for less than $10.
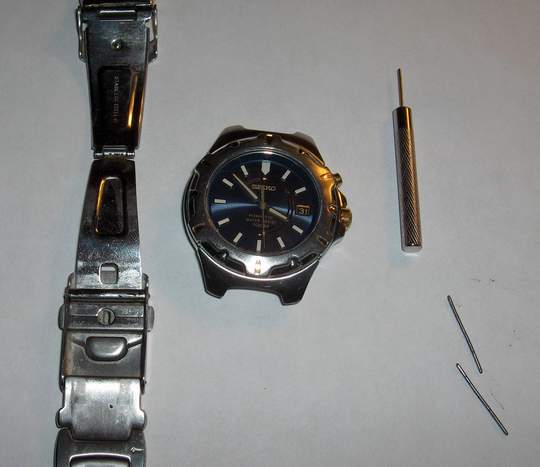
To make things easier, I decided to remove the watch band. Most of the watches I’ve owned had spring-loaded pins that were pretty easy to remove, but this model had pins pressed in that held the watch band in place. I was able to push them out with the tool shown below.
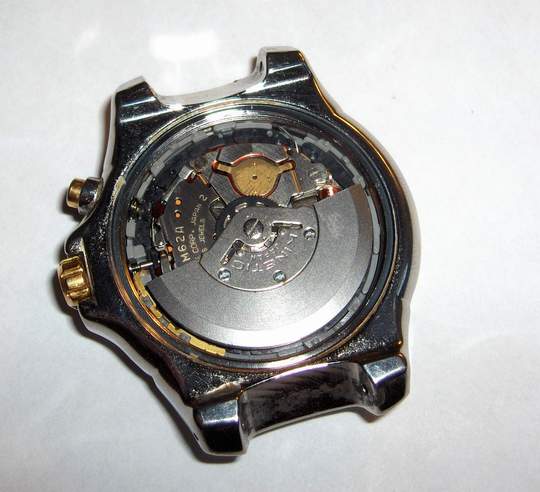
I used a paper towel to protect the watch and gently gripped it in a vice and was able to unscrew the back with the watch opener. It took a fair amount of torque to loosen the case back. In the image below you can see what it looks like inside. The battery is the brass-colored part in upper side of the image below. To get to it, you need to remove three very small screws. I had several small jeweler’s screw drivers around the house, but these screw slots are so tiny that I found it necessary to use a file on one of my screw drivers to make a very sharp tip in order for it to fit in the slots of these screws.
The center screw holds the winding weight and gear in place. These items can only go one one way as the shaft is keyed. Actually, they can go on two ways, but both ways are correct. However, you can put them in upside down, so pay attention to how they are installed as you remove them. The gear must mate up with a smaller gear so make sure that it does before installing the winding weight and screw.
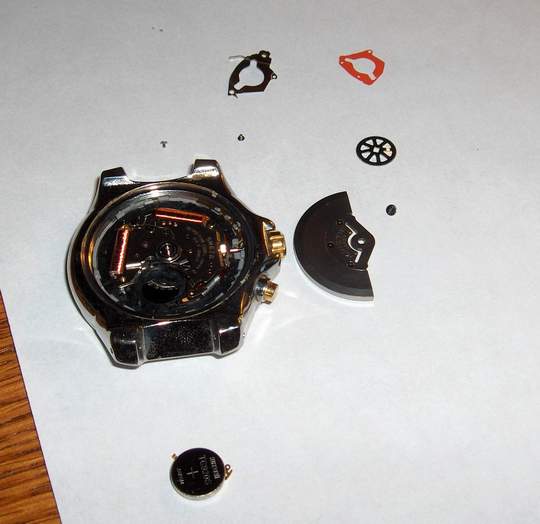
When you get all the parts out, they look like the image below. There are 3 small screws, the winding weight, a gear, a red mylar insulator, a battery hold-down clamp, and the battery. To re-assemble them, just (carefully) put them back together they same way you took them apart. You’ll find a pair of sharp tweezers useful to handle the screws and other parts.
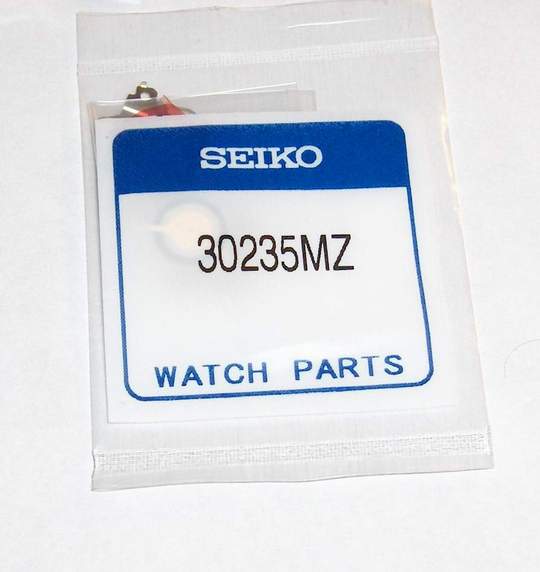
Here is the package I got from an online retailer. It came with a red mylar insulator, a hold-down bracket, and the Maxcell TC920S battery.
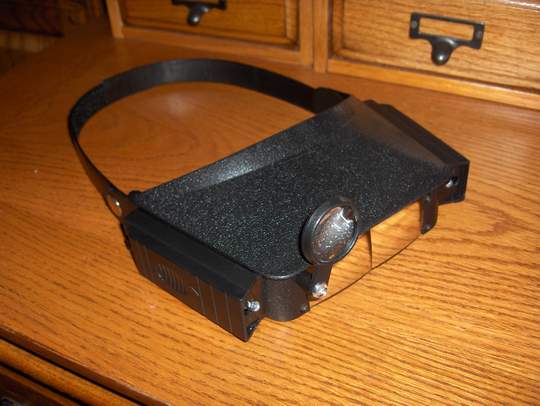
In addition to the tools mentioned above, I also used the magnifying headset shown below which I highly recommend. I think that the magnifying headset (with built-in LED lights) was instrumental in allowing me to work on such a small device. They can also be found on the Internet for less than $10.
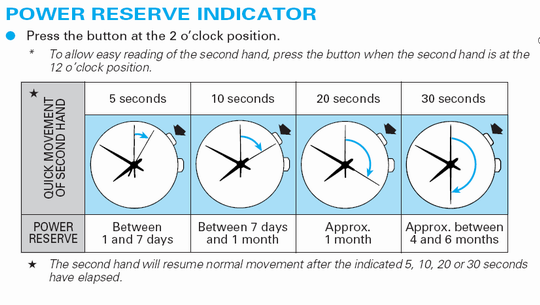
If you’ve stuck with me this long, I’m going to give you a bonus. I mentioned that I had owned the watch for 8 years so now I have a confession. I always wondered what the push-button at the 2-o’clock position was used for. Sometimes it would advance the second hand 5, 10, 20, or 30 seconds and then it would sit there and stop. Then it would start running after the time had caught up with it. I had no idea why it did this because I had never read the owner’s manual and don’t even know if I still have a copy of it. So, in case you’re wondering, here is a copy of the page from the owner’s manual I found online that explains it (hint: it’s a sort of ‘gas gauge’ for the battery):
Incidentally, when the watch battery had begun to fail, it was impossible to get the reserve indicator to advance the second hand more than 5 or 10 seconds even after vigorous winding. Now with the fresh battery, it jumps forward 30 seconds whenever I push it.
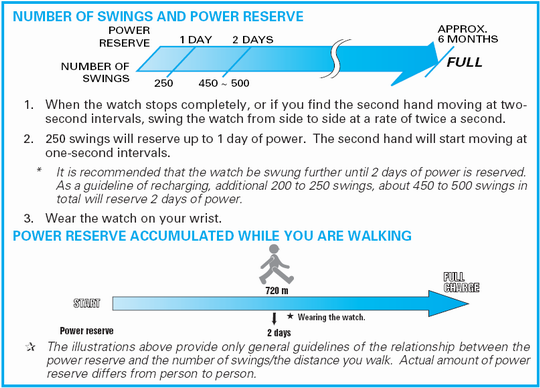
Would you like to know how to correctly wind the watch and how much it takes to keep it moving for a day? If so, here is the explanation, again from the Seiko manual:
It would appear that if you walk more than 720 meters (about 1/2 mile) you’ll impart enough energy to keep it going for a two days. Here’s another interesting tidbit: If you see the watch second hand jumping 2 seconds at a time, that means the battery is low and that you have less than 24 hours of charge left on it.
So, there you have it, a way to resurrect a watch that should last for decades. If you have one of these Seiko Kinetic watches sitting in a drawer gathering dust because of a dead battery, I hope my explanation gives you the motivation to get it working again for minimal cost. Please feel free to leave a comment if you have any questions or just want to share your experience with other readers.
Does it seem like too much trouble or beyond your skill level to do this repair? If so, you may want to get in touch with John Safranek at KineticRepair.com in Denton, TX or call him at 940-239-9888. He’s a Seiko Kinetic expert and performs these battery changes starting at just $49.95.



Hello Chris,
The problem you describe can be caused by two or more things having occurred:
The first, but not necessarily more probable cause given your description of events, is that the hands of the watch were removed and reinstalled incorrectly by the watchmaker.
When we install the hands on the watch, it is done by manually turning the crown until the date jumps. We then install the hour hand by the aid of our eye only, precisely at 12, utilizing acrylic-tipped tweezers and usually a specialized hand press that will limit depthing/plunge via correct adjustment. The minute hand is then installed with the hour hand advanced to 9 or 3, as the human eye can tell 90 degrees very adeptly, with the hour hand dead on an 12. Last is the sweep second, and this is the most difficult one of the three hands. It has to be installed on a hash mark, and then verified. We also look for flatness of the hands, and proper division between the dial, hands and glass (when the movement is cased). We run the hands manually around the dial to observe the interactions at various points on the dial. We verify the date change to occur plus or minus two minutes after or before midnight (allowance for deviation).
The above describes just one of the procedures that is done at my shop on watches that receive intermediate or higher level service to the kinetic movement. This dialing procedure – as it is called in the trade – is done on every analogue watch, by hand, with the exquisite human eye as a guide, combined with a very touch, to avoid damaging the very sensitive dial finish.
Another, and more likely cause . . . and this involves some good detective work on your part, and close observation of the dial with a loupe (or device to magnify your view to 3-5X), is now described.
Many shops will remove your movement with the dial and hands intact, to clean the case and bracelet. So your movement/dial/hands unit (intact) is now sitting somewhere on the watchmaker’s bench. If, during this removal process, or, during careless handling of the movement/dial/hands unit, the watchmaker (or more than likely the low-skilled, high-stressed person who is tasked with this dirty job of handling filthy watch cases), bumps/touches/knocks/whatever the hands, so that the hour hand receives a slight downward deflection, the tip of the hour hand will now come in contact with the left edge of the word ‘S’ on the dial’s “SEIKO” logo, as it transits the dial during a run (clockwise). This small logo is raised off the surface of the dial, as it is literally a group of metallic letters that are affixed to the surface of the dial.
When the tip of the hour hand contacts the left edge of the word “S”, the movement will continue to increase power to overcome the obstruction, as this is how the IC is programmed in the kinetic movement. Next, one of two or more things can happen. In your situation, if you do not notice any deformation of the hour hand or “SEIKO” logo, the hour hand then ‘slipped’ on its friction-fit hub, until the tip skipped up and over the “S”, resulting it the hour hand no longer sinking with midnight for the date jump. I have observed watches coming in for service, which had been worked on at a competitor’s shop (one with a very prominent internet presence), and this exact problem had occurred.
Think about this happening in your “minds’s eye”, and take a guess which condition would result: 1. Date jump early or 2. date jump late? That thinking in your brain right now is ‘watchmaker’ thinking – and it is the same mechanical thinking our human brains have been doing for the past 10,000 or more years. Keep up with this diagnostic thinking and you will be a first-rate mechanic. But also realize that in watchmaking, the slightest little, seemingly innocuous task, done improperly or without proper sequence or lacking proper technique and/or safety precautions, WILL cause problems somewhere else in the watch. Watches and tiny micro mechanical things are absolutely unforgiving – and when one works on them he or she is working at or near the limit of human ability.
Cordially,
JW Safranek
Just found this site and read 3/4 of the earlier posts. Superb tutorial. Thanks. From another tutorial got brave enough to take the back off the Sieko I got for $35 (eBay). t was running perfectly but didn’t show full charge so I decided to upgrade to the Li-ion battery. I got it apart OK only to find it already had a Li-ion battery installed. Crappola!
My problem is that at 82 years old my eyes aren’t what they used to be, even with a jewelers’ headband bi-occular magnifier. So I put everything in a small box to await removal of cataracts. The right eye was done last week and I’m up for giving it a go again ASAP. I’d like to mention that other sites emphasize that plastic (non-metallic) tweezers should be used to avoid accidentally shorting and ruining the battery during installation.
I find that the screws, being no larger than a pinhead, are difficult to get started while simultaneously holding the holes of both the metal bracket and the fiddly mylar insulator in position. I’m thinking of using office “stickey finger” collator’s wax for this purpose. I bought a magnetizer for my .6 mm jeweler’s screwdriver to keep the screws slotted for insertion.
Another point. The original Seiko kinetics didn’t have a battery because they were knock-offs of the Swiss Eternamatic chronometer (I bought one new back in 1960), copied right down to the 5-ball race bearing for the revolving weight. Eterna invented the kinetic movement I believe.
Thanks for a great article that has helped so many people.
I cannot thank you enough for this. I have this EXACT same watch which my mother gave me as a gift for her years worked at a printer company. I work as an RN, and my cheap $10 watch had died (in only under a year) and I felt the urge to see about this watch. I knew that it hadn’t been holding it’s charge for a quite a few years now but felt the impulse to fix it! I google search and I find this wonderful guide. Thank you so much, I look foward to fixing it myself, infact, I just ordered the capacitor/battery I just need to purchase all of the tools.