About Lee Devlin

I'm Lee Devlin from Greeley, Colorado.

Expanding the Boot Camp Partition on a Mac

Share

I got a MacBook Pro about a year ago and, coming from a background of using Windows, I installed Boot Camp on it so that I could run Windows programs. I find that I actually use Windows most of the time on my Mac computer. However, after a year, the 30 GB Boot Camp partition was reaching its limit. I found that in order to install some new program, I had to uninstall something else. I did a web search on how to expand the Boot Camp partition and was greeted with lots of advice from various forums, much of it conflicting, some of it untested, on whether it was possible and which tools to use. At first I was hoping to just find a utility that allowed me to move a slider bar that would shrink the Mac partition and expand the Boot Camp partition. However, after reading numerous postings and websites on how to perform the task, I realized that wasn’t going to happen. I saw a few recommendations for Camp Tune, which supposedly allows an easy way to resize the Boot Camp partition without deleting it but that program is no longer free and some have reported that it didn’t work all the time.

I dutifully backed up the Boot Camp partition several different ways and then committed to changing it from FAT32 to NTFS. I had set it up as a FAT32 partition initially because that would allow me to write to it with the MacOS. The MacOS can read from but not write to NTFS partitions. However, I found that I never used that feature and the free tool I was going to use (WinClone) didn’t allow you to expand a FAT32 partition. It could back it up and restore it, but it would stay the same size. So I had to convert my Bootcamp partition to NTFS. That’s actually easy to do, but it takes some time. You just need to boot Windows and then go into the DOS prompt and use this command:

convert C: /FS:NTFS

You may have to reboot to get this to work because it may be unable to unmount the partition to convert it. In my case it required two reboots, both of which ran the chkdsk program before the partition converted to NTFS.

Once this was done, I used WinClone to back up the Boot Camp NTFS partition to an external USB drive. According to one of the comments, WinClone may not work with MacOS 10.6 (Snow Leopard). I’m running Leopard (10.5). After backing up the Windows data, I used the BootCamp Assistant in the Utilities to delete the Bootcamp partition, and then to resize it to 120GB. After that I used WinClone to restore the image to the Bootcamp partition.

I followed the directions on this YouTube video:

That video gives you the impression that the steps all take a few seconds. However, some of them can take hours so you need to be patient.

Beware that some people have reported losing data while attempting to perform these steps, so it’s critical to have a backup of all of your important data prior to embarking on any partition resizing project.

Replacing a Seiko Kinetic Watch Battery

Share

I’ve owned a Seiko Kinetic model 5M62 watch for about 8 years and I really liked the fact that it never needed batteries and would run for days without winding. The Kinetic watch is self-winding, and instead of using a spring to store the energy, it converts the mechanical motion into electricity and stores it instead. This gives it the convenience of a self-winding watch along with the accuracy of a quartz movement. However, a few weeks ago I noticed that it would stop running if I took it off for a few hours. Sometimes, when I was just typing on the computer and not moving my wrist around, it would stop running. Below is a picture of the watch.

Seiko Model 5M62

I figured there was something wrong with the energy storage system, possibly a dead battery or bad capacitor. After a web search, I found out that the watch does have a battery, which is sometimes referred to as a capacitor, but it is indeed a battery. All rechargeable batteries eventually lose their ability to hold a charge and after 8 years, this one had simply worn out. The problem with changing it is that the Seiko Kinetic battery is not one of those standard watch batteries that you buy in a store and easily change by yourself. However, I found that it could be purchased from vendors on Ebay or other on-line websites like Swatchbattery.com for around $20.

In our disposable society, I’m sure this issue could have been an excuse to go shopping for a new watch. But once you become attached to a watch, and this one is water proof so I hardly ever take it off, it sort of becomes a part of you. I hated the thought of replacing it, especially because I felt it had many more years of service.

I started reading a few of the websites that talked about replacing the battery as a DIY project, but wasn’t sure if I was up to the task or had the necessary tools. I never had taken the watch apart and looking at the back of it, I didn’t think it would simply pop off like my previous watches that had user-replaceable batteries. I talked with the jeweler where I bought it and they told me that they would have to send it away for repair and thought it might cost $65 or more to replace the battery. The local jewelery repair shop had a similar assessment. So, being an adventurer and inveterate fixer, I decided to do it myself.

You can see from the image below that the watch had notches on the back of its case. This meant that it needed a special case opener wrench.
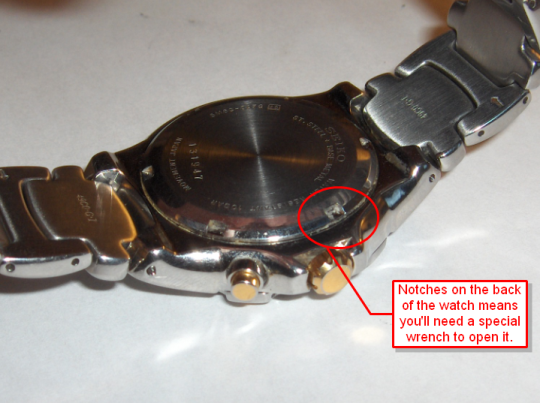
Watch with notches requiring a watch wrench

I decided to get a Jaxa style opener (shown below) which clamps down on three notches since it seemed like it would do the job better than the openers that only grabbed the case on two notches. These can be found on the Internet or at Harbor Freight for less than $10.
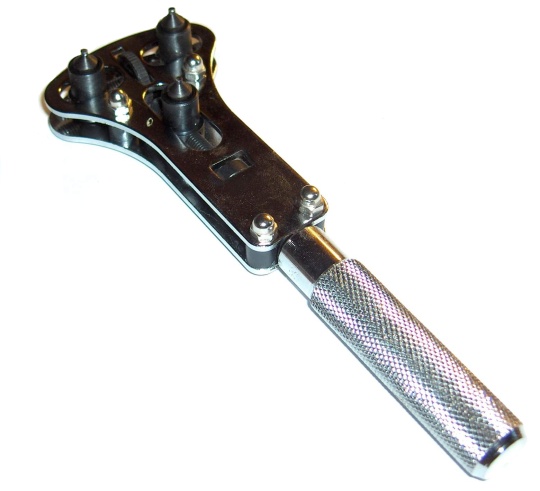
Seiko watch case wrench

To make things easier, I decided to remove the watch band. Most of the watches I’ve owned had spring-loaded pins that were pretty easy to remove, but this model had pins pressed in that held the watch band in place. I was able to push them out with the tool shown below.
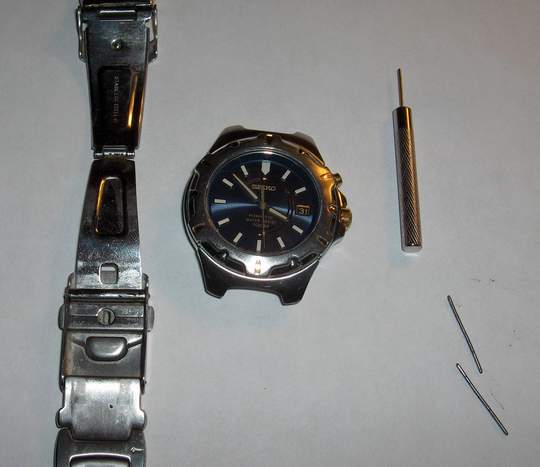
removing the pins from the Seiko watch band

I used a paper towel to protect the watch and gently gripped it in a vice and was able to unscrew the back with the watch opener. It took a fair amount of torque to loosen the case back. In the image below you can see what it looks like inside. The battery is the brass-colored part in upper side of the image below. To get to it, you need to remove three very small screws. I had several small jeweler’s screw drivers around the house, but these screw slots are so tiny that I found it necessary to use a file on one of my screw drivers to make a very sharp tip in order for it to fit in the slots of these screws.
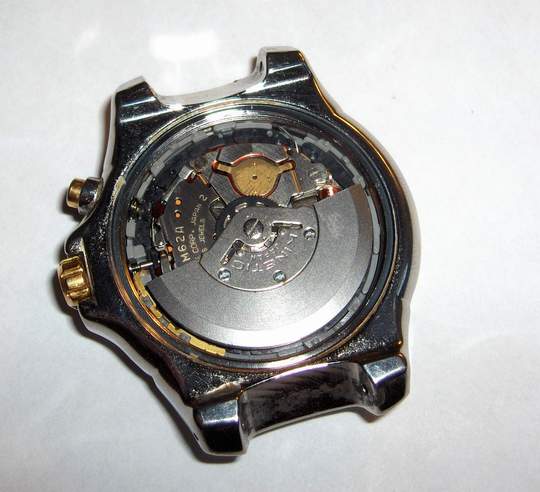
inside view of Seiko Model 5M62

The center screw holds the winding weight and gear in place. These items can only go one one way as the shaft is keyed. Actually, they can go on two ways, but both ways are correct. However, you can put them in upside down, so pay attention to how they are installed as you remove them. The gear must mate up with a smaller gear so make sure that it does before installing the winding weight and screw.

removing seiko watch rewiding weight

When you get all the parts out, they look like the image below. There are 3 small screws, the winding weight, a gear, a red mylar insulator, a battery hold-down clamp, and the battery. To re-assemble them, just (carefully) put them back together they same way you took them apart. You’ll find a pair of sharp tweezers useful to handle the screws and other parts.
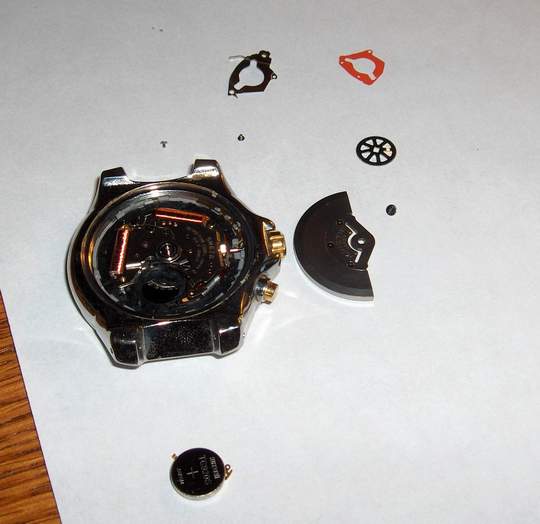
disassembled view of seiko 5M62 watch battery

Here is the package I got from an online retailer. It came with a red mylar insulator, a hold-down bracket, and the Maxcell TC920S battery.

Seiko 3023-5MZ replacement battery

In addition to the tools mentioned above, I also used the magnifying headset shown below which I highly recommend. I think that the magnifying headset (with built-in LED lights) was instrumental in allowing me to work on such a small device. They can also be found on the Internet for less than $10.
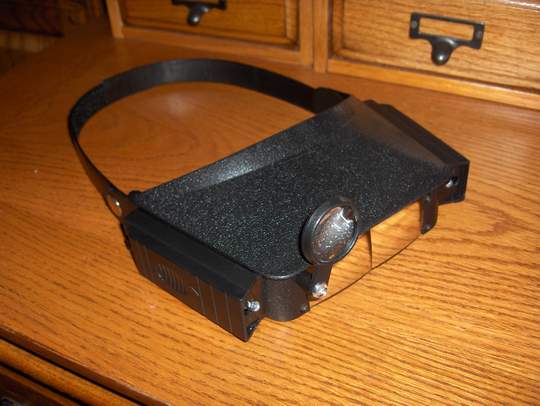
lighted magnifying headset

If you’ve stuck with me this long, I’m going to give you a bonus. I mentioned that I had owned the watch for 8 years so now I have a confession. I always wondered what the push-button at the 2-o’clock position was used for. Sometimes it would advance the second hand 5, 10, 20, or 30 seconds and then it would sit there and stop. Then it would start running after the time had caught up with it. I had no idea why it did this because I had never read the owner’s manual and don’t even know if I still have a copy of it. So, in case you’re wondering, here is a copy of the page from the owner’s manual I found online that explains it (hint: it’s a sort of ‘gas gauge’ for the battery):
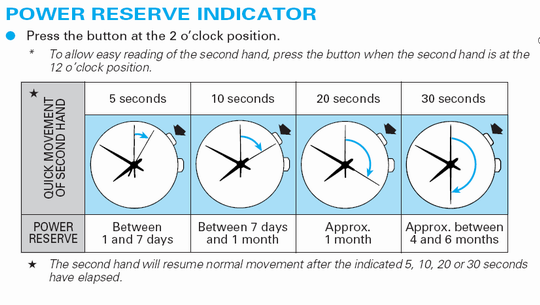
Seiko reserve indicator explanation

Incidentally, when the watch battery had begun to fail, it was impossible to get the reserve indicator to advance the second hand more than 5 or 10 seconds even after vigorous winding. Now with the fresh battery, it jumps forward 30 seconds whenever I push it.

Would you like to know how to correctly wind the watch and how much it takes to keep it moving for a day? If so, here is the explanation, again from the Seiko manual:
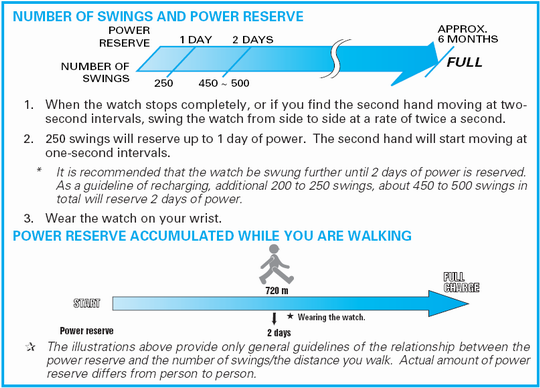
winding a seiko kinetic watch

It would appear that if you walk more than 720 meters (about 1/2 mile) you’ll impart enough energy to keep it going for a two days. Here’s another interesting tidbit: If you see the watch second hand jumping 2 seconds at a time, that means the battery is low and that you have less than 24 hours of charge left on it.

So, there you have it, a way to resurrect a watch that should last for decades. If you have one of these Seiko Kinetic watches sitting in a drawer gathering dust because of a dead battery, I hope my explanation gives you the motivation to get it working again for minimal cost. Please feel free to leave a comment if you have any questions or just want to share your experience with other readers.

Does it seem like too much trouble or beyond your skill level to do this repair? If so, you may want to get in touch with John Safranek at KineticRepair.com in Denton, TX or call him at 940-239-9888. He’s a Seiko Kinetic expert and performs these battery changes starting at just $49.95.

Solar Powered Air Conditioning?

Share

LG is getting a lot of media coverage for its Solar Hybrid Air Conditioner (model F-Q232LASS) but so far, no one has bothered to do any technical analysis on it. Most blog articles have nothing but enthusiastic praise for it. So, please allow me to provide an alternate viewpoint.

LG Solar Air Conditioner

I think this is a product intended just for PR purposes. Some people may look at it and think it is a solar powered air conditioner. Much of the news coverage uses the unrelated logic of how much CO2 it saves or, even more curiously, how it’s like ‘planting 780 pine trees’. As a side note, when someone starts describing an energy benefit with the lifetime CO2 savings and avoids discussing actual costs, be aware that you’re about to be bamboozled. The solar panel on top of the air conditioning unit produces a small amount of energy; according to LG it’s 70 watts. In case you’re curious, that amounts to about $12 of electricity per year, assuming a cost per kW-h of $.10 and average capacity factor of solar panels. That also assumes the electricity it generates can be used by other appliances when the A/C unit is not running and I’m not sure if that’s the case or not.

The air conditioning unit is rated at 28,000 BTU/hr. Assuming a SEER of 13, that translates to a 2800 watt draw, not including the fan the circulates the air through the evaporator and the house, which can add another 900 watts or so. That would mean that there’s a 52:1 difference between the air conditioner’s energy draw and energy produced by the solar panel. I am assuming that there is a grid-tie inverter that puts the energy generated when the air conditioner is not running into your home to offset other energy consumption. If not, then the solar panel output would only be used when the A/C was actually running and that would reduce the $12/year of annual power generated considerably. Also of note is that most residential air conditioning loads occur from around 4-6 p.m. when people return home from work. At that time the sun is much lower in the sky and solar output is about 20% of a solar panel’s maximum rating.

An air conditioner needs to get rid of the condenser’s heat and so it’s best placed in the shade. In this case, however, the condenser would need to be placed in direct sunlight, which counteracts what it’s trying to do, namely to get rid of heat, so that would negatively affect its efficiency. In addition, the condenser needs unimpeded forced air flow which is generally done with a fan that blows air from bottom to top to get the added benefit of natural convection since heat rises, but this unit’s fan has to blow air from side-to-side because the solar panel on top would block bottom-to-top air flow. I should also mention that solar panels work best when they are cool so attaching them to a hot condenser doesn’t help their efficiency either.

You’d be better off with having a solar system that is completely independent of the air conditioning unit because it introduces too many compromises in each of the respective systems’ design goals.

Nice try LG, but this product is no better than one of those solar powered attic fans which is another idea masquerading as a solution to a problem that it doesn’t solve.

I should mention that I am a big fan of solar energy. We use a solar array to power our home and it is a net energy producer, generating more electricity than we use on an annual basis. I hope to someday use the excess for a plug-in hybrid car. The reason I felt compelled to write about this topic is because I just get tired of rip-offs and scams that prey on people’s trust (and ignorance) when it comes to energy savings schemes so I have to call them out.

Energy Saver 3000 and other PFC nonsense

Share

My friend Jack recently asked me to write about the Energy Saver 3000 and whether it will save money on your electricity bill. I saw this product advertised on TV about a year ago and nearly fell out of my chair when I heard the ridiculous claims being made about saving money using a power factor correction device. And I understand other charlatans have jumped on the bandwagon and have begun offering similar devices that are supposed to ‘pay for themselves in a few months’ with the money you will save on your electricity bill.

Few people understand what power factor means and I guess this makes it an ideal way to extract money from consumers who trust that anything that appears on a TV ad must be legitimate. Basically, the power factor is an indication of phase alignment of the voltage and current in an AC waveform. In a purely resistive load, the alignment is perfect, which gives it a power factor of 1. On loads that have energy storage elements in them like inductors and capacitors, it can get out of alignment and the power factor falls below 1. A power factor below 1 doesn’t mean that all the energy is getting lost, it’s just that a portion of it is being returned to its source. Whenever energy is transmitted through wires a small amount of it is lost in the resistance of the wires, so it’s preferable to minimize the amount that gets returned. The power company has a vested interest in keeping the power factor as close to 1 as possible for the same reason. However, unless you’re a commercial customer, you don’t get charged for power that is returning to its source. You only get charged for actual power consumed. And in the grand scheme of things, the amount being returned is rather small as a percentage of the overall total, less than 10% for the average household. Since about 7% of all power is lost in the power company’s transmission lines, the overall loss due to having an imperfect power factor is 10% x 7% = .7%. This means that if every household in the nation were to have a PFC device (one that actually worked) the maximum potential energy savings is .7%.

You can improve the power factor of an inductive load such as a motor by adding a properly sized capacitor to it. This is what these power factor correction devices claim to do. But the problem is that they can’t match the capacitance to the load because most of these motors run only intermittently and so when they are not running, the capacitor will cause the power factor to become out of phase in the opposite direction. And none of these devices has active monitoring to switch the capacitor in and out. That is why these devices simply cannot save energy. Even if they did actively monitor and correct the power factor, the savings would be nowhere near what they claim since, as mentioned, the average savings would only approach .7%.

The Energy Star website has an interesting entry on these devices:

“ENERGY STAR does not qualify any Power Factor Correction Devices. Please send us an email at logomisuse@energystar.gov if you see one that claims to be ENERGY STAR certified.

Power Factor Correction Devices claim to reduce residential energy bills and to prolong the productive life cycles of motors and appliances by reducing the reactive power (kVAR) that is needed from the electric utility.

We have not seen any data that proves these types of products for residential use accomplish what they claim. Power factor correction devices improve power quality but do not generally improve energy efficiency (meaning they won’t reduce your energy bill). There are several reasons why their energy efficiency claims could be exaggerated. First, residential customers are not charged for KVA-hour usage, but by kilowatt-hour usage. This means that any savings in energy demand will not directly result in lowering a residential user’s utility bill. Second, the only potential for real power savings would occur if the product were only put in the circuit while a reactive load (such as a motor) were running, and taken out of the circuit when the motor is not running. This is impractical, given that there are several motors in a typical home that can come on at any time (refrigerator, air conditioner, HVAC blower, vacuum cleaner, etc.), but the unit itself is intended for permanent, unattended connection near the house breaker panel.

For commercial facilities, power factor correction will rarely be cost-effective based on energy savings alone. The bulk of cost savings power factor correction can offer is in the form of avoided utility charges for low power factor. Energy savings are usually below 1% and always below 3% of load, the higher percentage occurring where motors are a large fraction of the overall load of a facility. Energy savings alone do not make an installation cost effective.

Power factor correction devices are NOT eligible for a federal tax credit.”

Most of the ‘evidence’ to support claims by companies hawking these devices is very unscientific, often times just unsupportable anecdotes by shills talking about how their energy bill went down after installing one of them. This could simply be due to behavioral changes one naturally makes when focusing on an area of improvement, behavior that a customer who purchases an expensive power saving device is likely to engage in without realizing it. To truly measure improvement, you need to run a controlled experiment and I’ve yet to see a legitimate experiment demonstrated when it comes to these devices. Even the videos on the websites don’t bother to measure actual power, just current or power factor before and after which to me means that they are intentionally trying to mislead customers. There are many inexpensive power meters out there such as Kill-A-Watt and yet there are no demos with a power meter used properly, i.e., showing watts consumed before and after installing a PFC device. Instead, they show power factor or current before and after, which makes for an impressive demo, but tells you nothing about the energy savings you’d experience.

If you’re thinking about buying one of these devices, I’d recommend you buy a whole house energy monitor like the TED5000 instead. It will cost less than a useless PFC device and is likely to help you figure out where your energy is going so you will be more aware of how you can save energy. It will also tell you exactly what your power factor is at any moment. As I type this, my furnace blower (a 900W load) is running and my power factor is .94, which is close enough to 1 that it’s hardly worth worrying about.